Setting a budget is a crucial part of the project planning process. The tricky part comes with tracking spending and expenses as your project progresses. To help you get better control, we're going to show you all our best tips and tricks for tracking and monitoring your budget with monday.com! 💸
Set up your board
Let's set up a board where we can track all of the expenses associated with one of our projects.
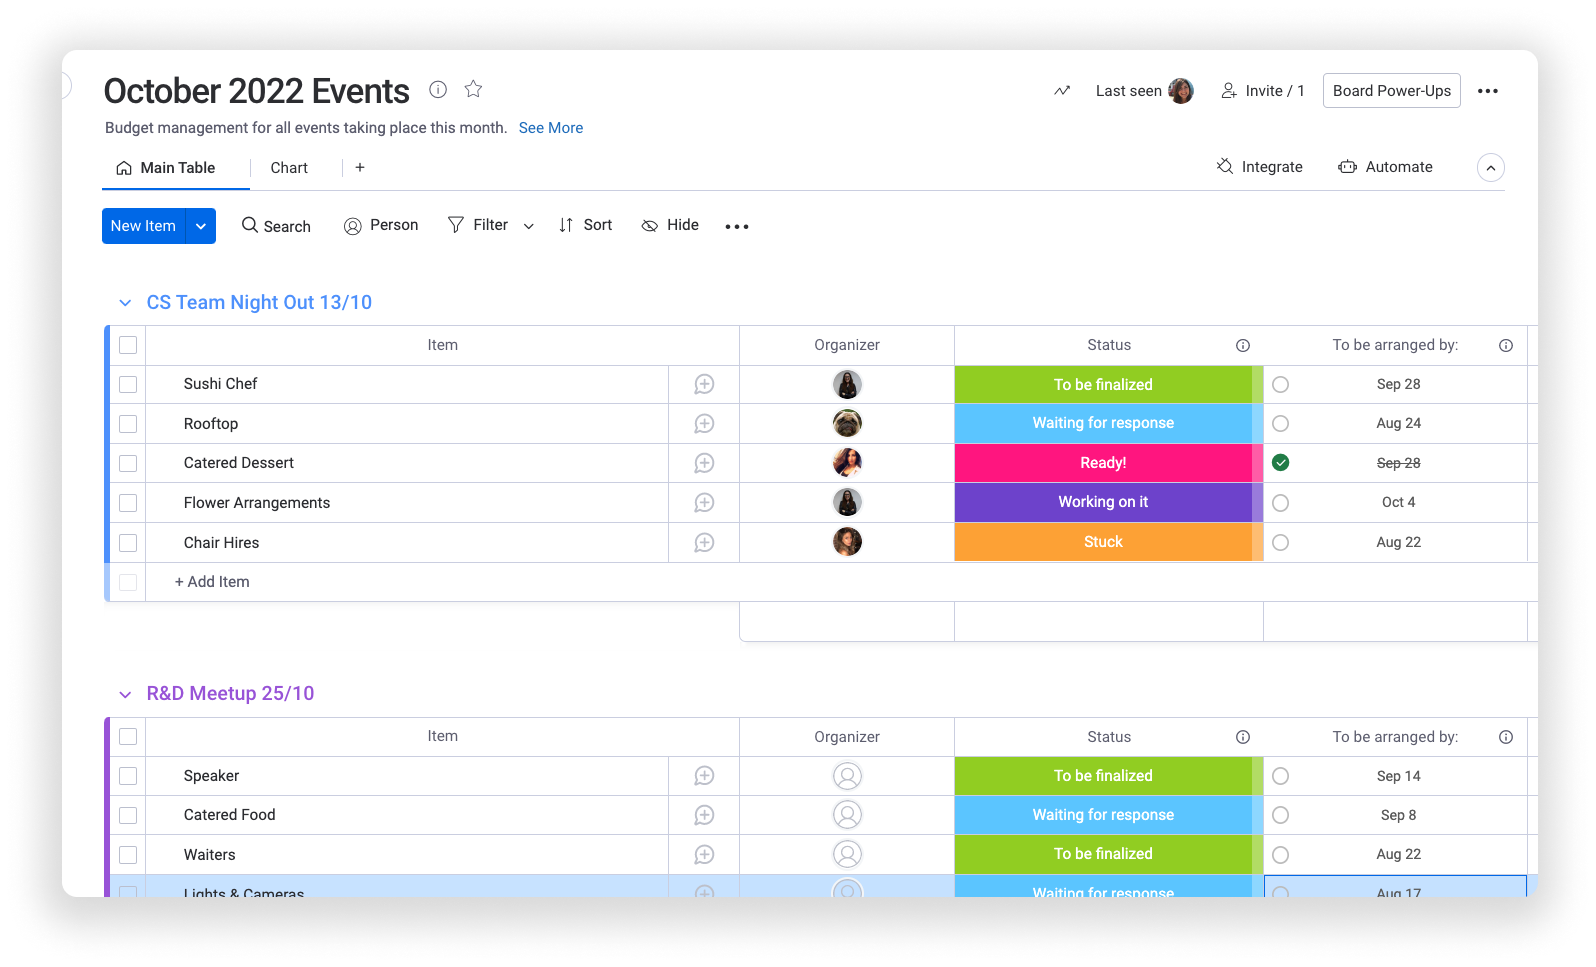
First, we'll create a group for each project, or in this case, each upcoming event to be planned. Next, we'll add our items, which will each represent a task that must be done to prepare for the event.

Once we have our items plotted into our board, we'll add a few columns to help us define details about the tasks. We'll use a People Column to assign the person responsible for each task, and a Status Column to update where we stand on each task, and a Date Column to set deadlines.
Use the Numbers Column to track expenses
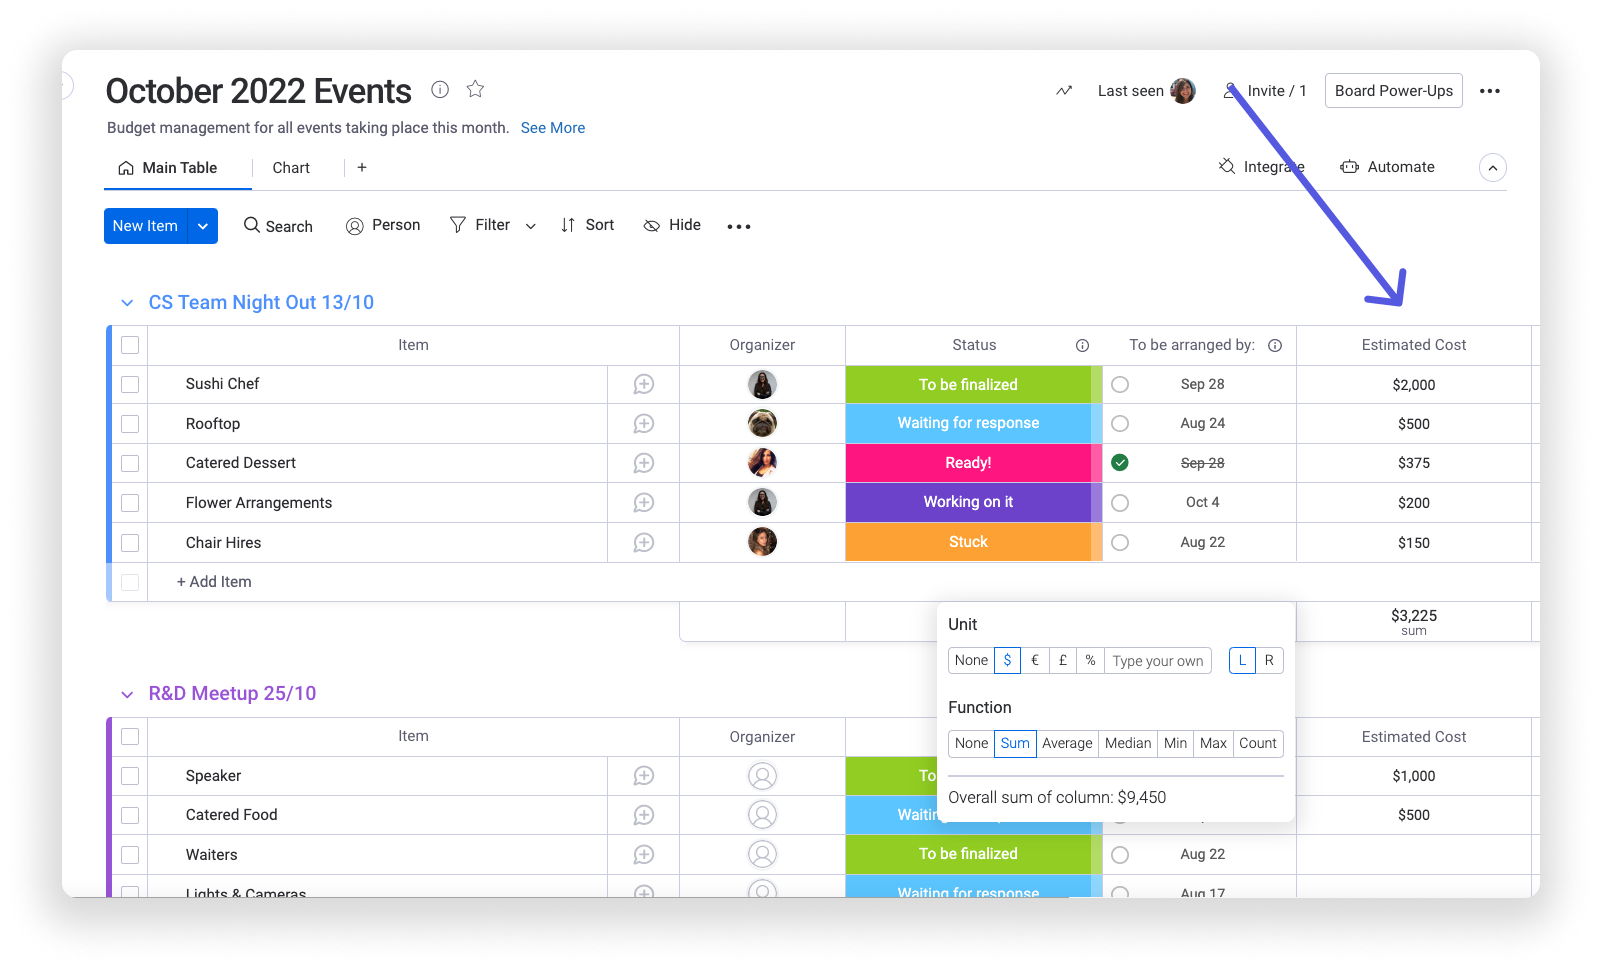
Now that we have our tasks and projects plotted into our board, we can begin adding our expenses! Let's add a Numbers Column to our board, and fill it in with the total budget, as well as the budget per item. We can even add a Column Summary to show the sum of all of the costs in each group. This will give us the total budget per project at the very bottom of the column.

But what about the amount of money we've actually spent on each task? To track this, we can add another Numbers Column where we can input all of the money actually spent.

Interpret your data with formulas
With our two Numbers Columns, we can track our intended budget as well as our actual expenses and spending. To make our workflow even easier, we'll add a few Formula Columns to help us quickly interpret our numbers. From basic calculations to complex formulas, the Formula Column will do all the heavy lifting for you, and leave you with what you need to know to stay on track.
- Check if you're within budget
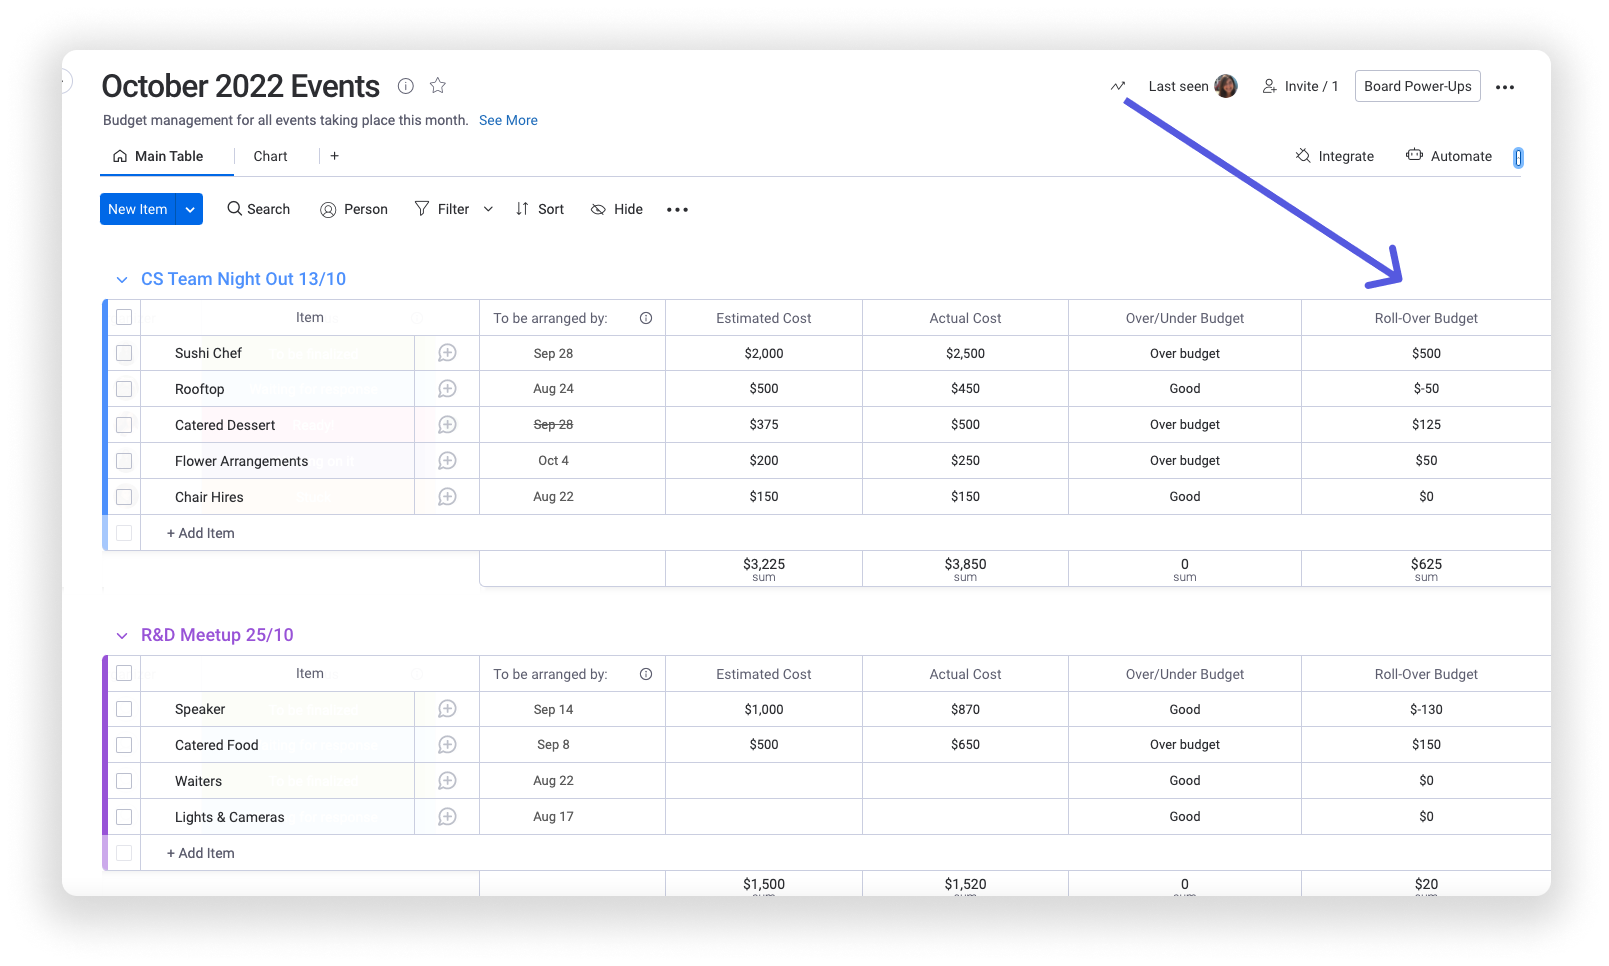
We have a Numbers Column showing our budget targets, and a Numbers Column showing us what we've spent, but we don't want to have to do the math every time we want to know where we stand. So we've added an "If" formula, which takes the delta of the two numbers and sends us the message "Within Budget" when we're below or have met our intended budget, or "Over Budget" when we've exceeded our budget.

- Know how much budget is left
We're very busy with loads of different events going on every month. Some months our expenses exceed our budget while other months we're under the budget. So for every month, we'd like to be able to see how much roll-over we have for each event, and overall. We calculate the leftover budget using the following formula:

For more use cases about our formula column, check out this article.
Highlight important data
Use Conditional Coloring to automatically highlight any important information that you want to draw attention to. We want to highlight any item that we've gone over budget with, so we've chosen to conditionally color every "Over Budget" label in our Formula Column in red!

Take a look at this article to learn more about Conditional Coloring and how to set it up.
View your budget's breakdown
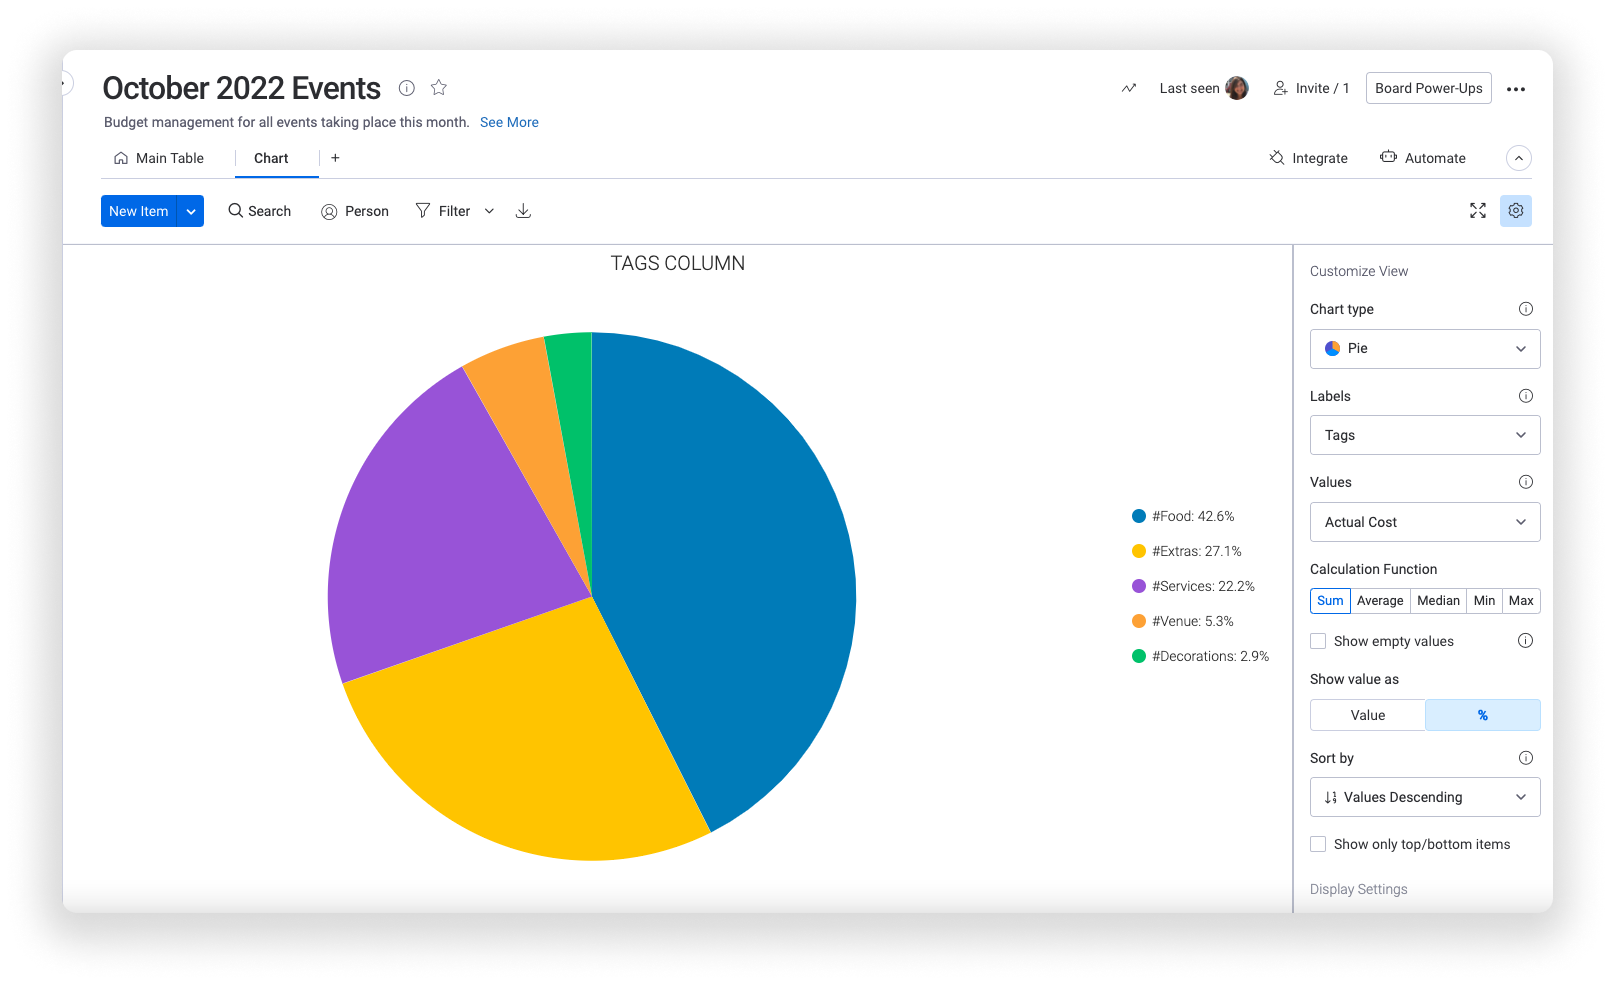
We're always interested in seeing what the biggest expenses for our events are every month. To display all of these important stats, we can create charts using the Chart View!
Once we've added the Chart Views to our board, we can customize the type of chart it is and which columns it is based on. We've chosen to base our chart on the Tags Column, showing us the type of expense associated with each item on our board. From the findings on our chart, we know that 64.9% of our monthly costs went to FOOD! 🍩

Automate your workflow!
To reduce the amount of manual work you and your team need to do, add in some automations such as due date reminders, recurring tasks and events, dependencies and more! All of the grey, underlined words are fully customizable to make each recipe unique for your uses!
Add the following automation to notify the person in charge of finances when any costs are reported above a set amount. For example, our Financial Department Head would like to be notified every time we spend over $1000 on one task, so we've set this one up like this:

We've also added the following automation, which will notify the event manager every time the deadline arrives and the task's status is not "Done" yet.

Stay tuned for some more budgeting-related automations soon!
Track your progress with a dashboard
Dashboards are a great place to keep all of your expenditures in one space, to see breakdowns of all your expenses and compare budgets to one another. We can even connect several boards to one dashboard to compare and contrast stats, numbers and progress! Let's check out a few widgets that will help us get a pic-picture view of our projects.

- The Calendar Widget shows us the time span of our projects in a comprehensive calendar. The items are color-coded corresponding to the boards they belong in, so we know where to go for more details!
- The Numbers Widgets calculate the sum, average, median, or any other important metric for the numbers in our Numbers Column! We used three different widgets to compare the intended budget, the budget spent, and the roll-over budget!

- The Chart Widget generates charts based on the data in our boards! This chart shows us the breakdown of our items between the groups in our board, which represent different events or projects. This way, we can see how many tasks we have to do to prepare for each event.
- The second chart is a Battery Widget, giving us an overview of how many tasks are completed and how many are in progress or completed already!
- We also added a Countdown Widget for each of our events so that we don't let the time slip away from us!
There are many more useful widgets that can be added to your dashboards to empower your budgeting. You can check out this article for more info.
If you have any questions, please reach out to our team right here. We’re available 24/7 and happy to help.
Comments