


 6 min read
 Feature
While it's easy to keep track of the items and tasks in your monday.com workflow, the meetings and reminders in your external calendar can be forgotten. We'll show you how to integrate your Outlook Calendar into your monday.com workflow so that you can see all of your tasks in only one place (or both)!
Important notes before you begin
Before you get started, there are a few details to take note of:
- You must have a Microsoft 365 Business Premium license to use this integration. If you do not have this type of license, you will receive an error message when setting up this integration.
- This integration only works if you have a Microsoft online exchange inbox and not on Premise. To check which type of inbox your account has, please visit this site. If you're able to connect, then you have an online exchange account, but if you're unable to connect and receive an error message, you don't have an online exchange account and won't be able to use this integration.
Two-way sync with Outlook Calendar
There are two ways that you can connect your monday.com account with your Outlook Calendar. First, we'll look at how to create a two-way sync. A two-way sync simultaneously imports your Outlook Calendar events into monday.com and exports your monday.com items to your Outlook Calendar.
Step 1: Add a date column and locate the integration recipes
First, make sure your board includes a Date Column:
After you have filled all of your data filled into a Date Column, you are ready to set up your integration!
To begin the Outlook Calendar two-way sync, click on the "Integrate" button at the top of your board. From the Integrations Center, select the Outlook Calendar integration as so:

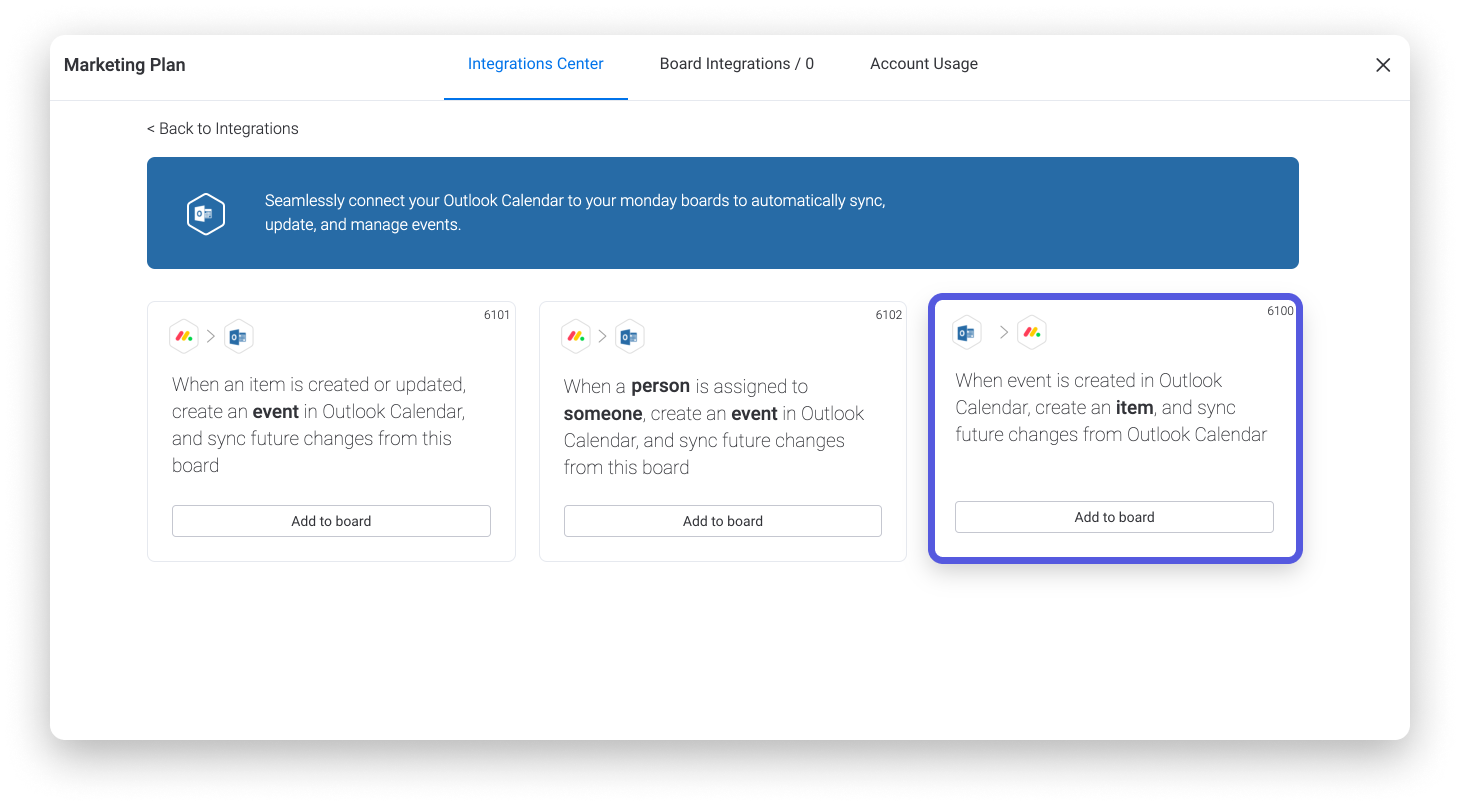
There, you'll find three separate Outlook Integration recipes. You'll need to add two recipes onto your board for the two-way sync to work:
- One that creates an event in Outlook Calendar based on an action in monday.com
- One that creates an item in monday.com based off a new event in Outlook Calendar
We'll learn more on how this can be done later in this article.
Step 2: Add the first recipe
After locating the recipes, it's time to add the desired ones onto your board!
Start off by selecting a recipe that will create an event in Outlook Calendar based off an item on your board (one of the two outlined in red below) and then follow the steps on your screen to connect your Outlook account.

Step 3: Configure the first integration recipe
After completing the connection of your account, you'll be redirected to the recipe that you chose.
There, click on the underlined fields in the recipe to configure them. In our example below, we selected the "event" field to map out how the Outlook Calendar event will appear according to the columns values from our board.
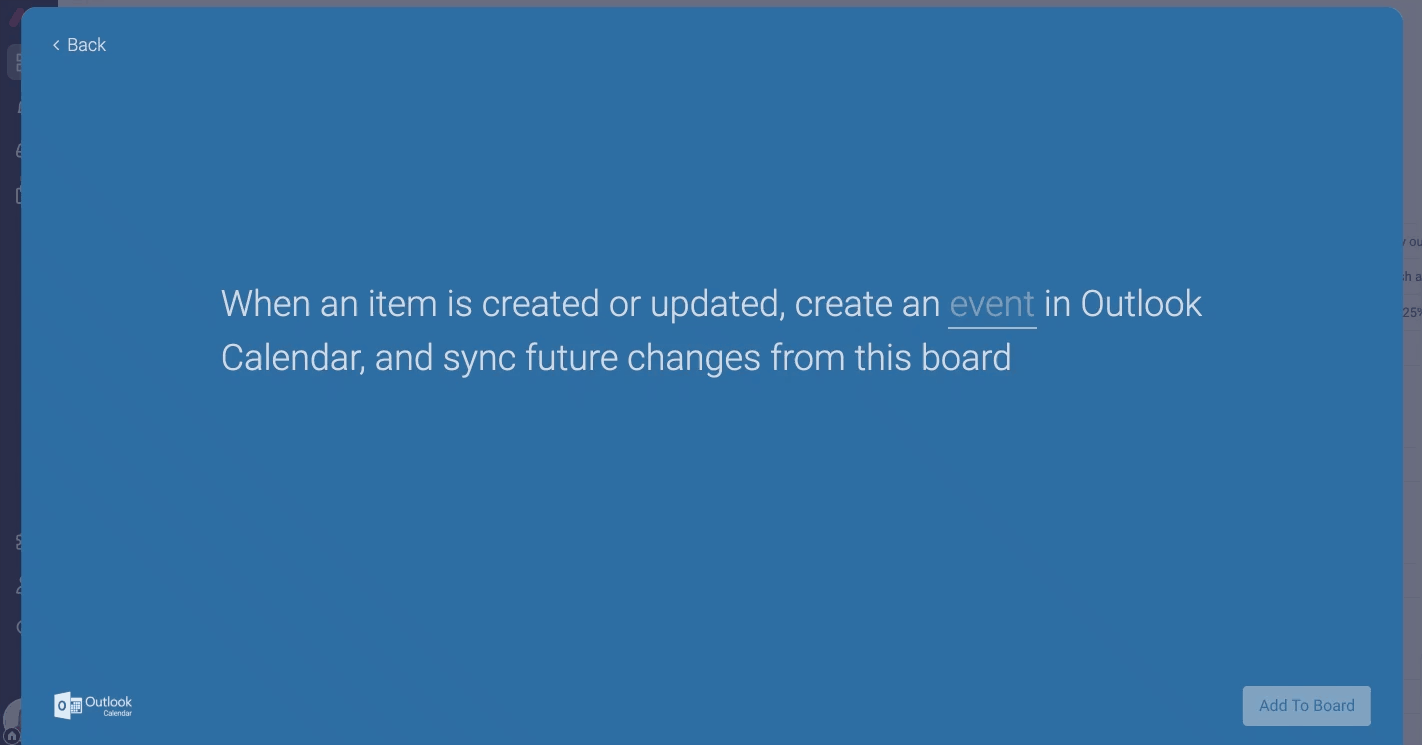
In this example, when a new item is created or updated on our board, an Outlook Calendar event will be created with the duration of the event according to the Start date and End date of the item, the subject of the event as the Name of the item, and the description of the event as the Status that the item has.
Step 4: Add the second recipe and configure it
Now that your first recipe is complete that will create an event in Outlook Calendar based off of an item on your board, it's time to add the second recipe to create an item on your board based off of a new Outlook Calendar event, thus allowing for a two-way sync.
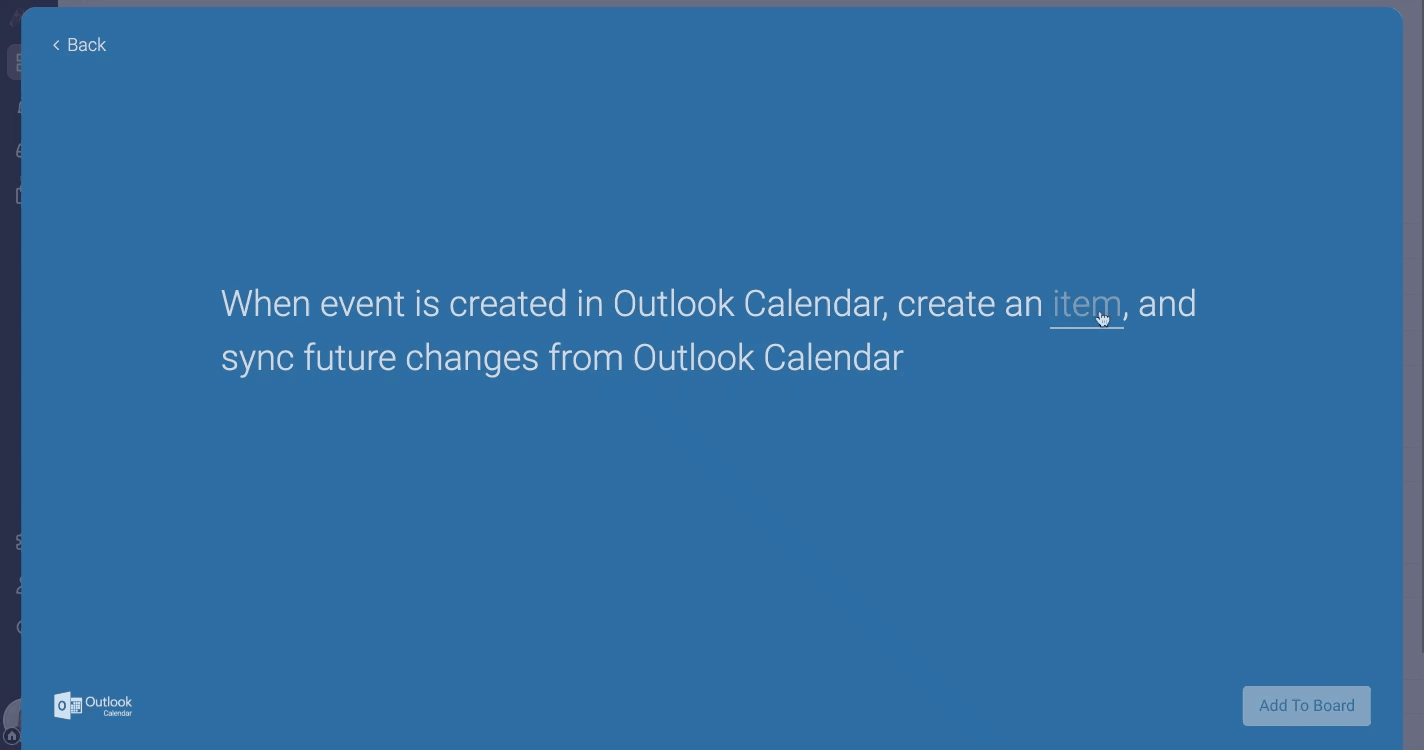
Click to add another integration and make sure to choose the Outlook Calendar Integration recipe that states "When an event is created in Outlook Calendar, create an item, and sync future changes from Outlook Calendar".
This time around, select on the "item" field and map out how you'd like a new item to be created on your board in accordance to the Outlook Calendar events that are added!
Step 5: Watch the magic happen!
With both Outlook Calendar Integration recipes set-up, you should have a full two-way sync in place! Now, each new item that is created or assigned to a specific person will appear as an event on the connected calendar and every new calendar event will populate as an item on your board. 🎉
Outlook Calendar integration column
When adding any Outlook Calendar integration recipe, an integration column will be added automatically onto your board with a link to each respective Outlook Calendar event (once the integration has been triggered). Clicking on a link in this column will direct you right to the event on your own calendar!
Two-way sync supported fields
The following fields are supported when using our Outlook Calendar two-way sync:
- Title
- Start Time
- End time
- Attendees
- Description
Show monday.com dates on your Outlook Calendar
The second option that you have to integrate your board with Outlook Calendar is through a one-way sync, allowing you to display the dates from your board directly on your calendar. The following step-by-step instructions can be used to set the one-way sync up for your account.
Step 1
First, make sure your board includes a Date Column:
Or a Timeline Column:
After you have filled all of your data into a Date or Timeline Column, you are ready to sync your calendar!
Step 2
Click on the three-dot menu at the right side of your Date or Timeline Column's heading and click "Settings" and then "Customize Date column". Next, click on the "Sync" button next to "Other Calendars". Doing so will allow us to add any internet-based calendar that we use outside of monday.com.
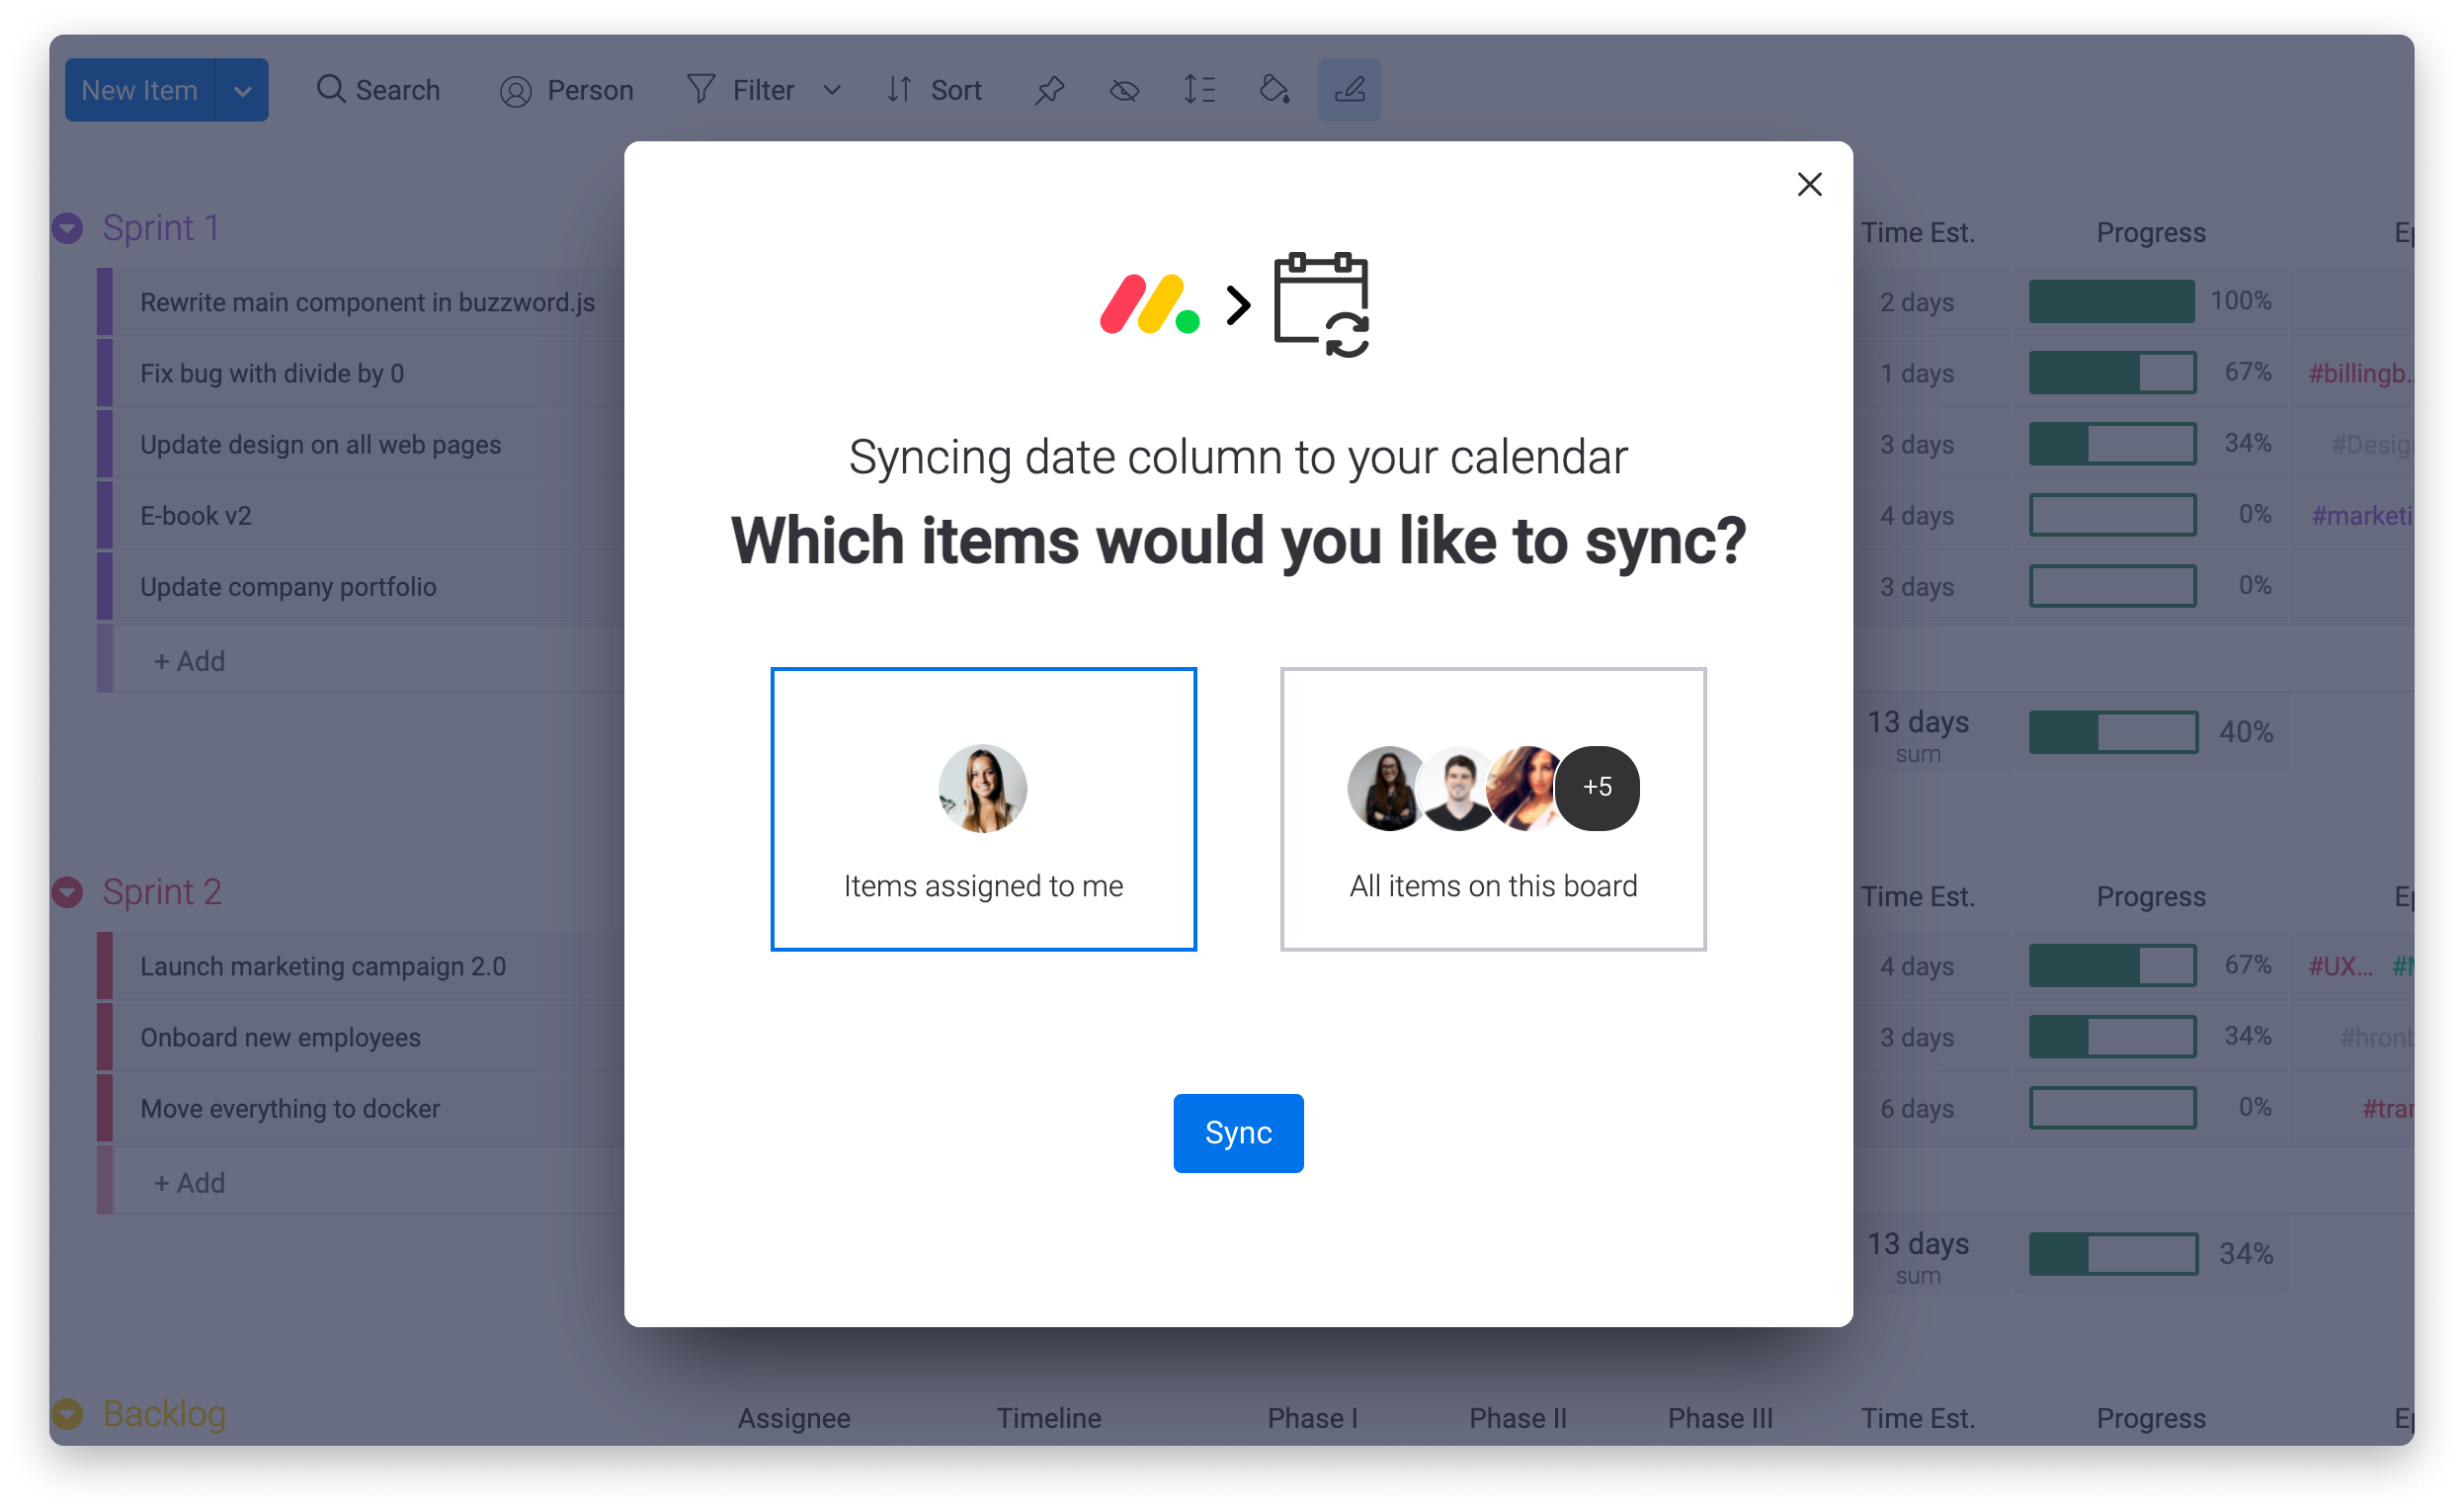
Step 3
The following window will pop up, allowing us to choose whether we want to sync only the "Items assigned to me" or "All the items on this board". After we select an option, we just have to click "Sync"!
Step 4
Now we have generated a URL address that we can use on our Outlook Calendar. We'll copy this link and head over to Outlook.

Add calendar to Outlook
Step 5
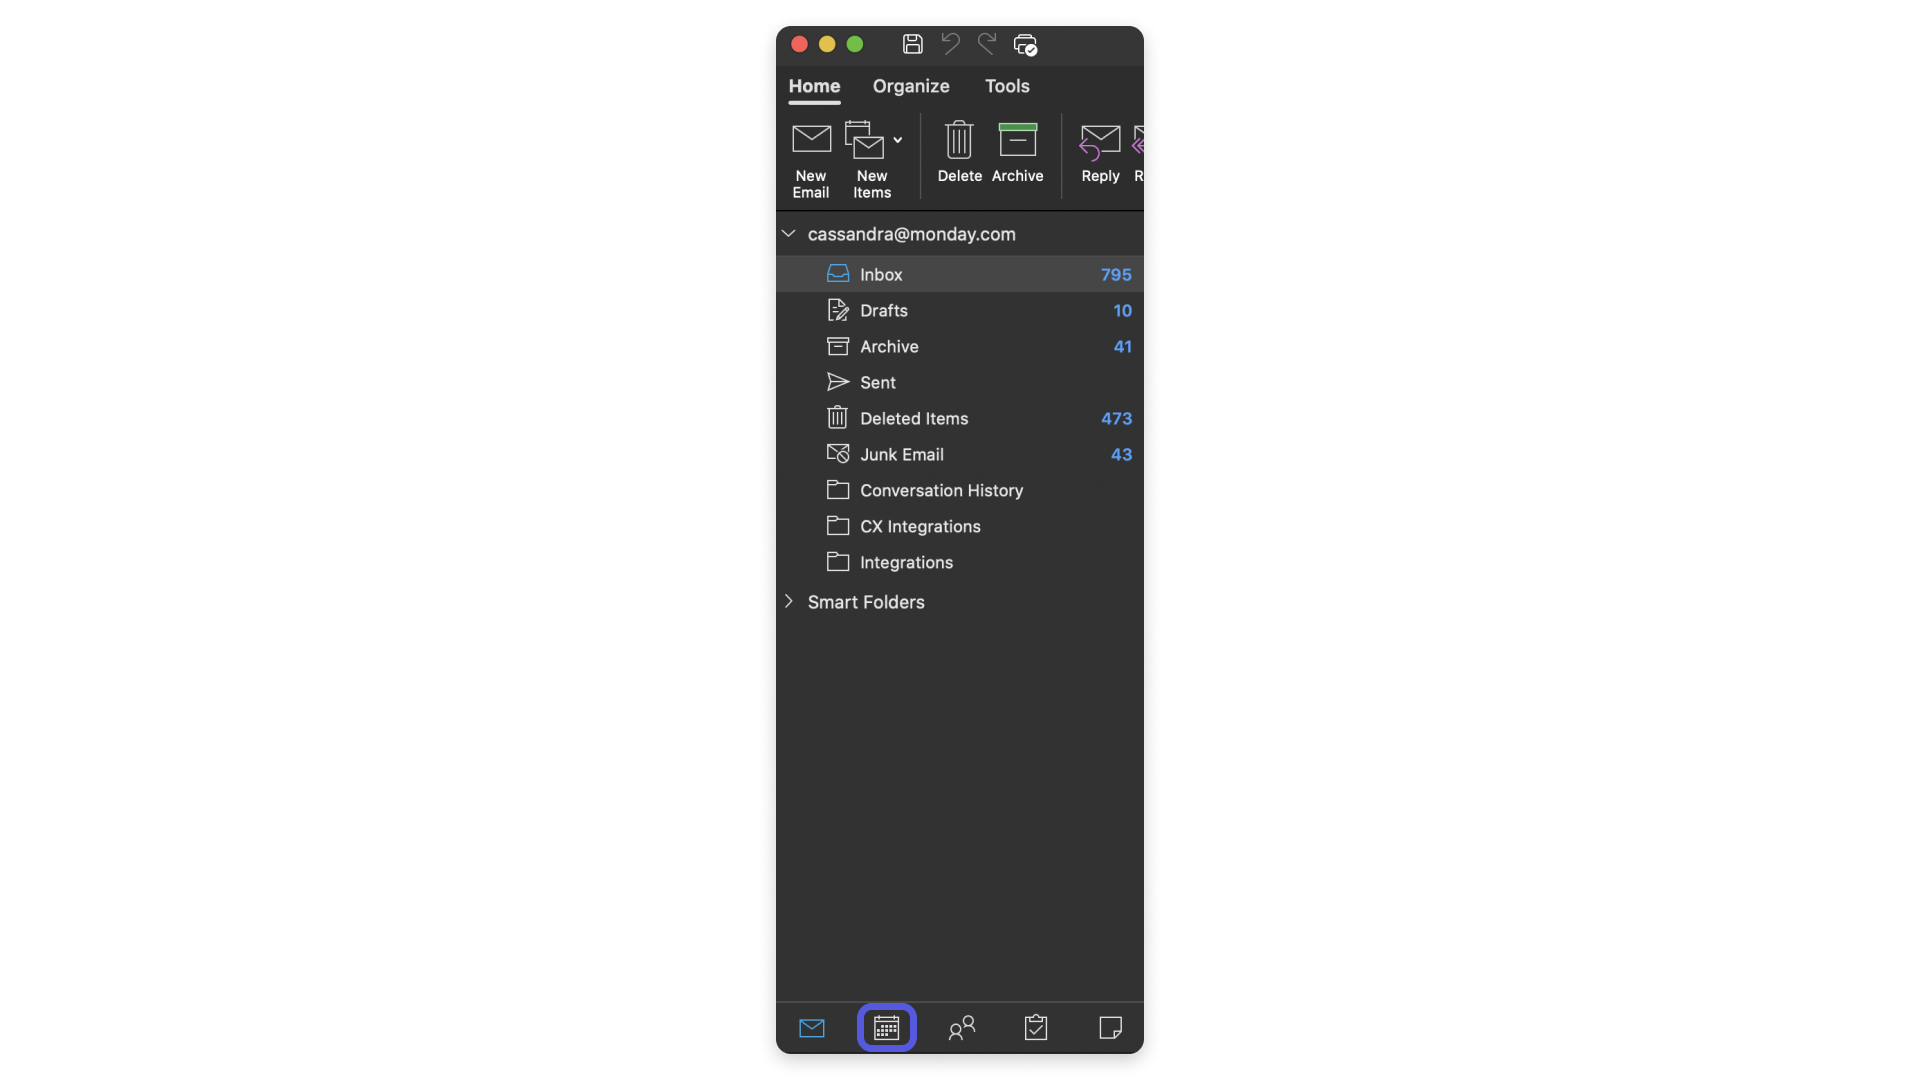
In Outlook, we'll first select the calendar icon at the bottom left of the screen.
Then we'll switch to the "Organize" tab:
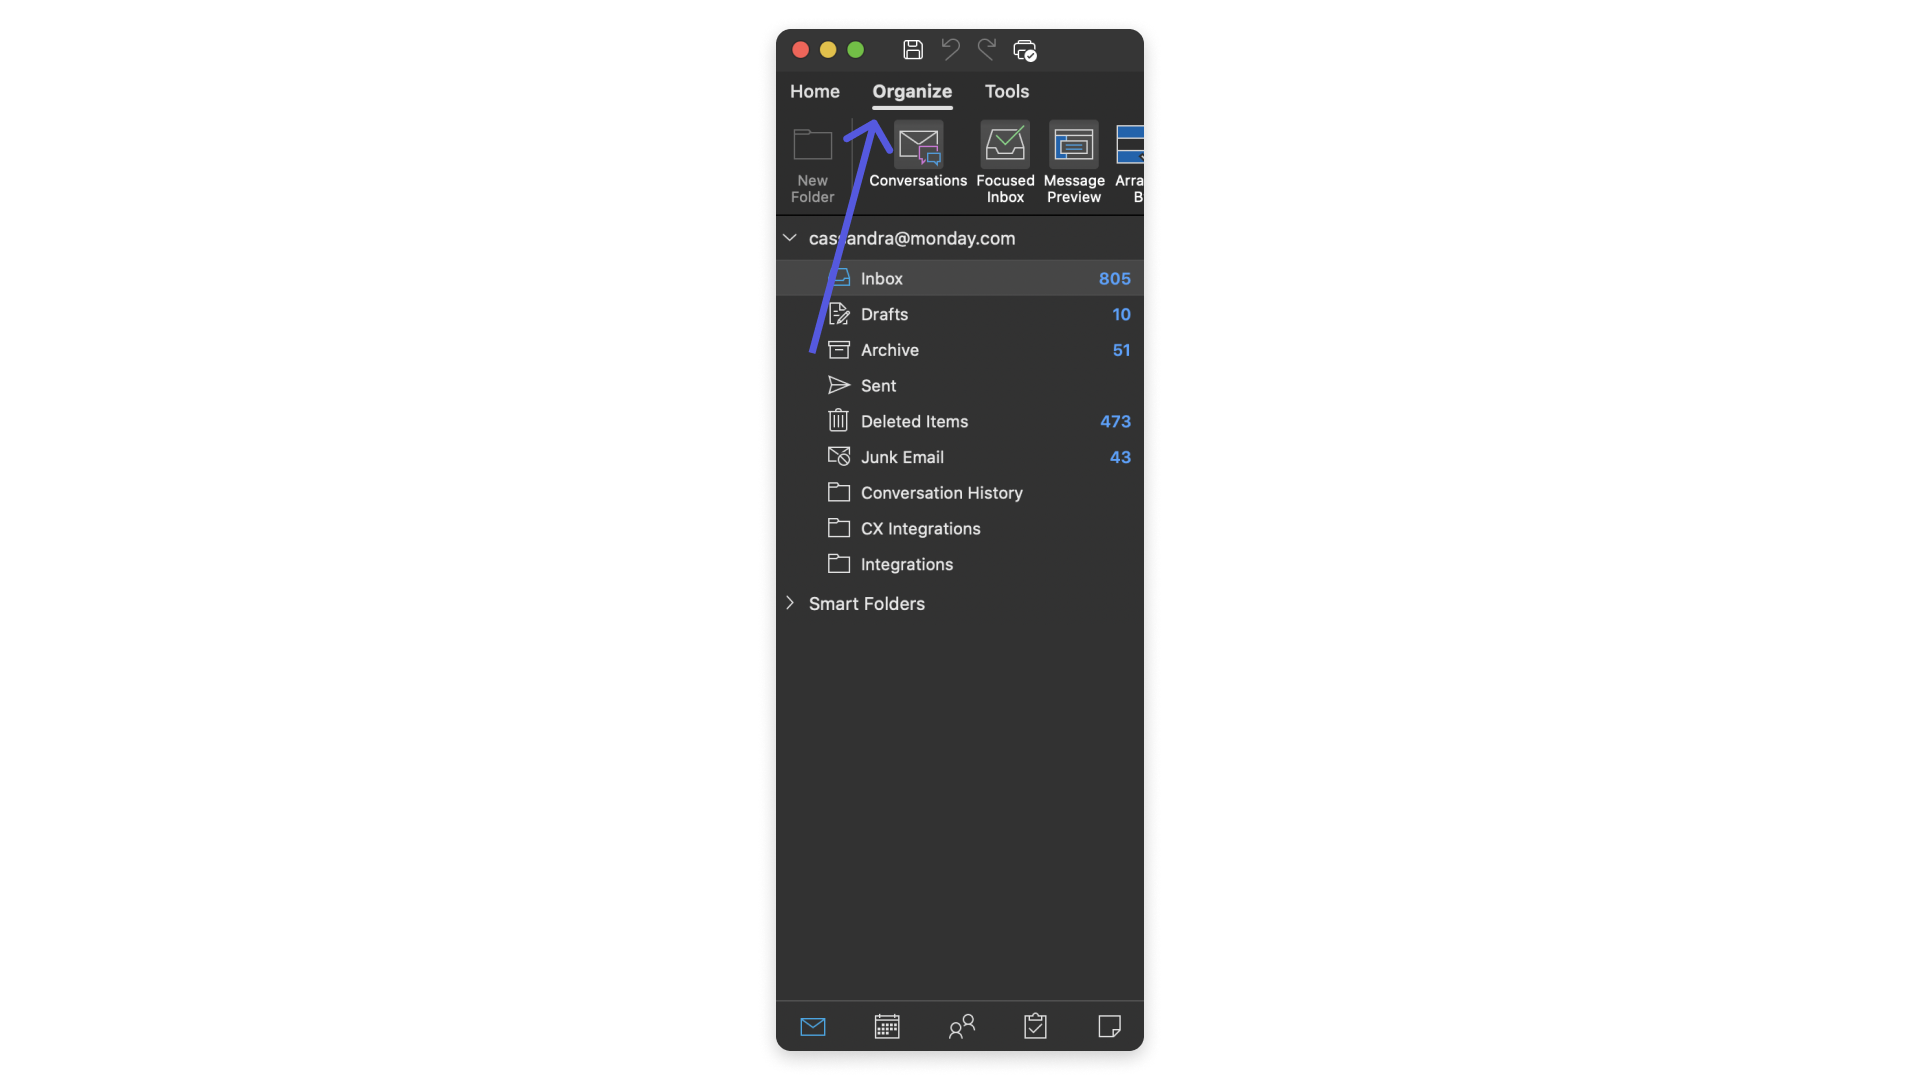
From there, navigate to the "New Calendar" button in the upper left of the Outlook window. Click on the button:

Step 6
A window will pop up where we can paste the link we copied from monday.com in Step 4.
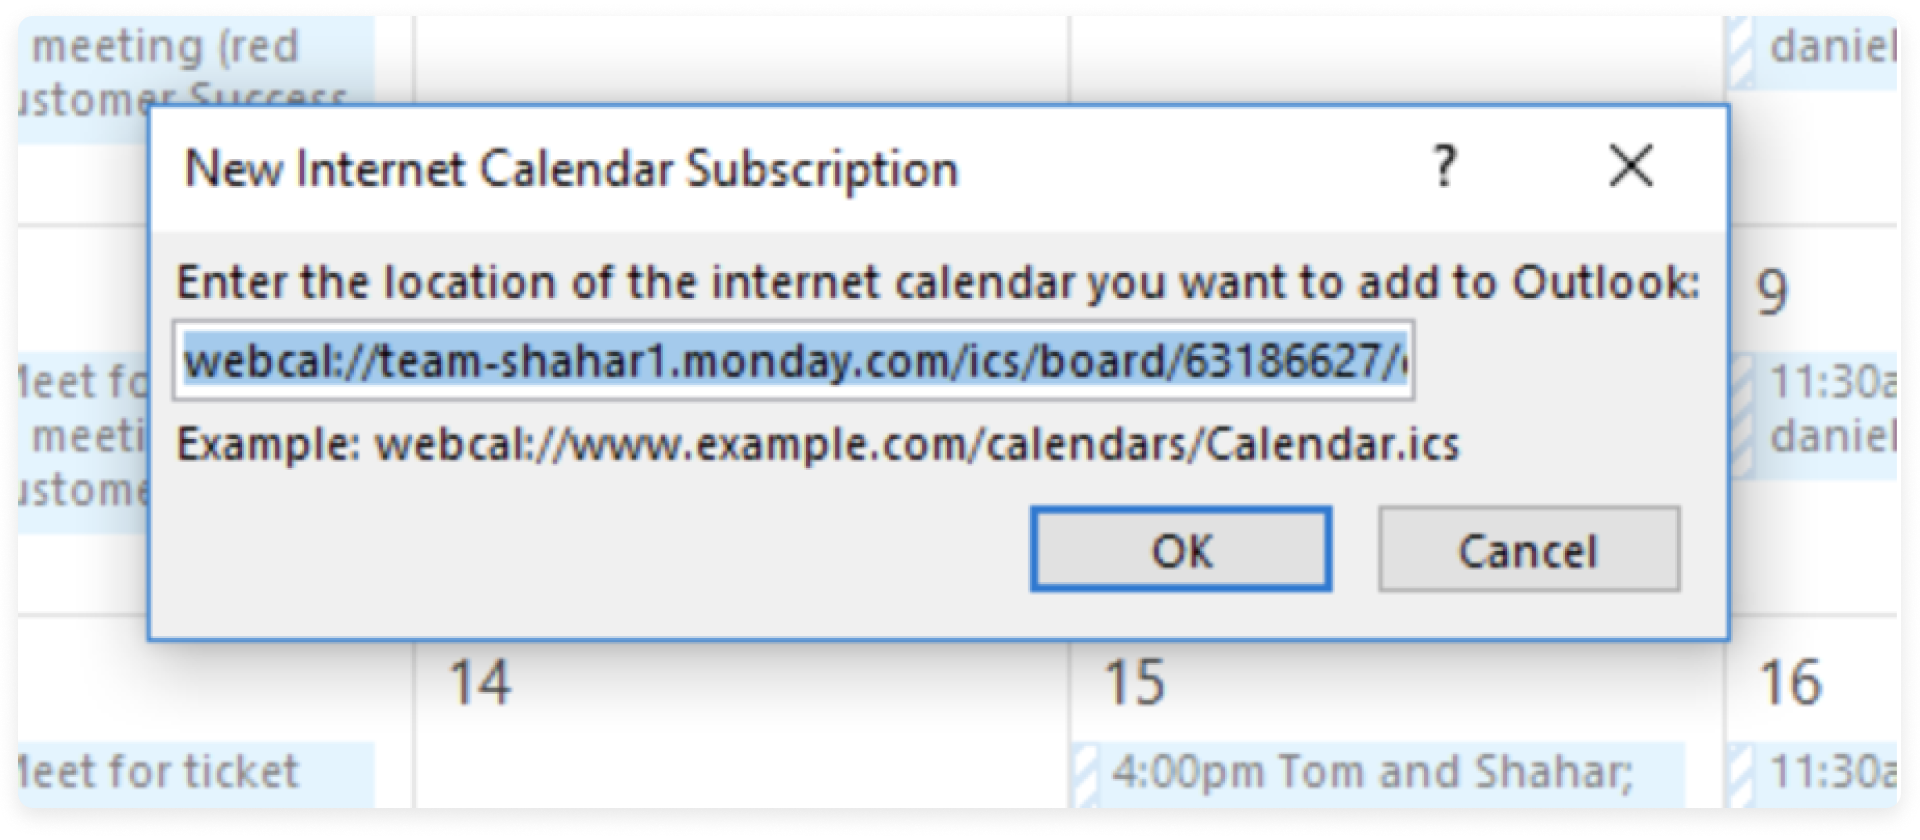
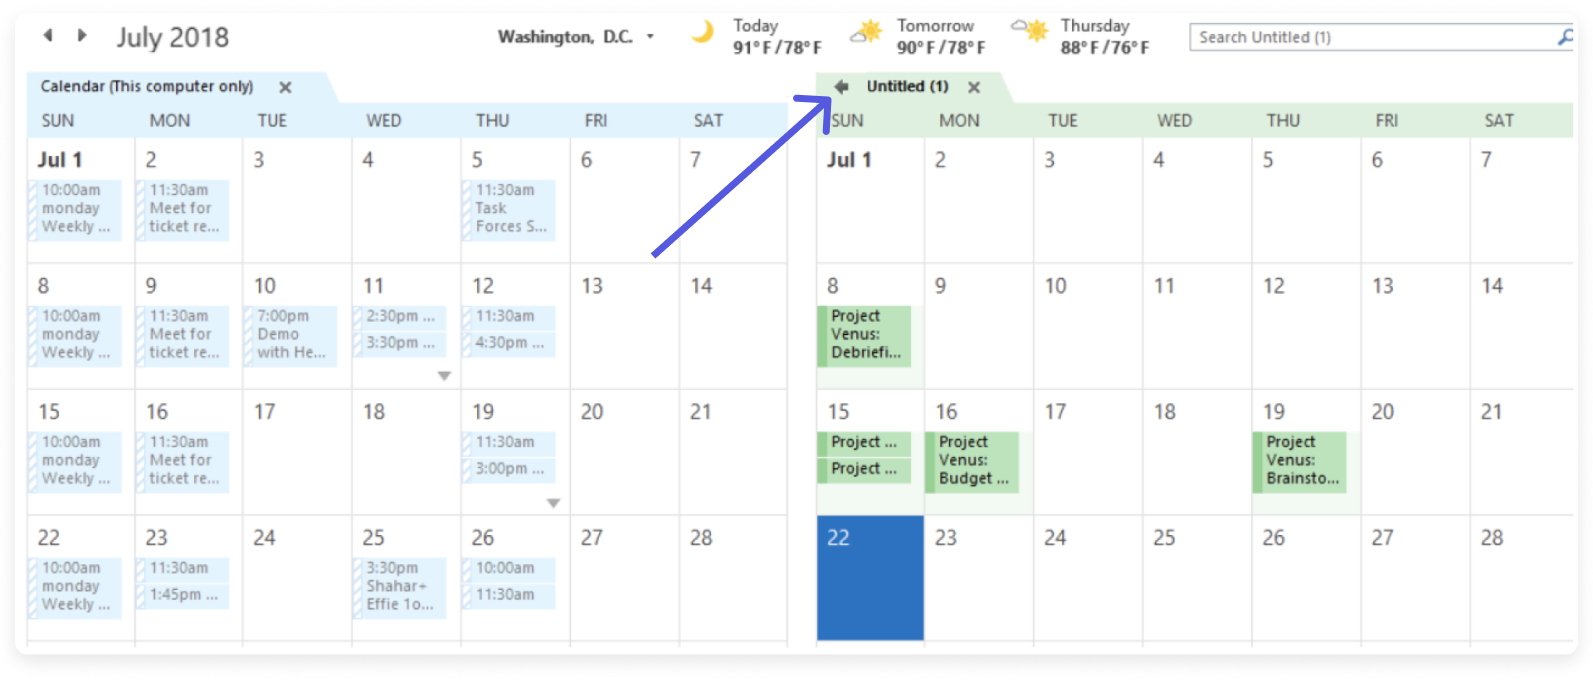
And that's all! Now we can see all of our monday.com tasks together with our Outlook tasks.
Frequency of Outlook calendar syncs
Though Microsoft confirms that when you subscribe to a calendar, your Outlook calendar will automatically refresh when the subscribed calendar is updated, this automatic refresh can take more than 24 hours. This means that it may take Microsoft more than 24 hours to automatically refresh and display updates that are performed on your monday.com board.
Currently, there is no option to control the frequency of the automatic refresh. As this is the result of settings on Microsoft's end, if you do wish to explore workarounds, please reach out to Microsoft.
You can learn more about subscribing to a calendar from Outlook on Microsoft's support site.
Set up alerts
After integrating your Timeline or Date Columns with your external calendar, you can quickly set up alerts for upcoming item deadlines. That way, the alerts will pop up even if you don't have your monday.com account open!
All you have to do is set reminders from your external calendar, and you will receive all of your monday.com item reminders in your external calendar as well!
If you have any questions, please reach out to our team right here. We’re available 24/7 and happy to help.
Comments