


 6 min read
 Guide
Guide
What is resource management?
Resource management is the process of planning the use of your resources and scheduling out their allocation. Resources can be anything your business needs in order to operate effectively— employees, equipment, or even your brand assets. If you manage a team for example, the challenge will be to make sure your employees are assigned to the right tasks and that they have the capacity to complete all of them in time.
The goal of resource management is to use resources in the most efficient way possible.
Why is it important?
Managing resources efficiently is a crucial step of any successful project. It promotes transparency and seamless collaboration. Everyone knows what they are responsible for and how long they have to complete their tasks. By planning and managing your resources, you will get a clear overview of and control over your project. It will also help you with setting goals and planning your future projects even better.
Whatever your resources may be, monday.com is here to help you keep your business on track!
Plan your resources
Planning your resources is the first step to allocating them. This will help you understand everything that needs to be done in order to complete the project. Let's get started!
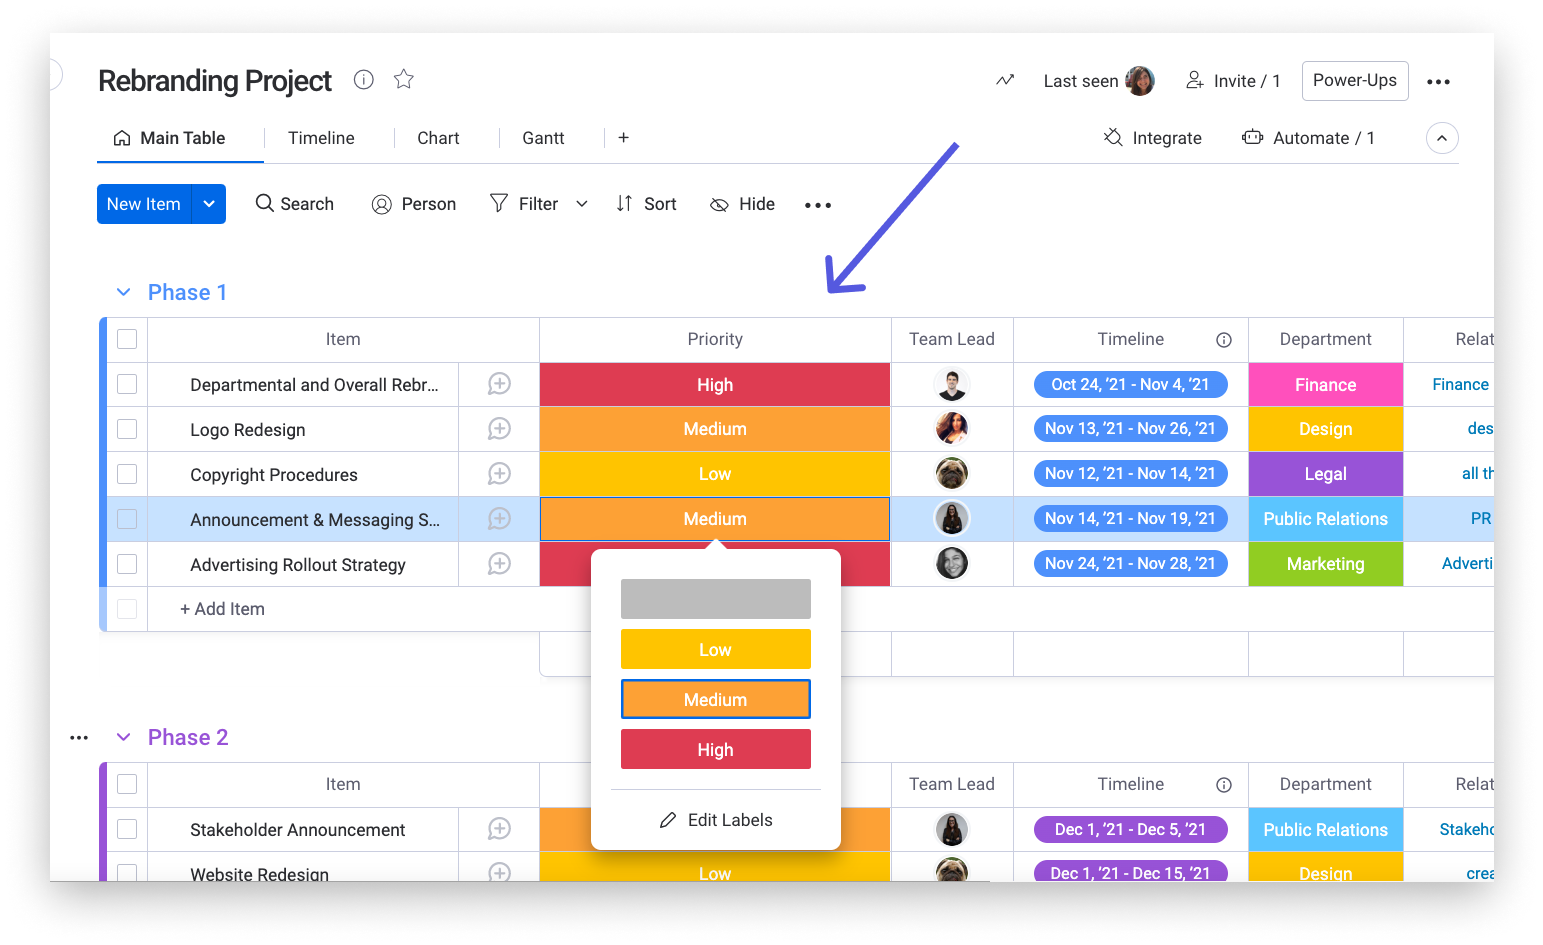
Step 1 - Define priority
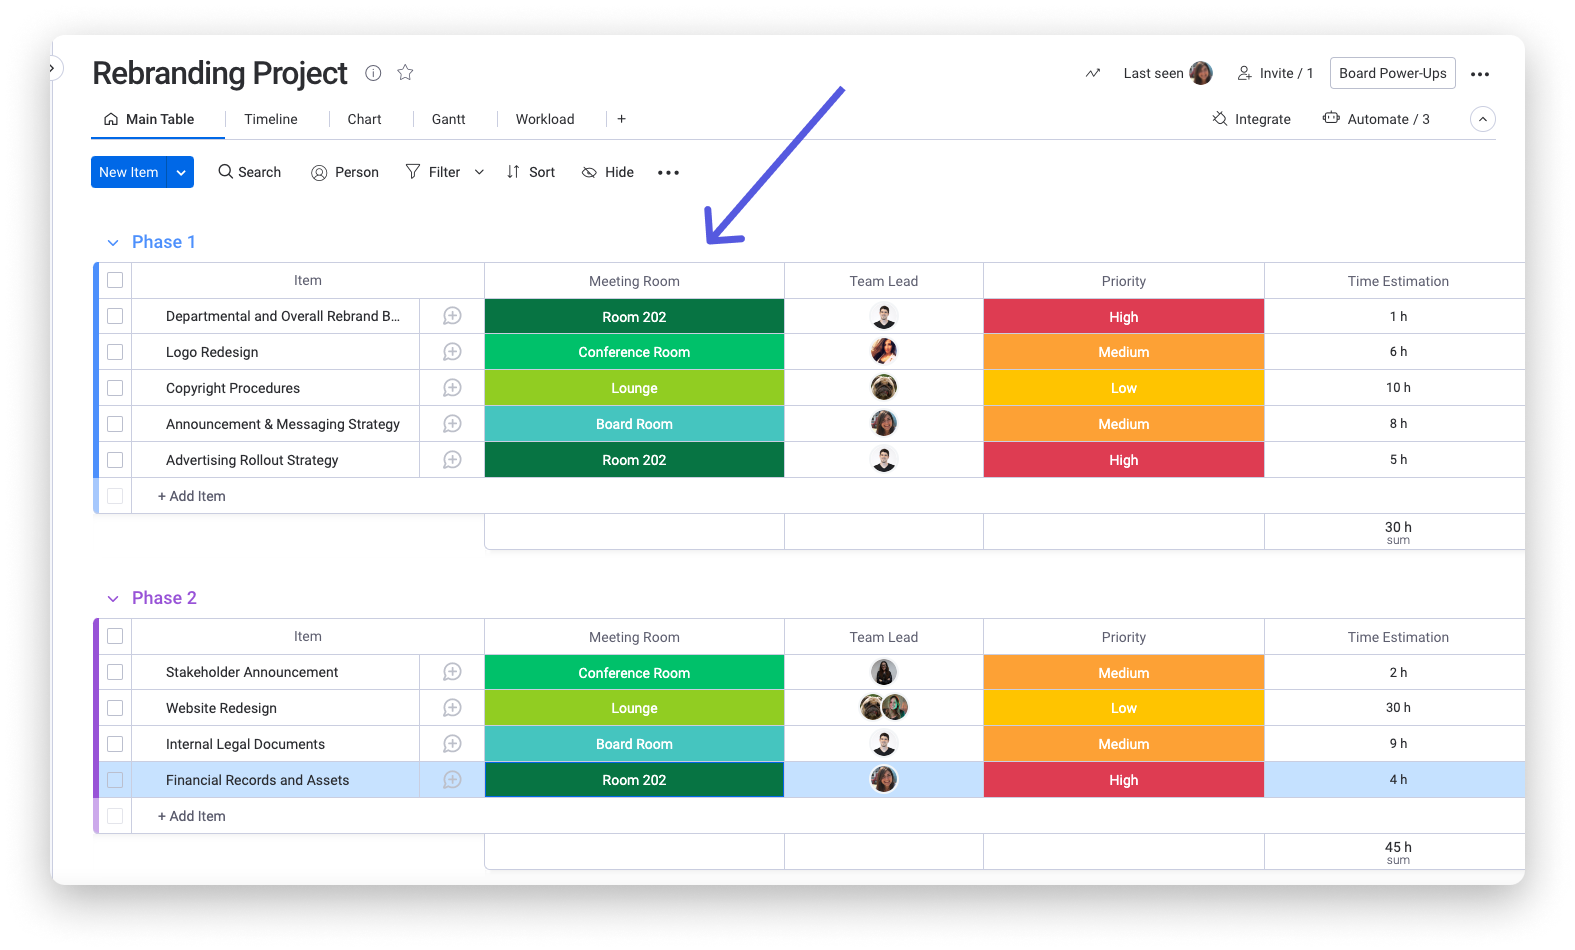
The very first step in planning your resources is to break your project down into tasks. This can be from the smallest to the largest task that you need to get done. Once you’ve jotted down all your tasks, you will be able to prioritize. At monday.com, we love using the Status Column to define what is important and what can wait.
In this example, we are working a rebranding project:
Step 2 - Add due dates
Another important step in managing your resources efficiently is to add due dates. This, combined with the priority status, will help your team manage their time better. To add due dates, you can use the Date Column. You can also set up date reminders to make sure that your team will not miss any deadlines. To learn more about it, check out this article.
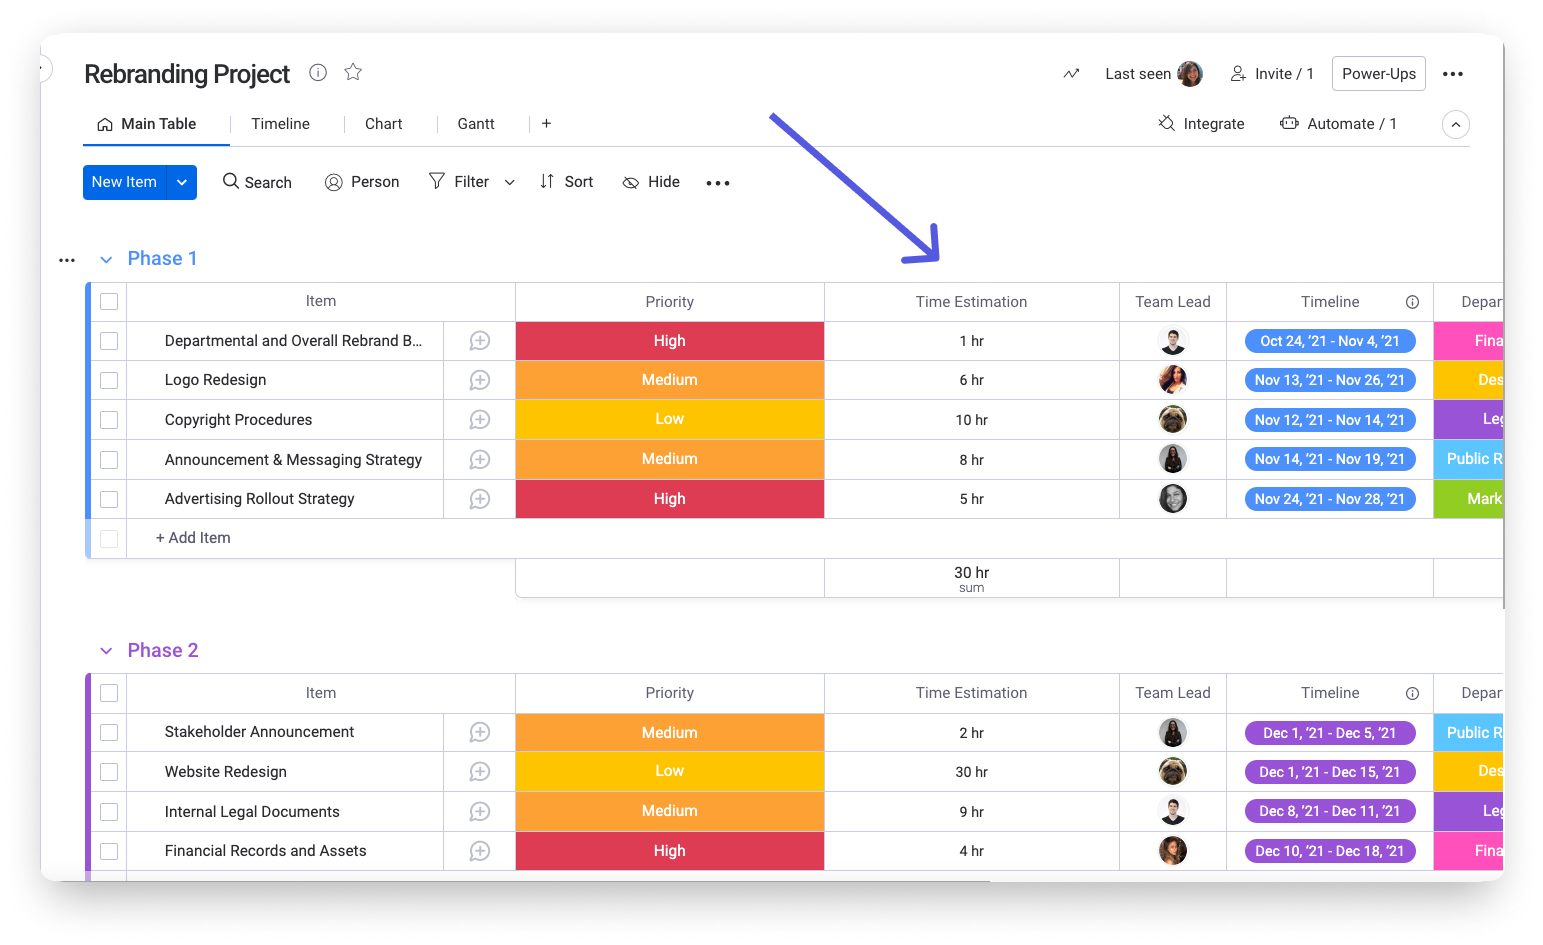
Step 3 - Estimate time
Some tasks take longer than others to complete. Adding a time estimate for each task will then help you to allocate your resources better. Here, we are using a Numbers Column, and adjusting the units in the column footer to be measured in hours.
Distribute work efficiently
Once you've planned all the tasks that need to be done, you can start allocating work to your team members! To help you with that process, we have created the Workload View. This amazing feature will help you see in one glance who is over their capacity and assign upcoming tasks accordingly.
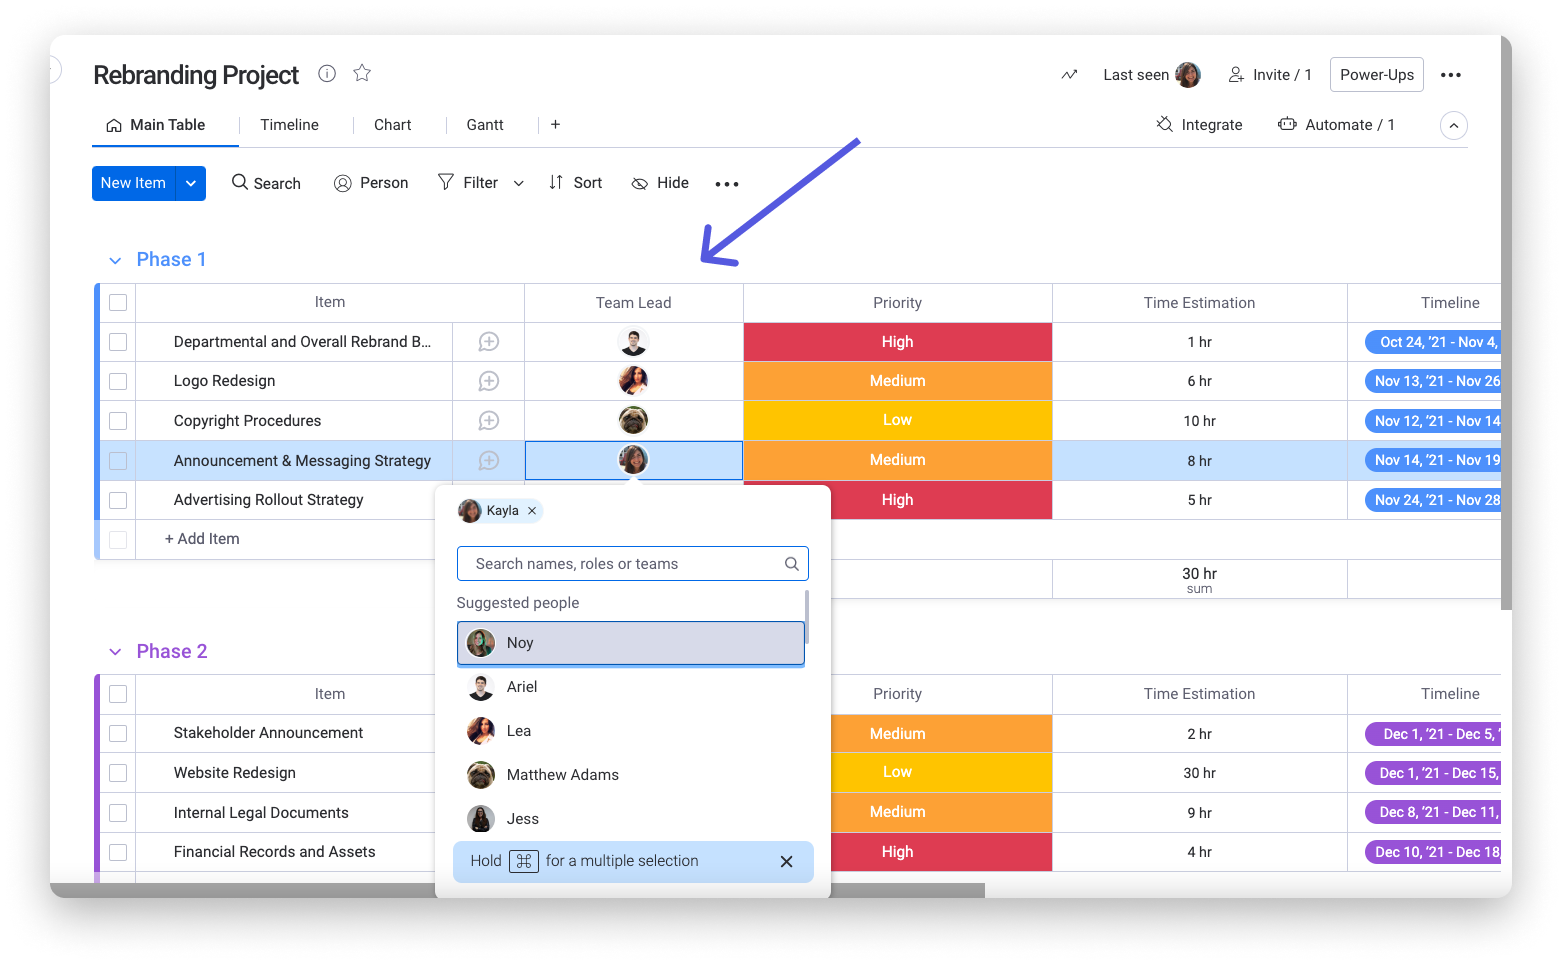
- Assign ownership
Before adding the view to your board, make sure to add a People Column. This column is used to assign tasks to your team members and brings transparency to the team.
- Add the view
Once all your tasks are assigned, you can open the Workload View. To add the Workload View, click on the plus sign next to the "Main Table" button at the top of your board and click on "More views".
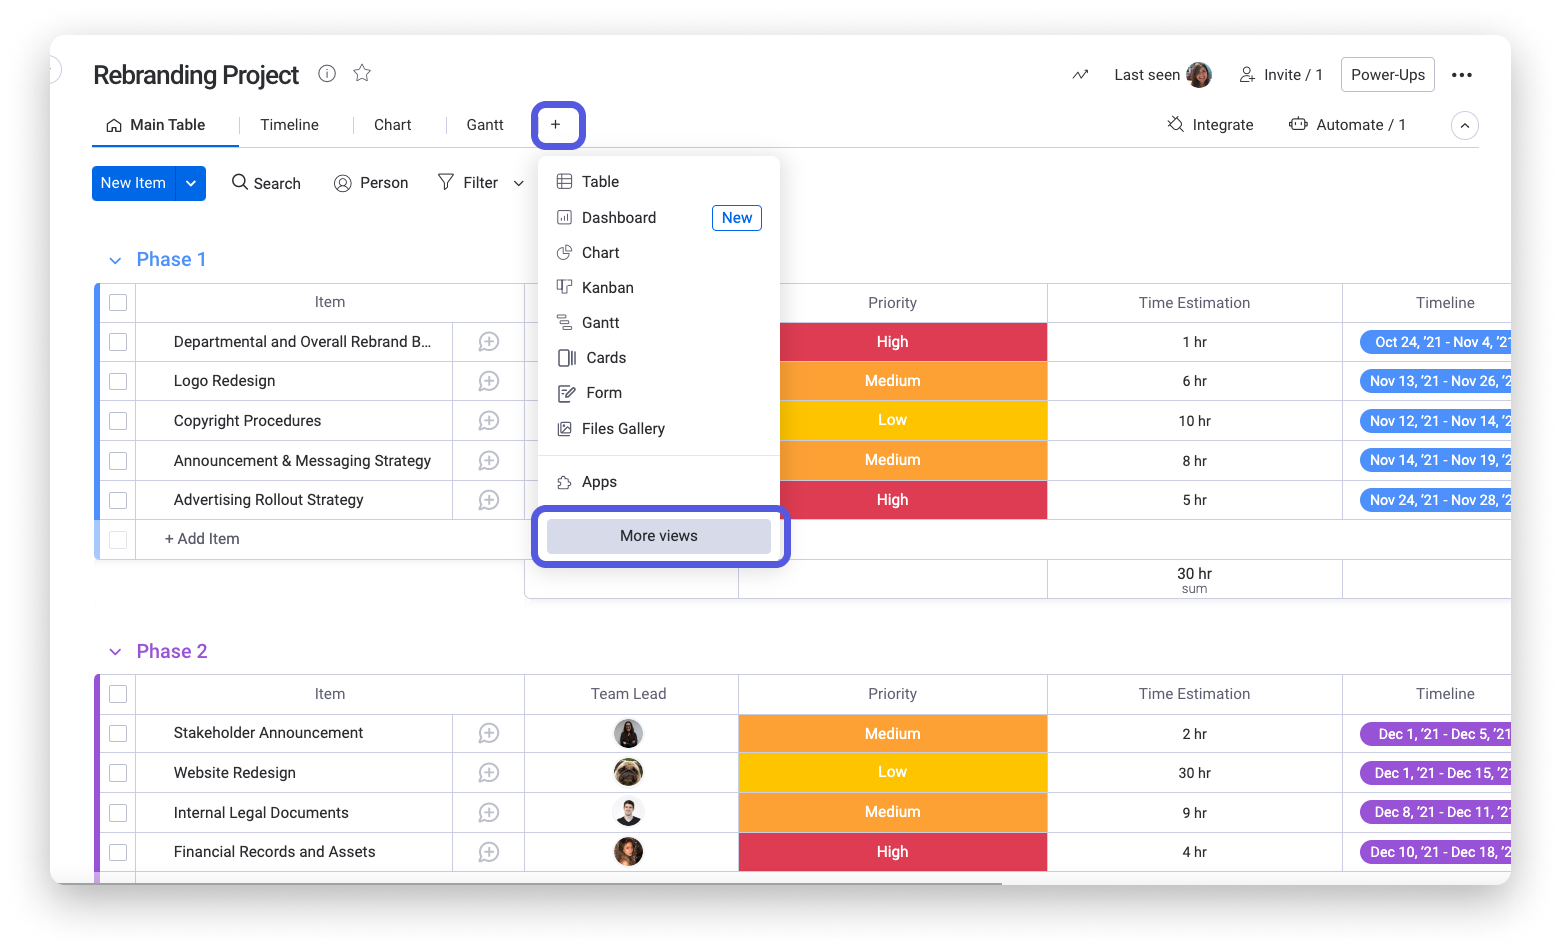
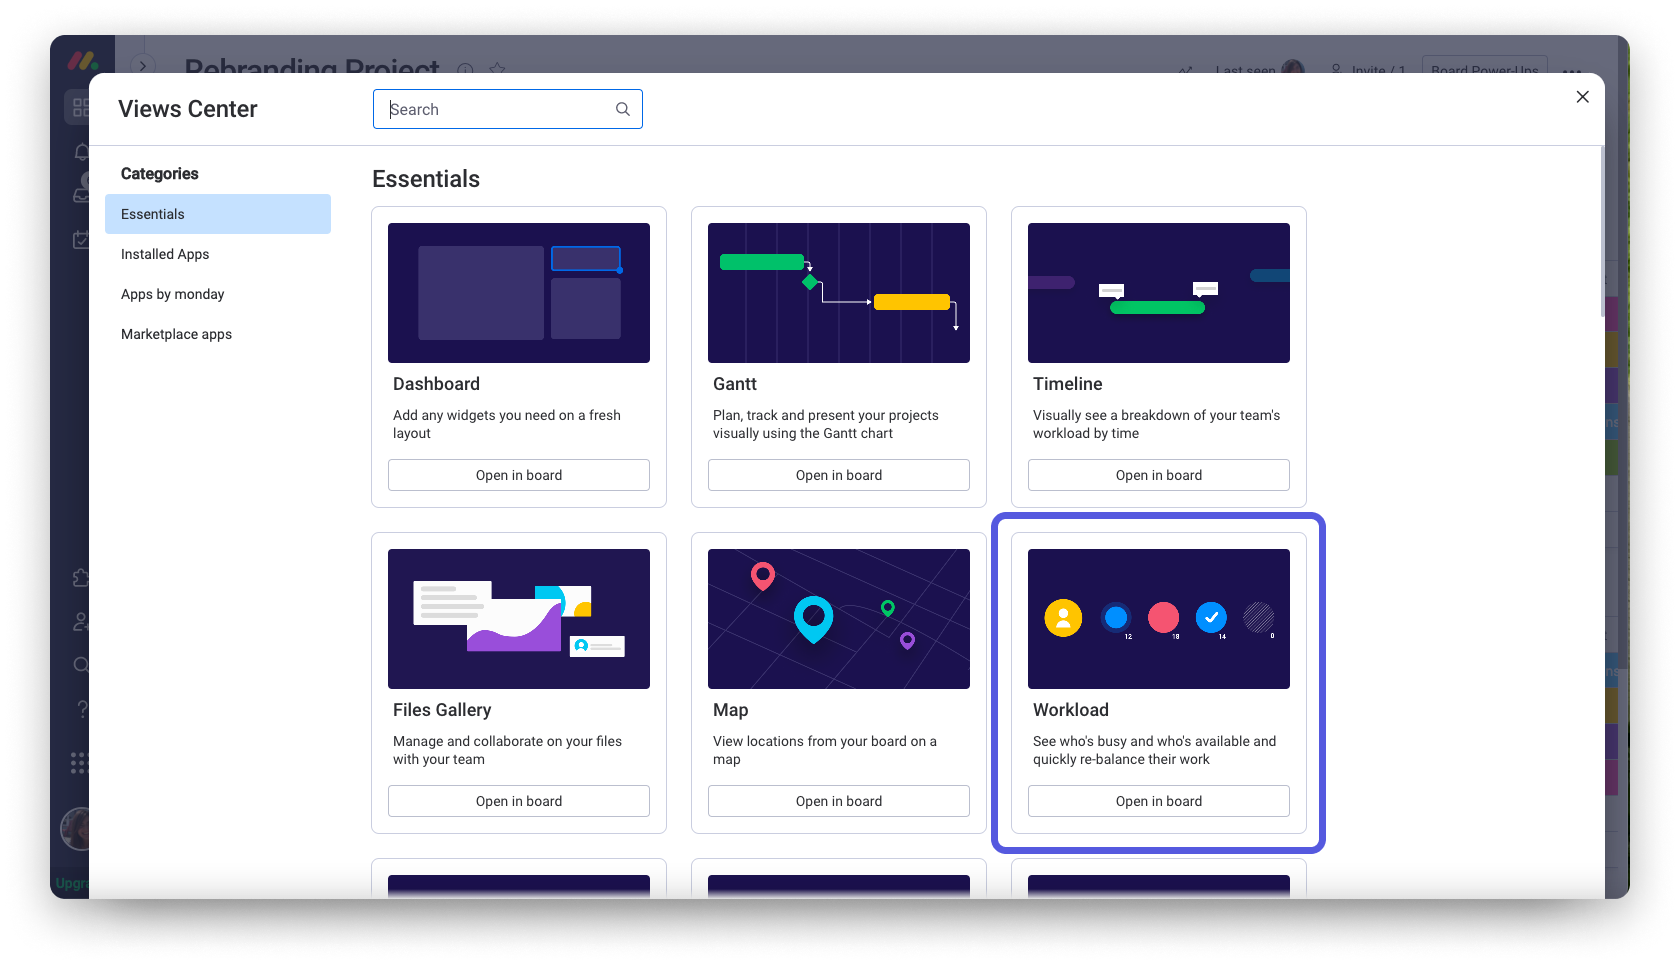
Select "Workload" from the Views Center.
- Customize
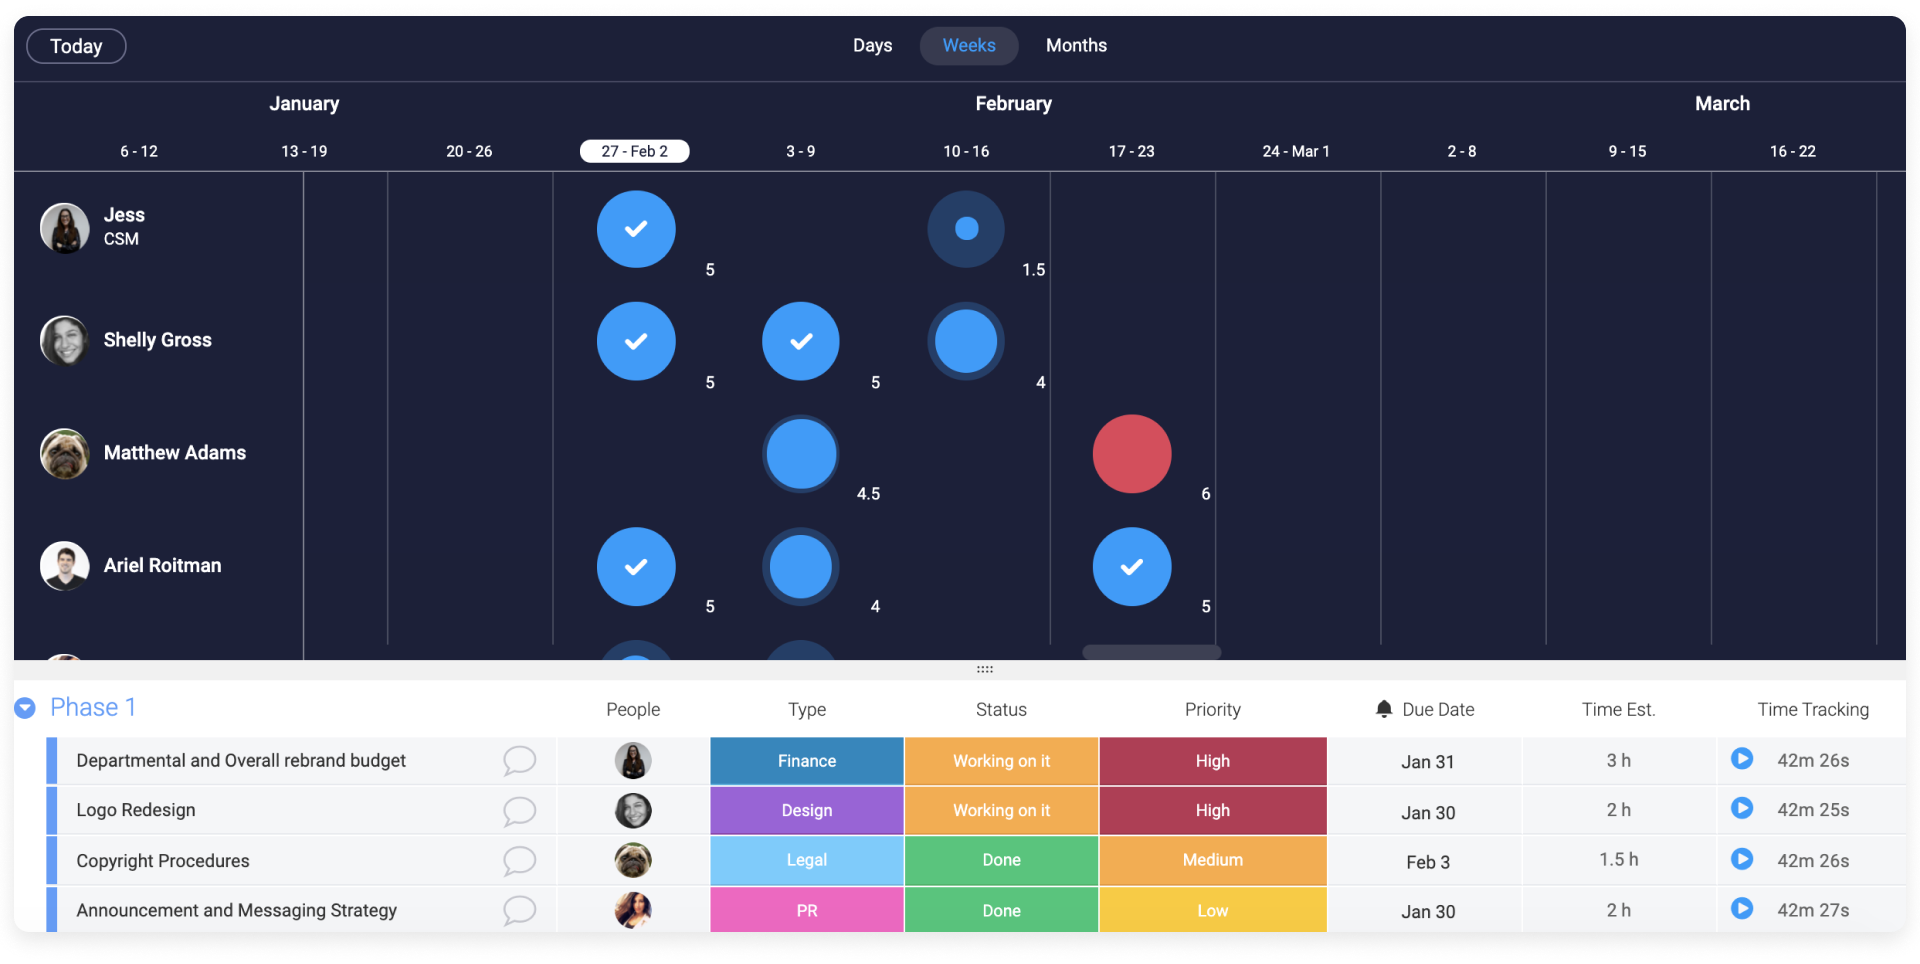
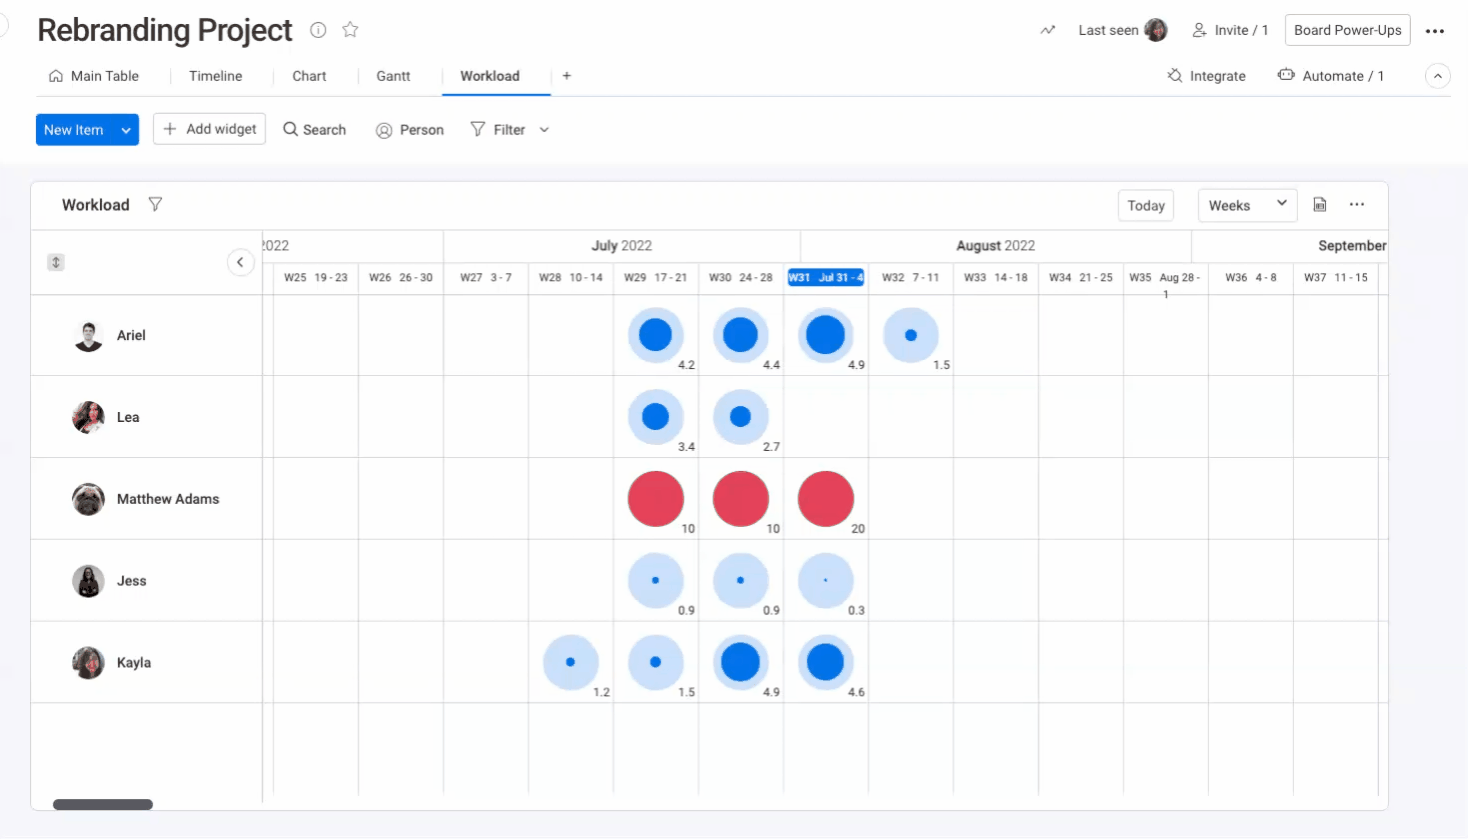
Next, you will find a bunch of different settings allowing you to customize your Workload View to work best for you. We want to assess the amount of tasks assigned to each team member, so we've chosen our People Column under "Resource Type".
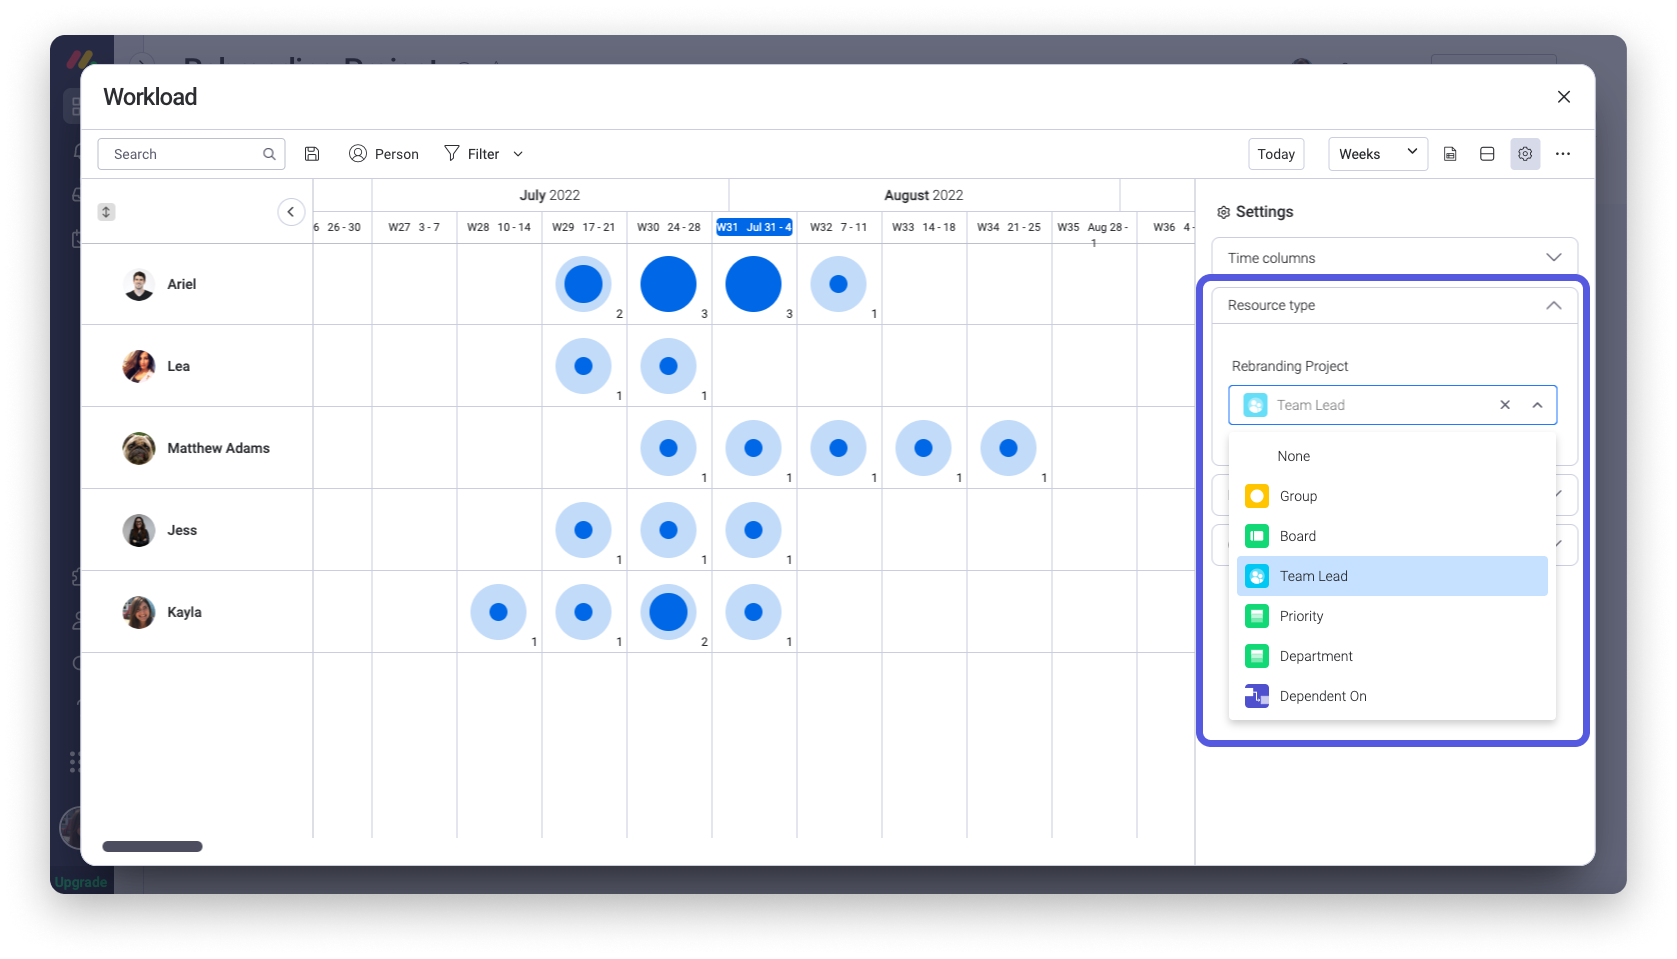
This way, we can see each team member on the y axis of our view, with the number of tasks they are assigned plotted along the calendar.
Another customization we've done here is to measure the effort based on the time estimation of each task. We also set up a weekly capacity per person of 7 hours.
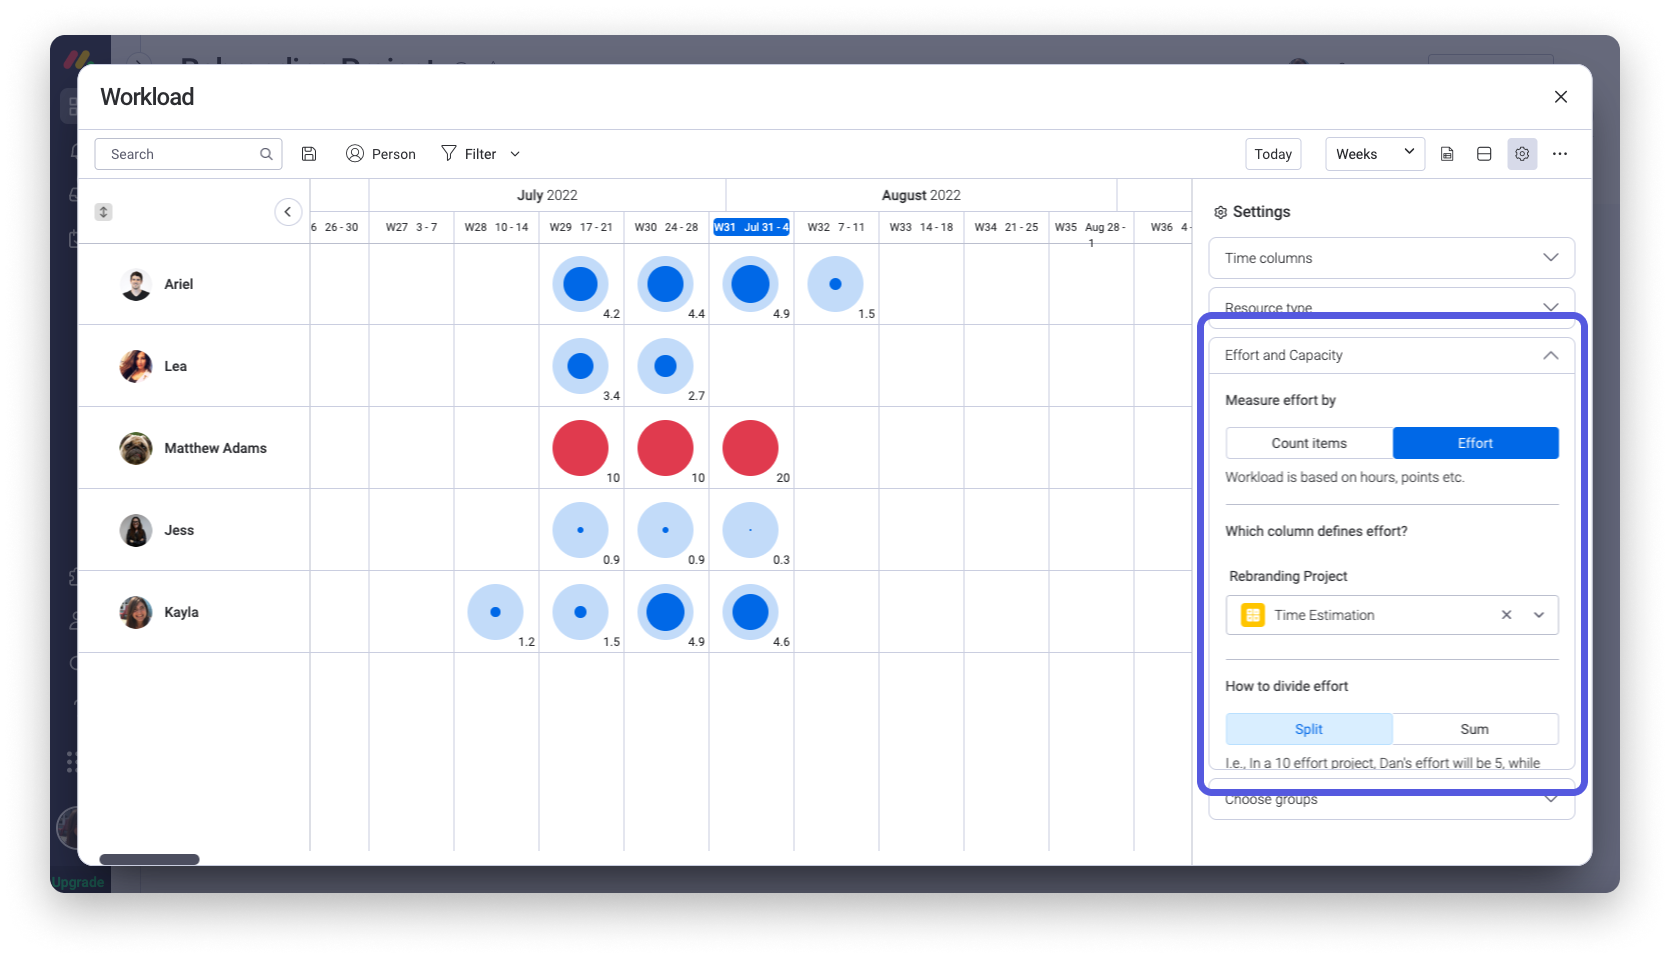
- Drill down and re-allocate
The bubble colors help you to see in one glance who is over capacity or under capacity. You can click on any of the bubbles to drill down and see details of all the tasks that person is assigned to. This week, for example, we can see that Shelly is over capacity (red bubble) but that Lea is under capacity and could take one more task. We can reassign one of Matthew's tasks to Lea.
If your team is assigned to tasks on multiple boards across your account, you can use the Workload Widget. Similar to the view, it allows you to combine information from several boards into one single place. Check this article for more information.
Allocate physical resources
The Workload View is not only good for allocating human resources, but is really effective for physical resources as well! We use a Status Column called "Meeting Room" to record the meeting room we are booking in order to work on each of our tasks.
Rather than viewing each task according to the team member assigned to it, we can view all of our tasks according to the meeting room we are using! To set this up, we've chosen our "Meeting Room" Status Column as our "Resource Type".

Because the company needs the meeting rooms for other purposes throughout the week, our rebranding project has a limited amount of weekly hours we can use the rooms for, so we need to be strategic about how we utilize them! We're measuring effort by counting the number of hours each room is booked per week, and have set a weekly capacity of 2 hours per week for each meeting room.
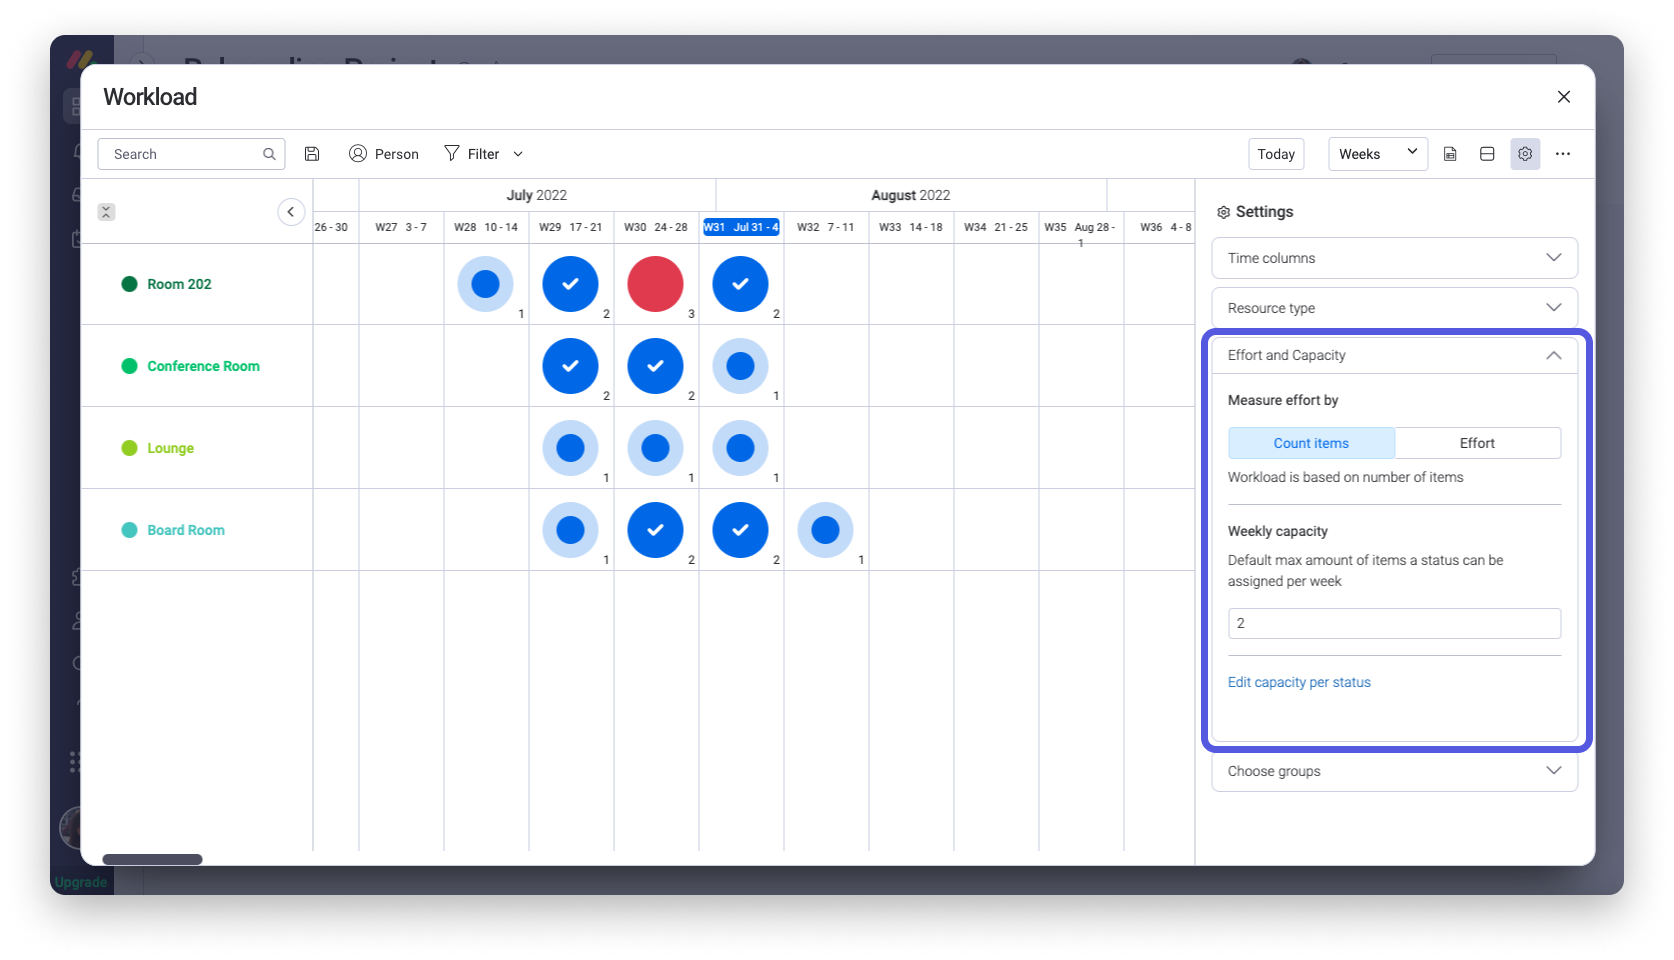
We can see when we've overbooked the rooms and when there are scheduling conflicts so that we can reallocate our resources according to their availability!
To learn more about resource allocation using the Workload Widget, check out this article.
Track progress
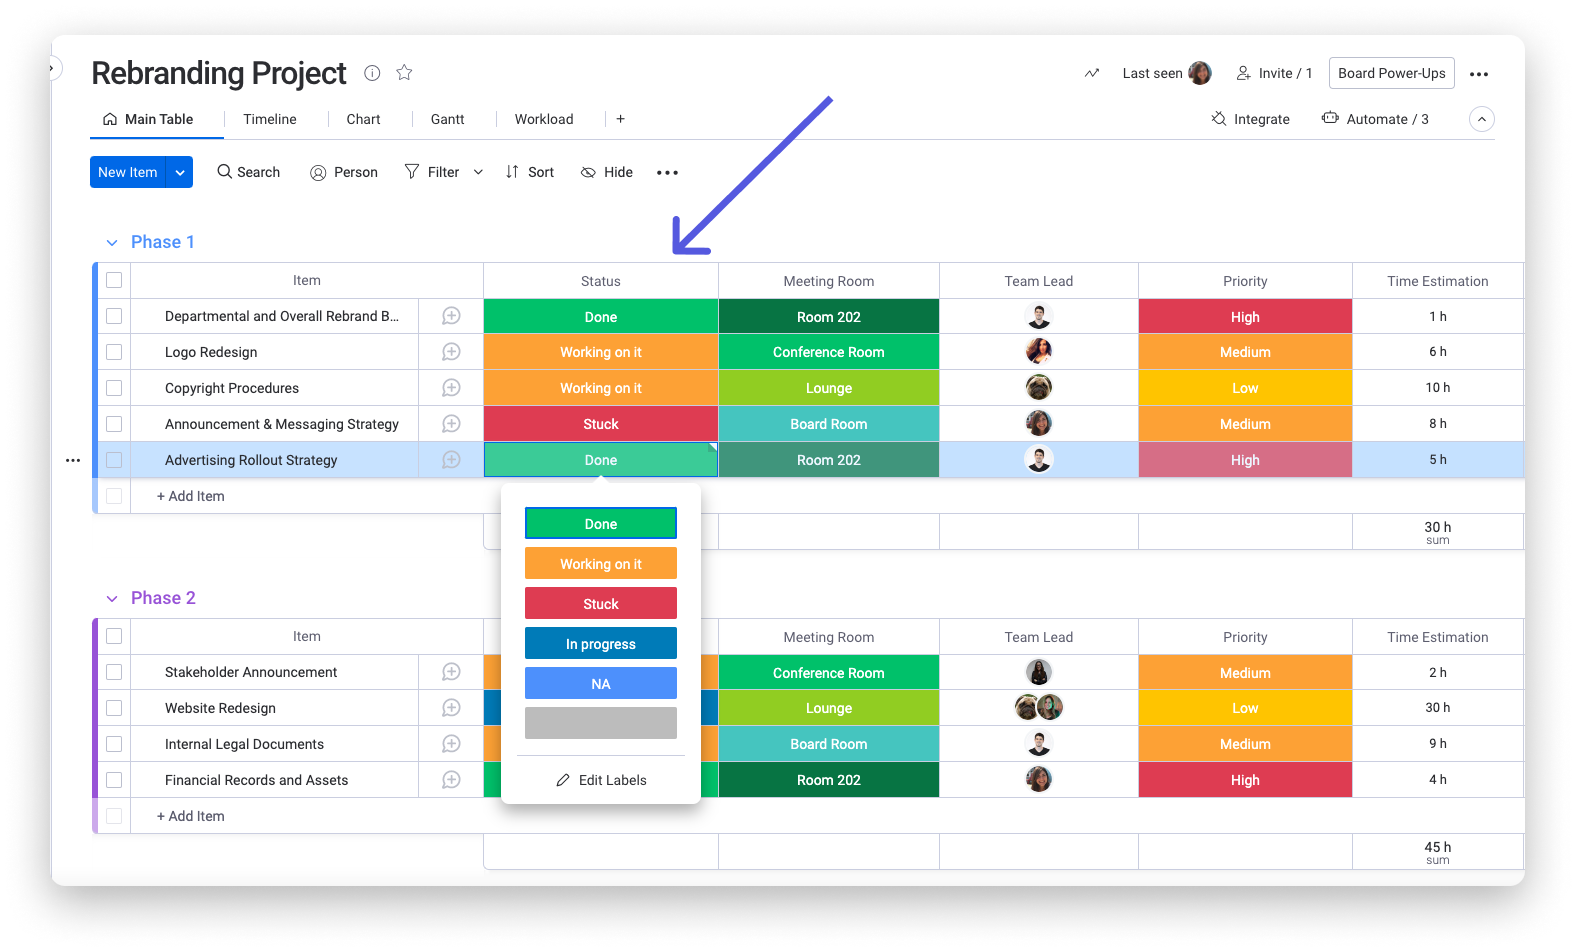
- Add a Status Column
Once your tasks are allocated perfectly, you can add a Status Column to keep track of the progress. With this column, you can see if a task is completed, is being worked on, or any other status you wish!
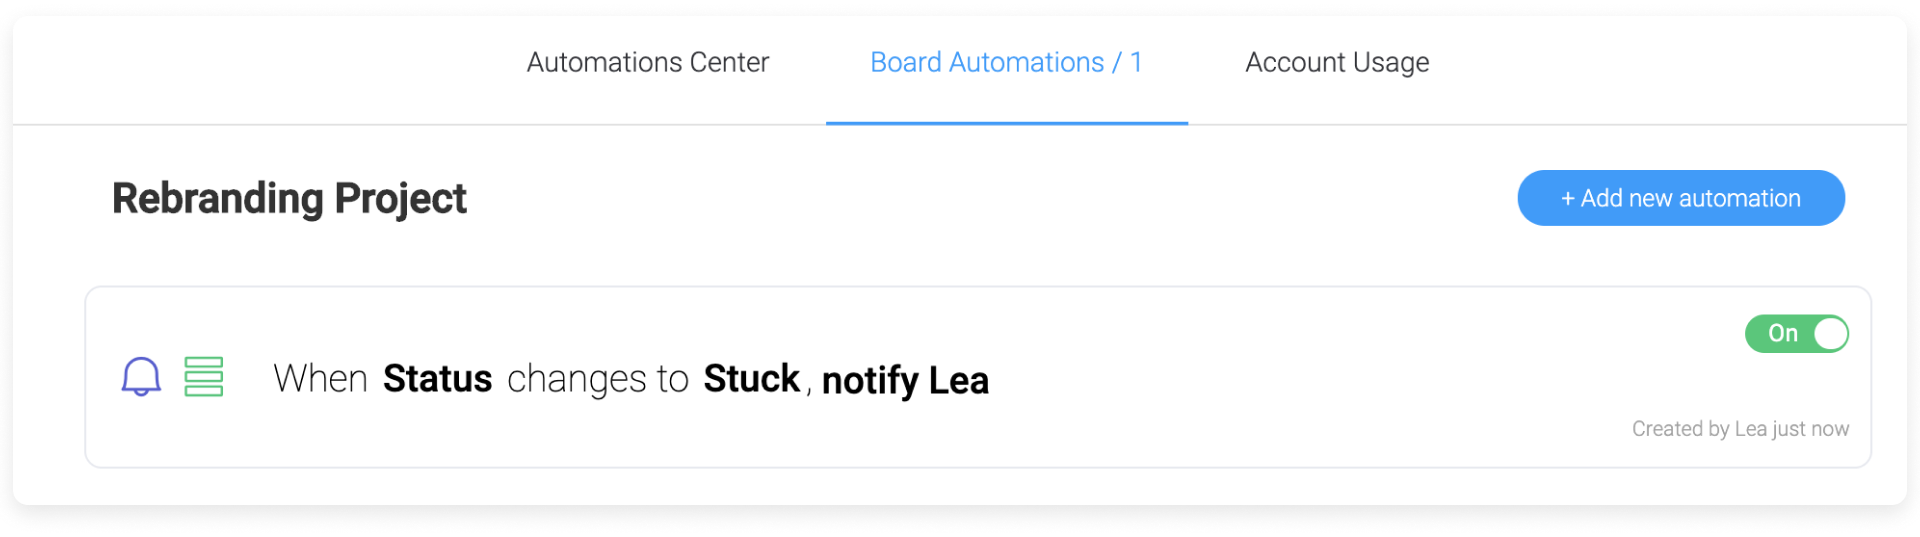
- Receive notifications when a status changes
Power-up your board even more by using automations! In this example, I want to be notified each time a status changes to stuck.
We can also get notified 1 day before a due date arrives if the status of the task is not marked as done:
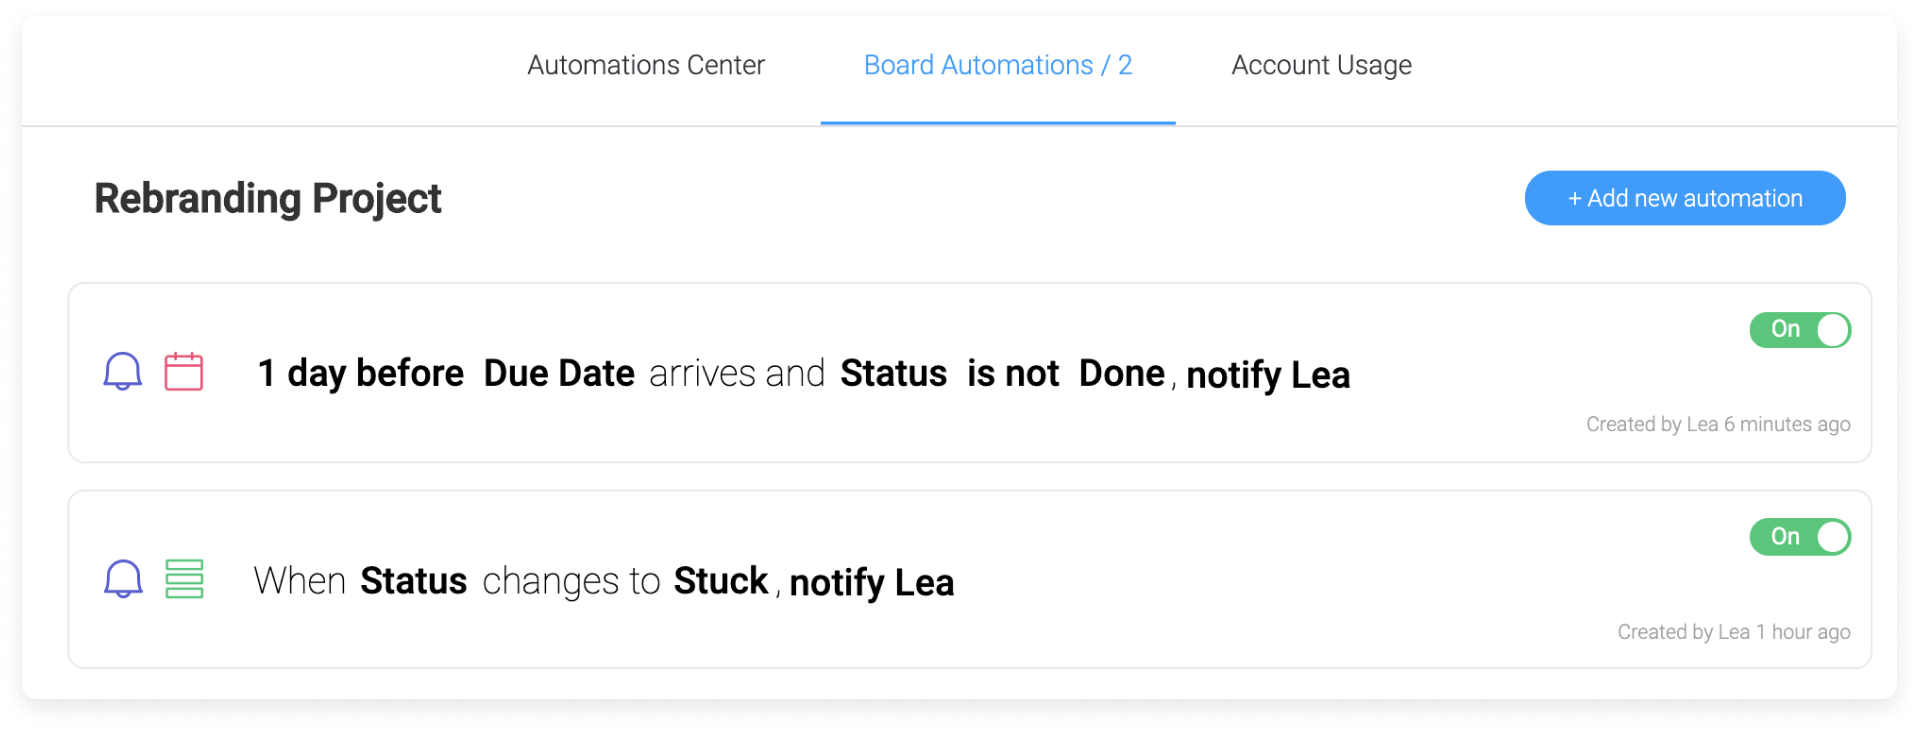
Automations are a great way to stay on top of everything important and reduce manual work.
- Get more insights with the Chart View
The Chart View breakdowns and analytics enable you to make informed decisions. Here, for example, we are interested to know how each of our higher priority projects are advancing.
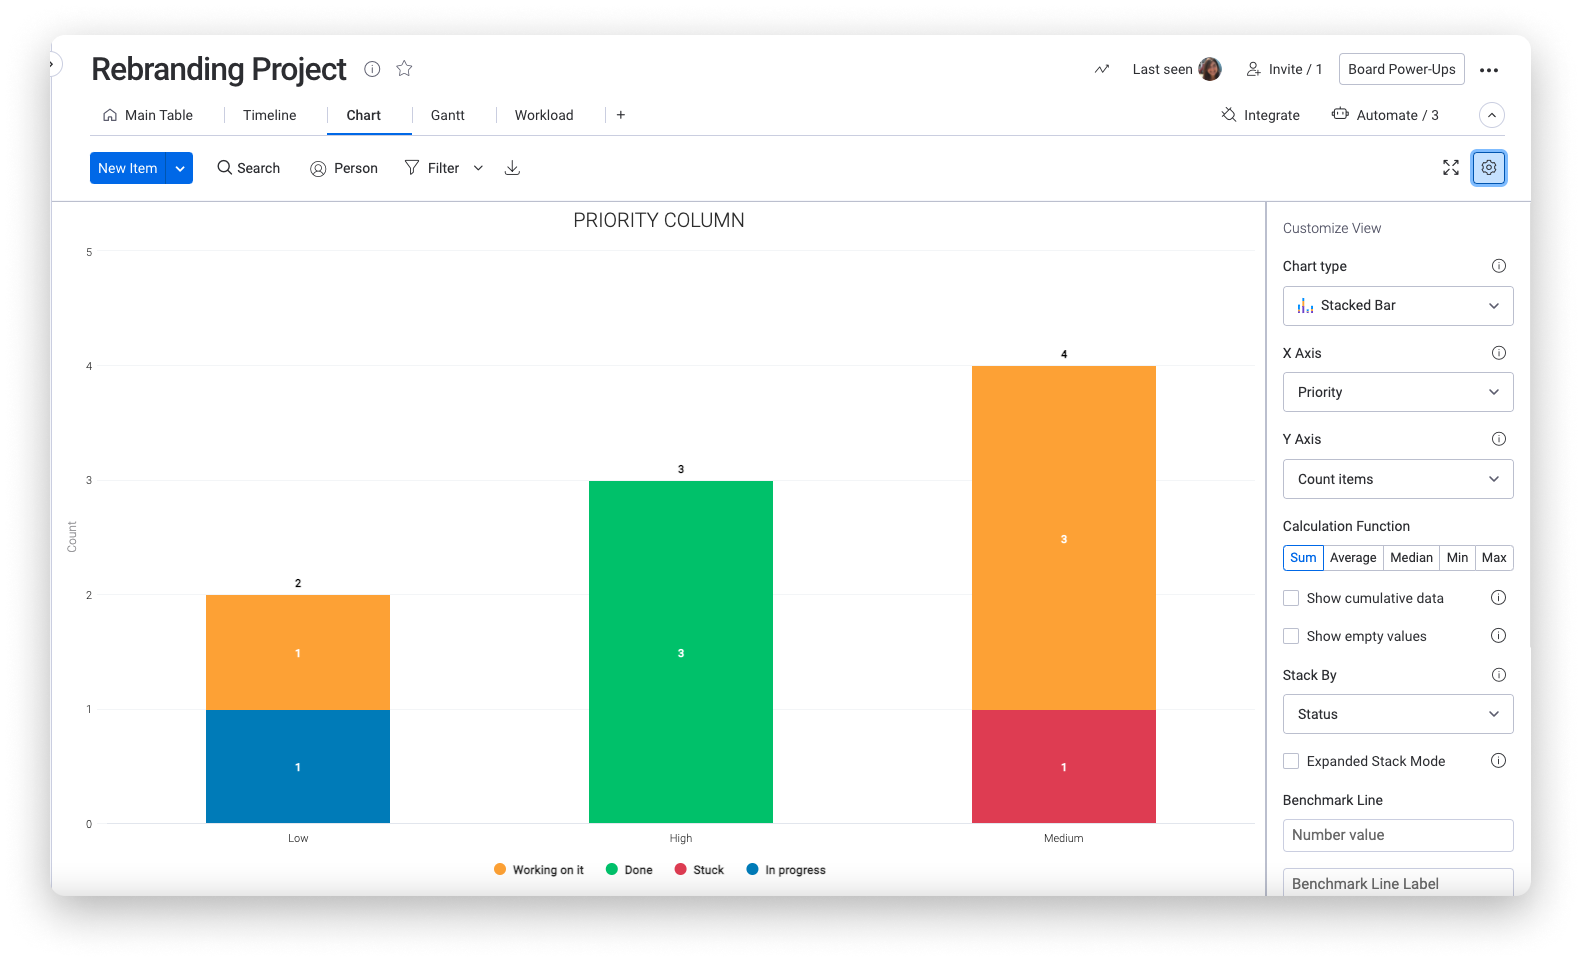
It is a great way to know where to invest our time and efforts and which resources to use for this project. In our case, we need to get a move on our medium-priority projects!
Keep track of time spent
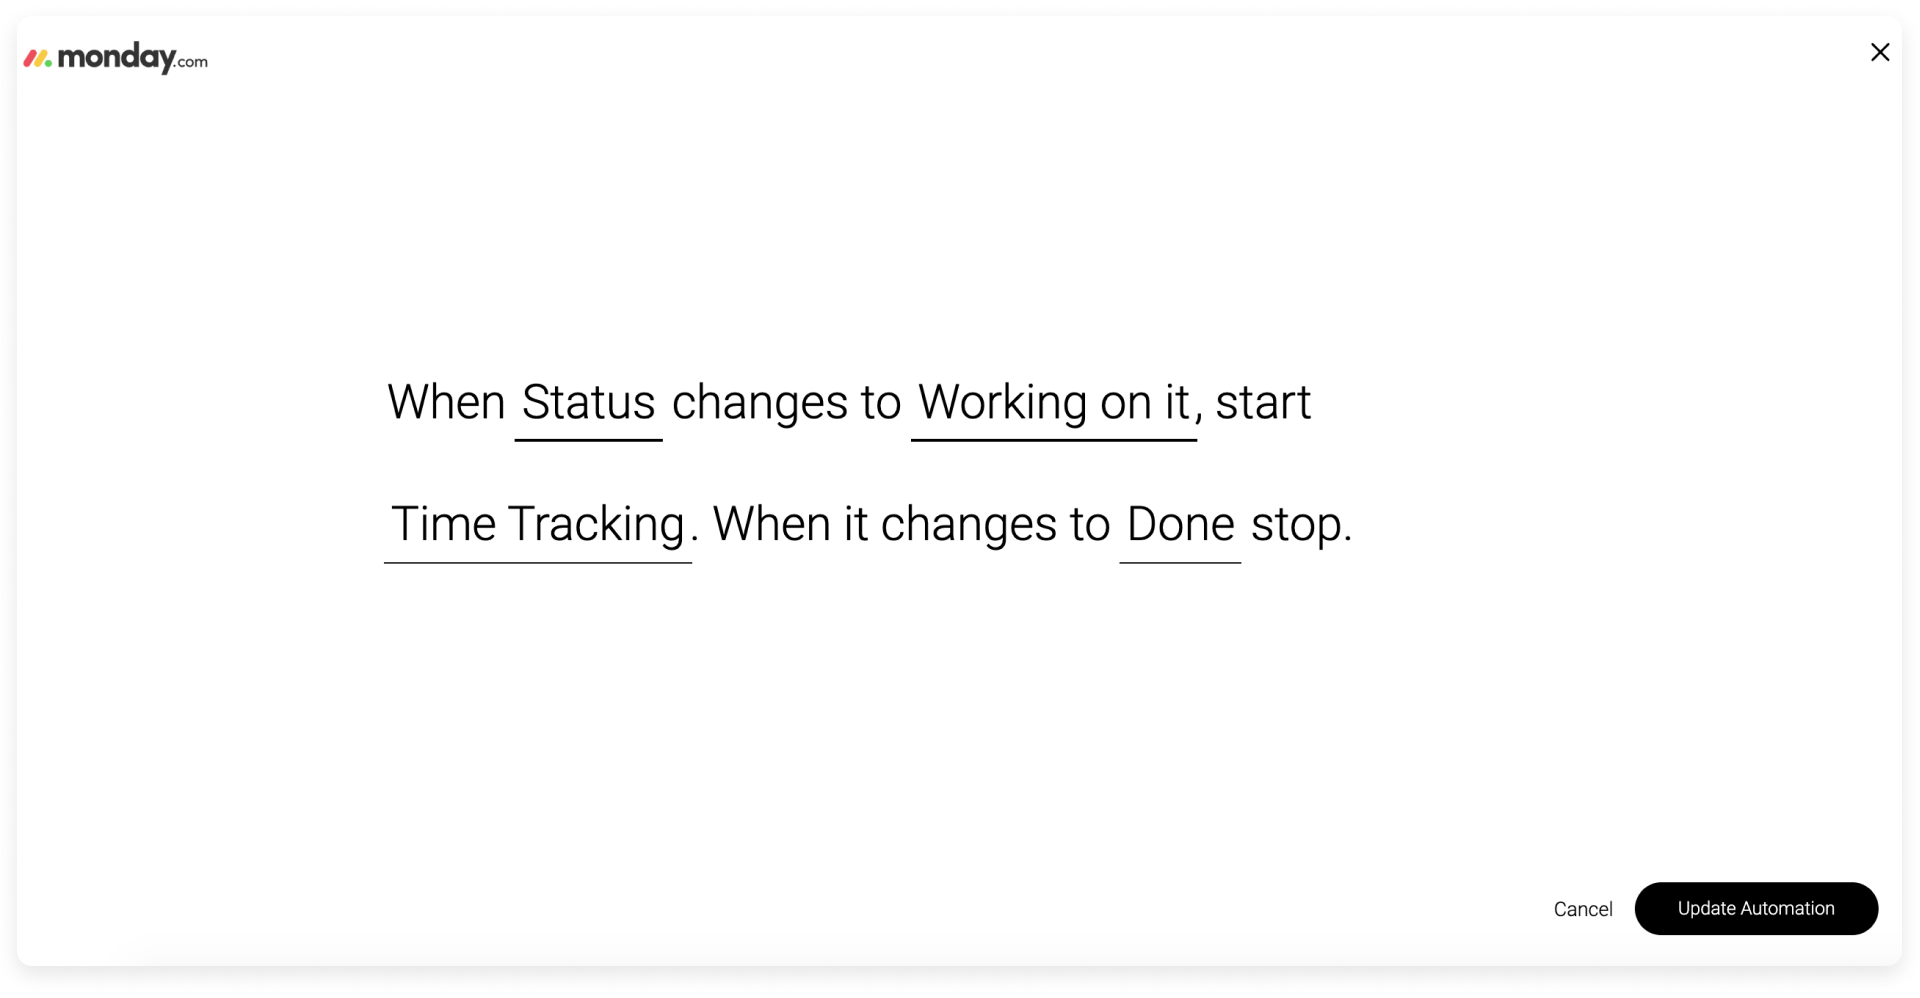
While having a time estimate column is useful, you can gain even more powerful insights by tracking the time your team is actually spending. This is where the Time Tracking Column comes into play.
With the Time Tracking Column, your team can press start to begin recording time as soon as they start to work on a task. We can even automate this process with our automations. With the below recipe, your timer will start and stop automatically:
If you'd like an easy visual to better understand the difference between your estimated time and your actual time, add the Formula Column. This will allow you to plan more accurately for similar tasks in the future:
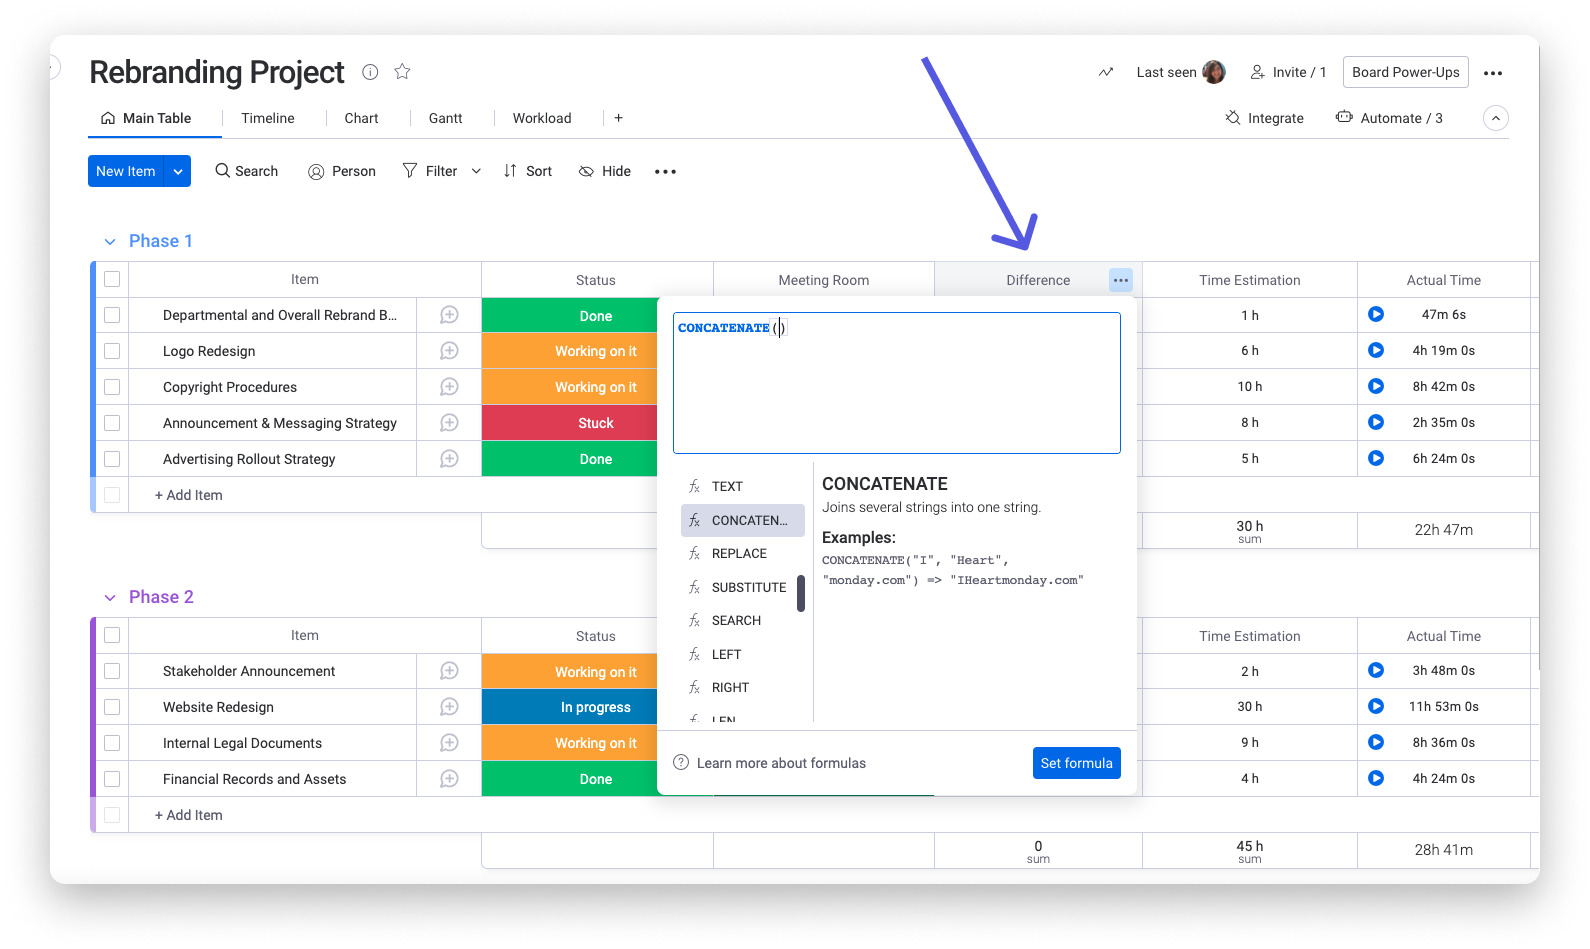
The formula used here is:
Get all insights in one place
To get an overview of what’s happening on your project or on your entire account, you can add additional widgets to your view or use a Dashboard! This is great to see how your team is performing, and to manage and plan your resources better.
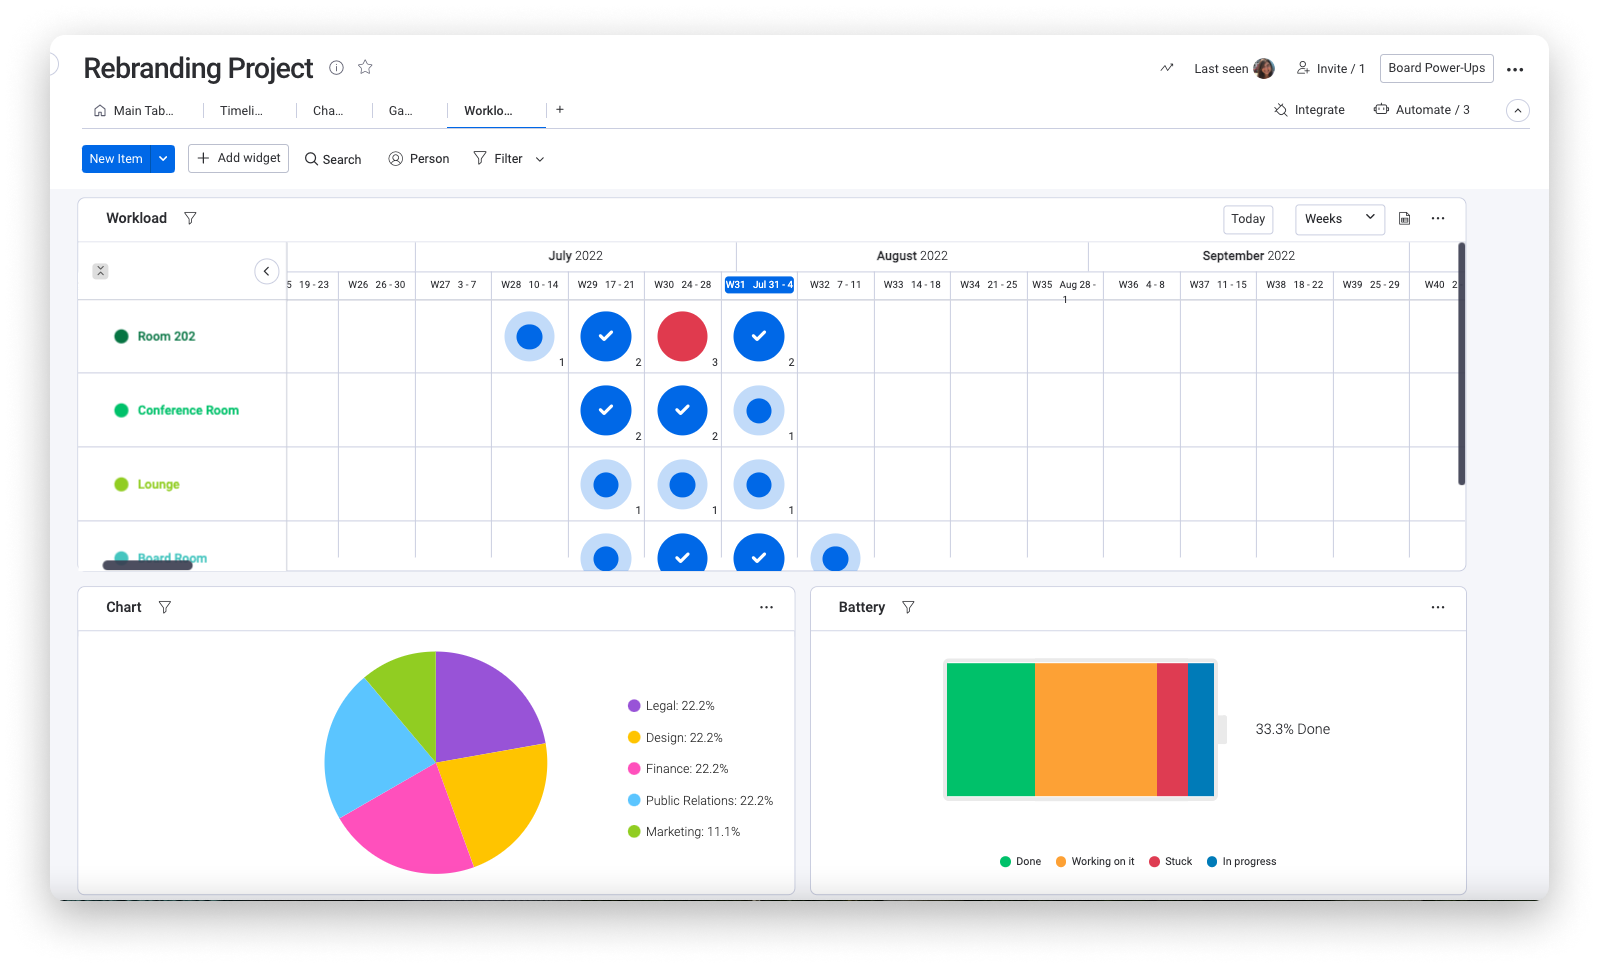
Here, we have used the Workload, the Chart, the Battery, and the Time Tracking Widgets.
If you have any questions, please reach out to our team right here. We’re available 24/7 and happy to help.
Comments