


Whether it's in tech, construction, or hardware, managing your project's life cycle from ideation to completion is nothing short of challenging. As a Project Manager (PM), you’ll be assigned to a project, be required to set priorities, align all your goals, and manage your resources throughout the different project life cycle stages, while communicating your results to internal and external stakeholders.
In this guide, we will walk you through how to use monday.com to streamline the entire project life cycle and its stages. We’ll show you how to create an approval process, a program high-level board (consisting of a collection of projects) and the individual low-level project board itself. We’ll touch on the relevant views and dashboard that will help you to better monitor and control the project's progress - all intertwined and connected by monday.com automations.
Set up your Projects Approval board
The cornerstone of our process will be the Projects Approval board. This board will create a seamless process to gather all future projects and ideas. It will allow stakeholders to review each project's business needs, to determine a project budget, assign the relevant PM and give the green light to move forward once approved. This board will be helpful whether you’re working on contractual projects, or when used by a committee to approve internal suggestions from the company employees.
This board is set up so that all new requests are received and then pass into the different groups or stages as they are reviewed and approved. The columns include details of each project which are important when considering whether to approve or reject the project.
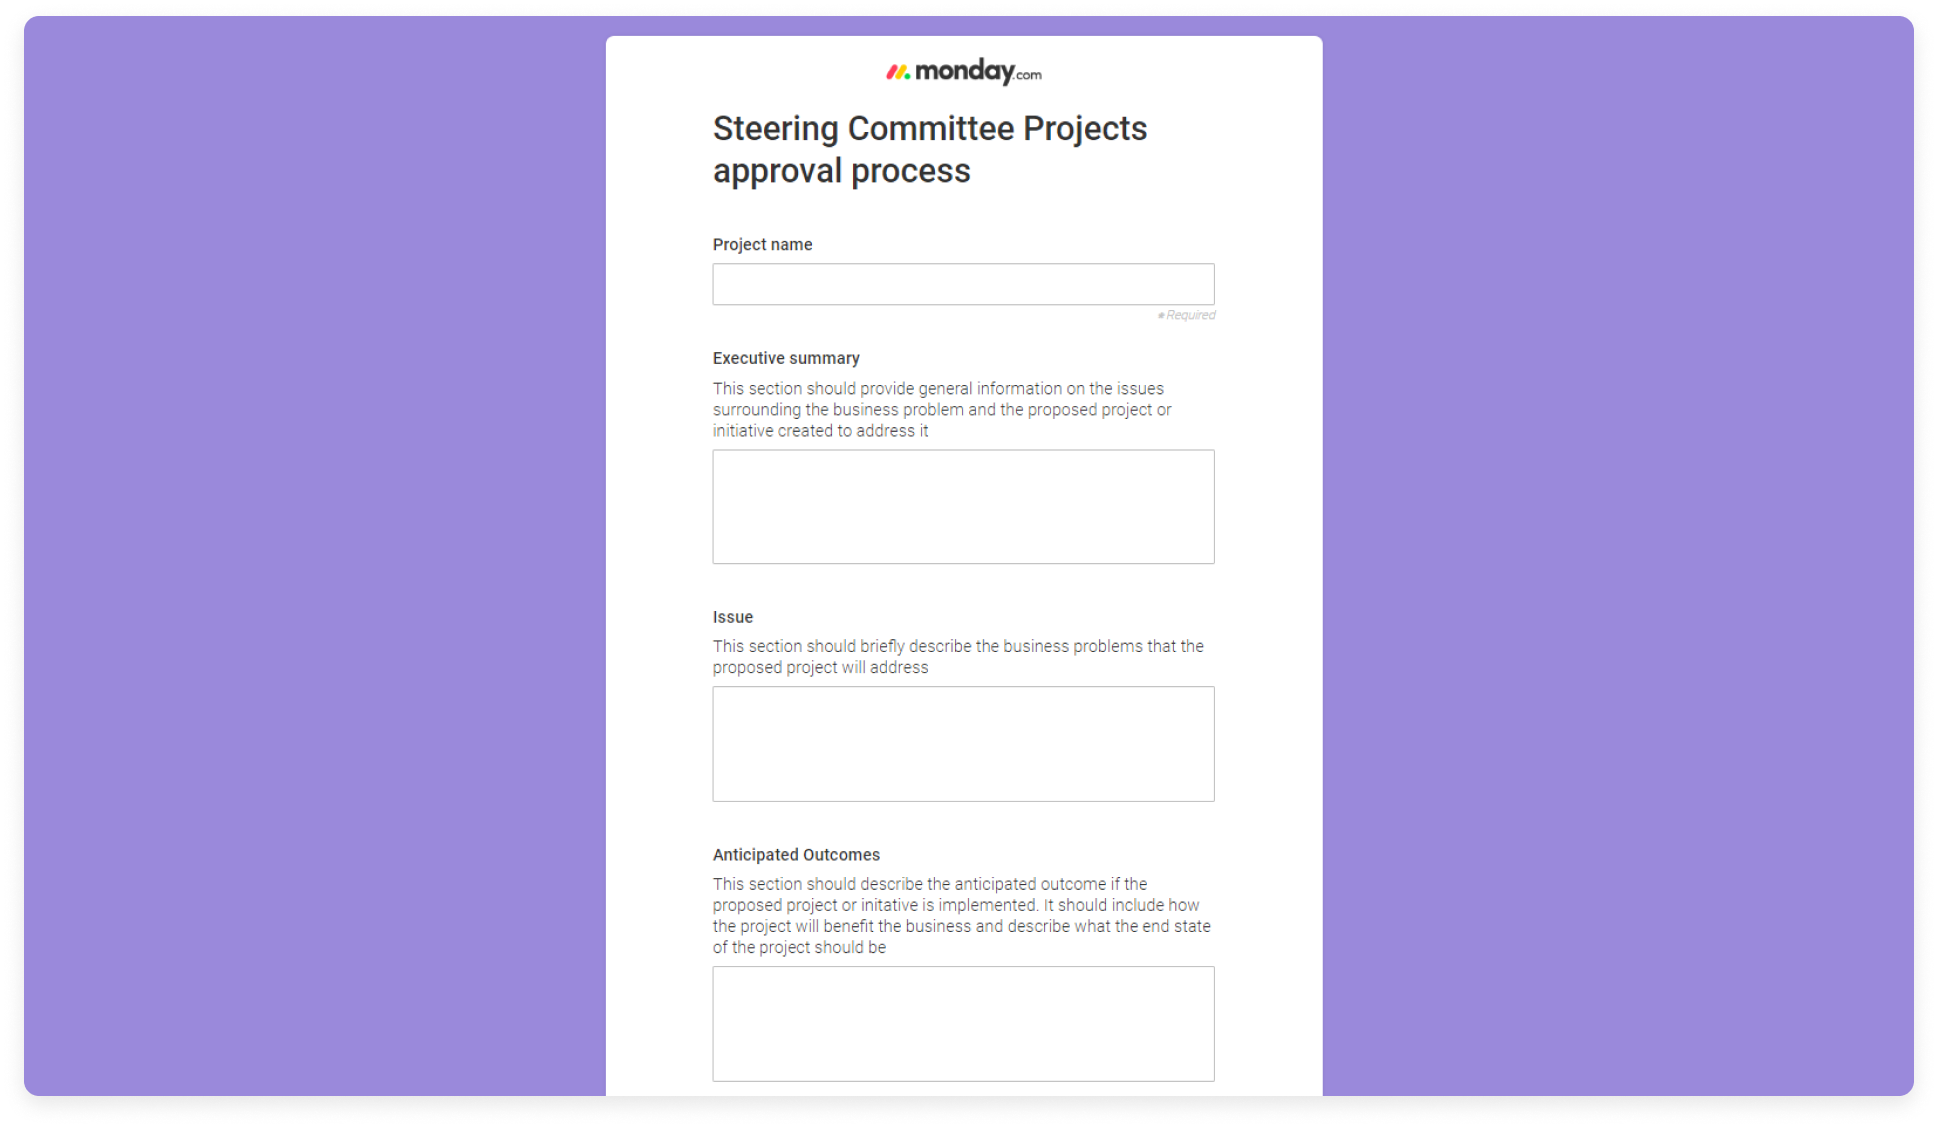
Gathering project ideas through forms
monday WorkForms help streamline the process of gathering ideas, suggestions or requests onto a single board. Thanks to the form view, any type of stakeholder (team members, managers or even external users) can add his/her project ideas by simply filling in the required fields that will help evaluate the business need of each project.
Once a new idea has been added via the form, it will automatically be added to the "New Requests" group at the top of the Project Approval board.
Creating your Program High Level board
Once all projects are approved, we'll need to list them to keep track and stay on top of things. The Program High Level board will help with this. While projects are temporary, one-off undertakings, programs contain multiple interconnected projects. The Program High Level board will be built in a way that helps visualize if all our approved projects are on the right path to achieving a larger business objective.
This board will be built directly and automatically from the approved projects in our Projects Approval Board. Read on to learn how!
Integrating with the Program High level Board
To create that smoothe collaboration between the Project Approval and Program High Level board, we’re going to add in an automation. Automations are helpful in keeping your workflows aligned, hassle-free as well as save you time on unnecessary manual steps.
The first cross-board automation we will use is to create an item in the Program High Level board with all the relevant information, once the proposed project idea has been approved in the Project Approval board. This automation will be triggered whenever the status label is changed to "Approved".

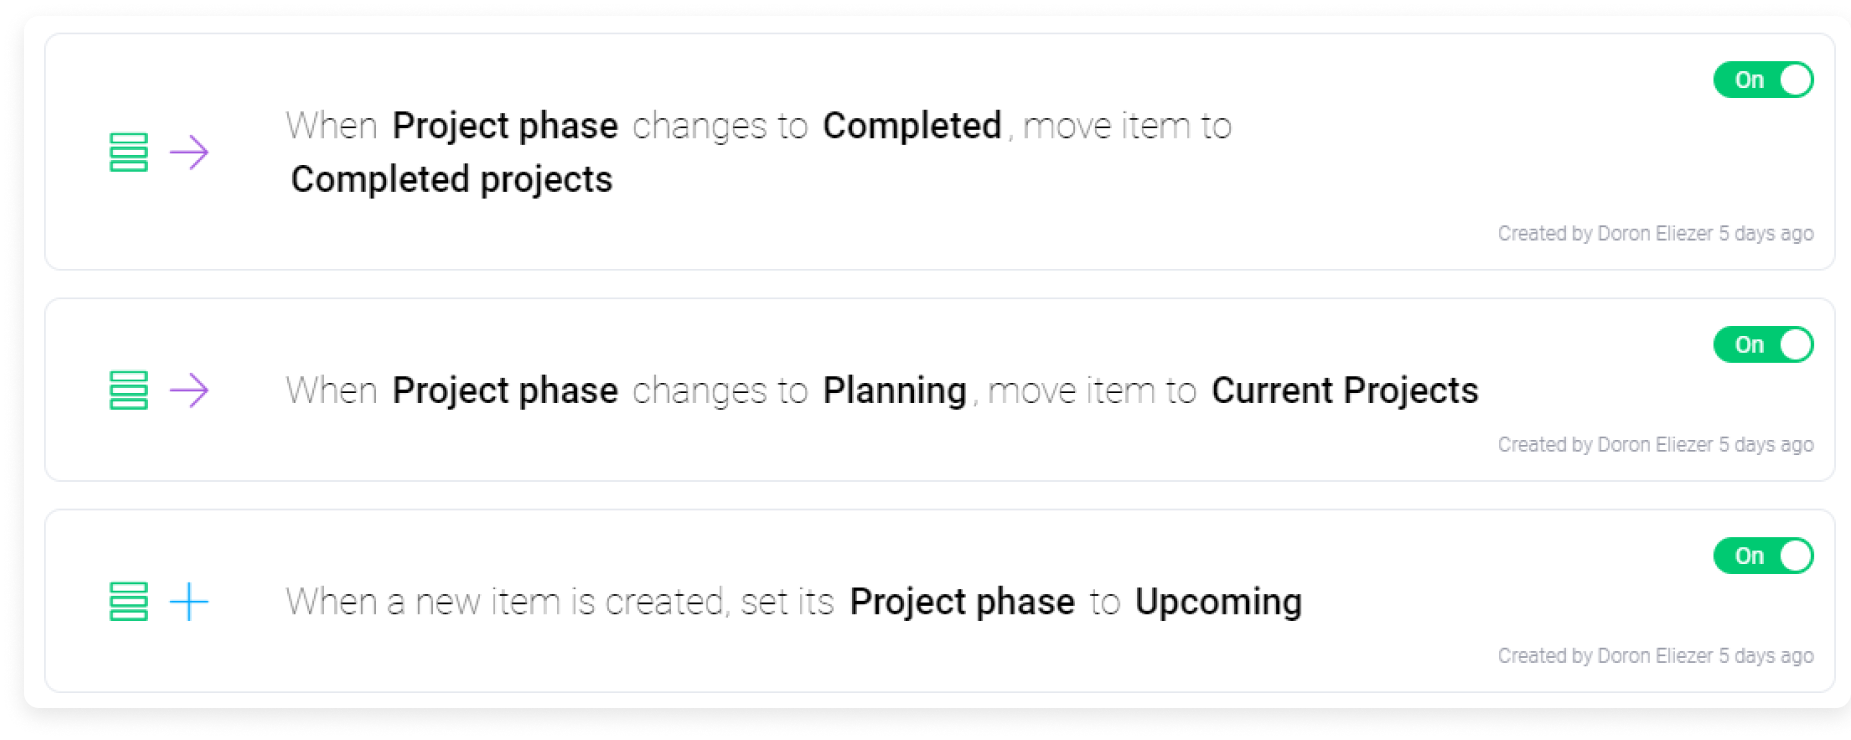
Once the new item has been created in the Program High Level board, it will move between the different groups to indicate where it stands (ie. upcoming, current or completed projects). It too will automatically be moved accordingly through the different groups on the board with the help of automations, whenever the “Project phase” status column is changed. For example, whenever the "Project phase" status changes to "Completed", it will be moved to the "Completed projects" group.
Managing and tracking each project on a Low Level Board
The Program High Level board we just saw is great to see the big picture and make sure we’re working towards a common goal on all our projects. However, it is not the place for PMs and the team to manage and track their project activities in terms of scheduling, effort and cost management- this will require a dedicated, low level board.
In order to create this low level board, automations will once again come in to play here. When the “Project Phase” status on the Program High Level board changes to “Planning”, an entire project board template will be created. This board will be created directly inside the dedicated “projects” folder. From this project template board, PMs can start drilling down to the details and start moving forward on the project.

Let’s take a look at the low level projects board just created, which we will call "Project Romeo" for our purpose.
HERE
Low Level Board - Project Romeo
The low level board that was created from the "Program High Level" board above, provides the PM and the team with a deliverable-oriented breakdown of the project into smaller components or work-packages. This board supports all aspects of the schedule, effort, and cost management. Let’s break these down and see how each one can be implemented on the board with the help of different board features.
- Schedule Management
Setting Baselines and Dependencies
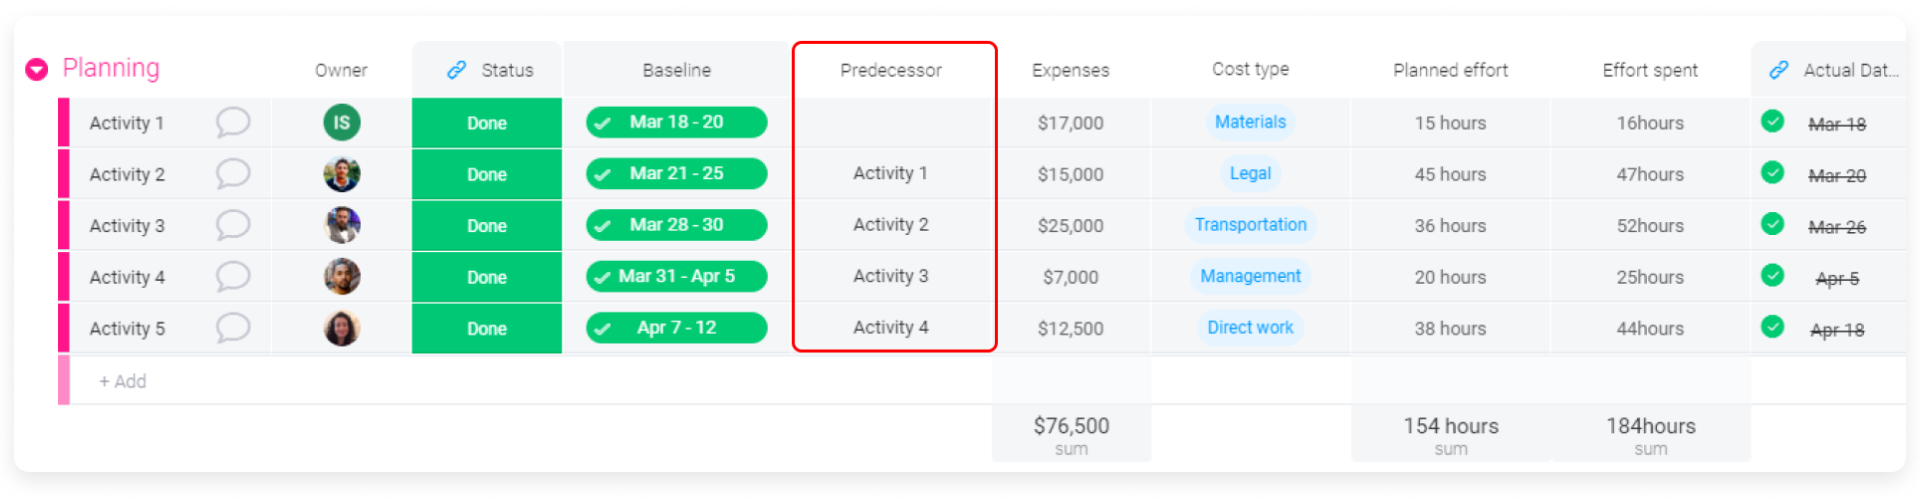
The timeline column on this board offers us the ability to plan our project “baseline”, the planned time frame that we wish to complete the project in. It gives us a visual way of understanding how each of the activities making up the project stack up in terms of time. We can then use the Dependency Column (called “Predecessor”) to connect the different timeline activities in case of any future changes - a change in one activity, will lead to a change in another.
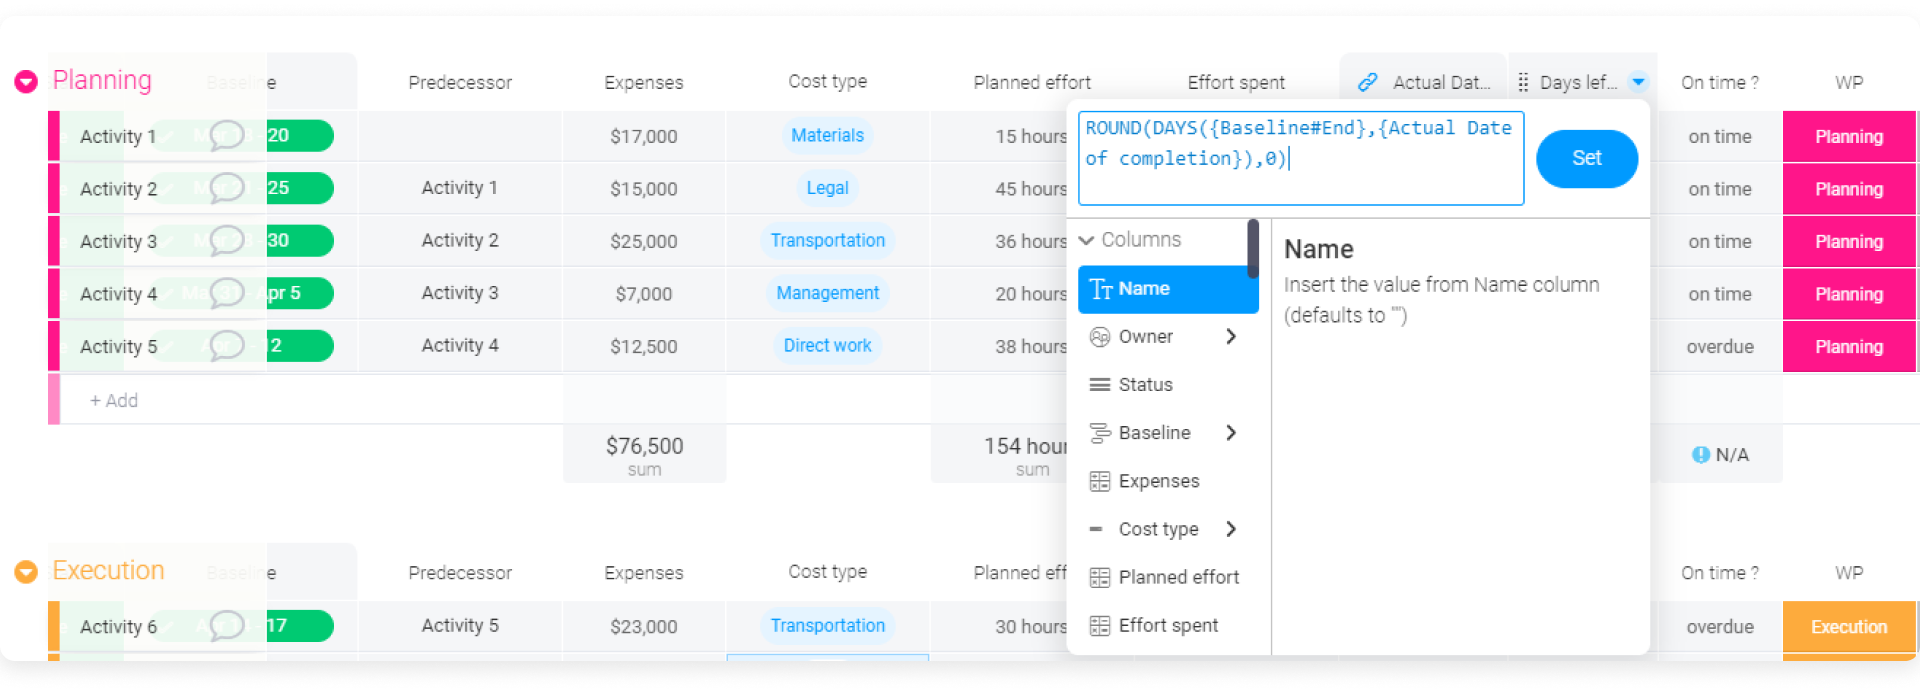
Planned vs Actual
Now that we have our baseline set, there are bound to be changes in the timelines of various activities. To measure our planned baseline compared to the actual completion date, we created an automation. This will help us document the actual date of completion whenever the Status Column of the activity changes to “Done”.

Once we have the completion dates filled in, we can use a Formula Column to reflect the lead or lag time for each activity and later use it for different reports to gain better insights about our planning process.
Milestones
Milestones are specific points along the project timeline. It’s important to be able to distinguish them from other activities, so for that reason, we've added them clearly to our board and timeline. Setting milestones is easily done by clicking on a specific date on your timeline popup window and then, "Set as milestone". Milestones will be clearly visualized on the Timeline view and on the board itself in the shape of a diamond.
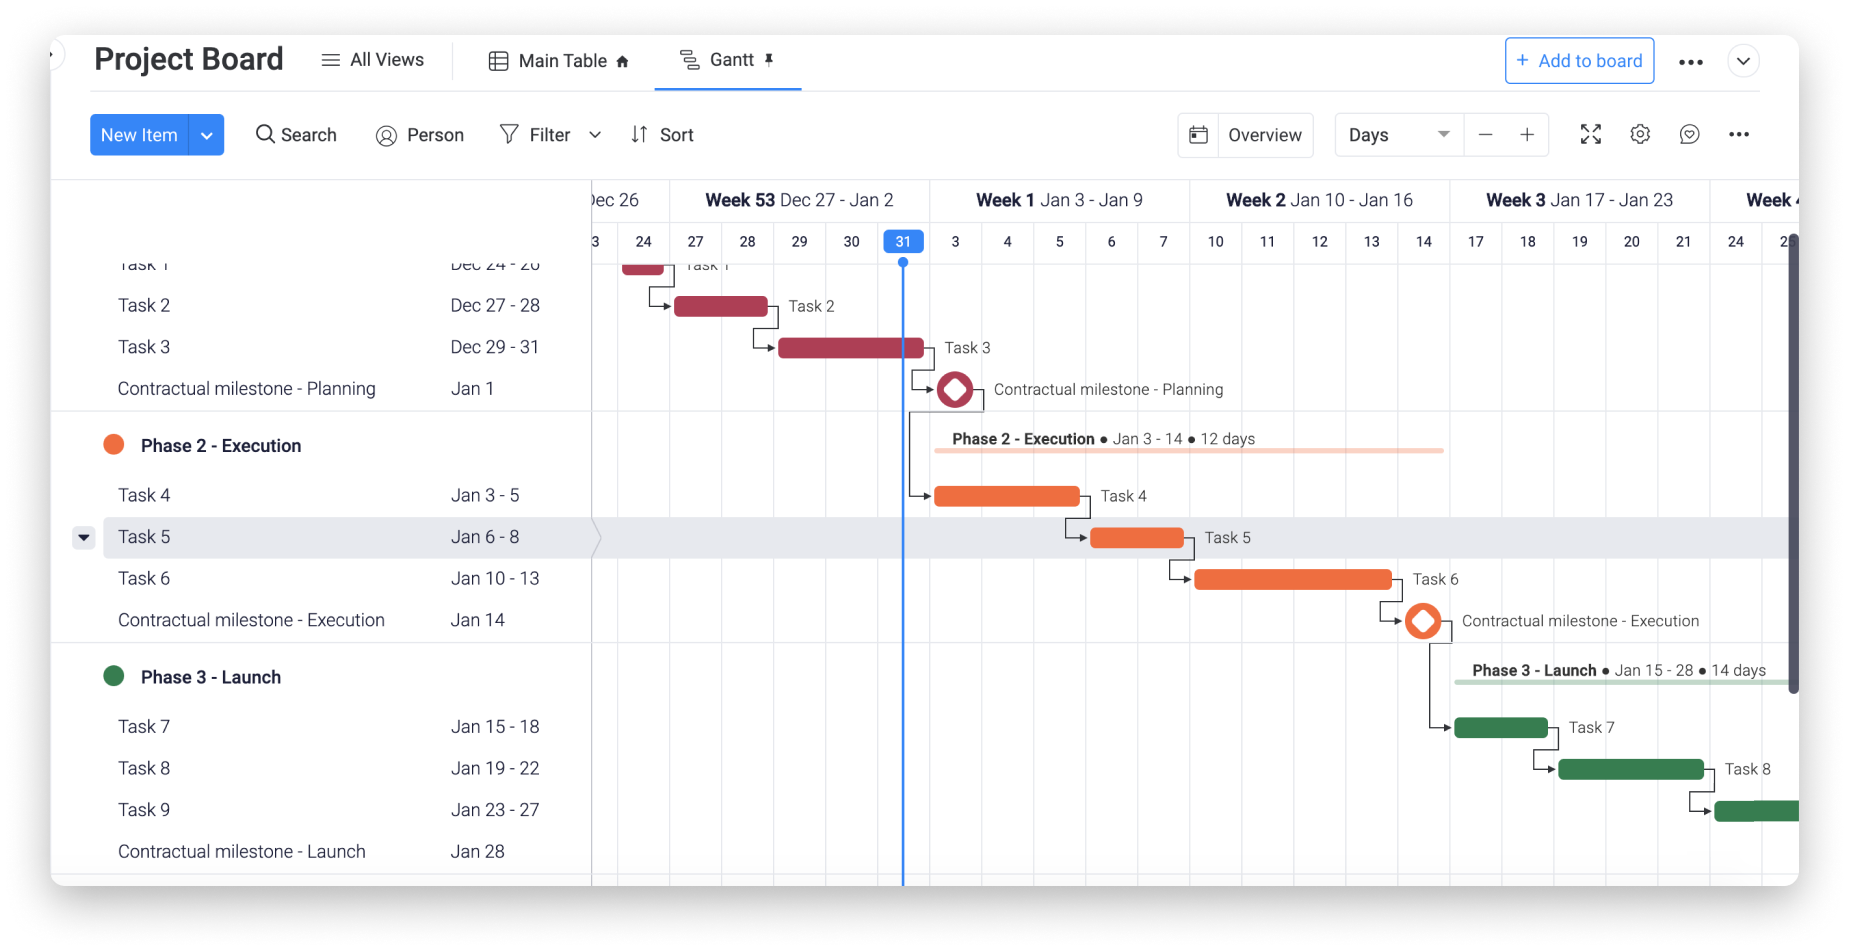
Gantt Chart
Setting up our board in such a way allows us to present the project Gantt Chart by the different project phases and to visually distinguish the milestones from other regular activities. To do so, the Gantt View can be added, and organized by activities and milestones per group.
When viewing the Gantt Chart, milestones will be displayed clearly according to project phase as singular icons on the view.
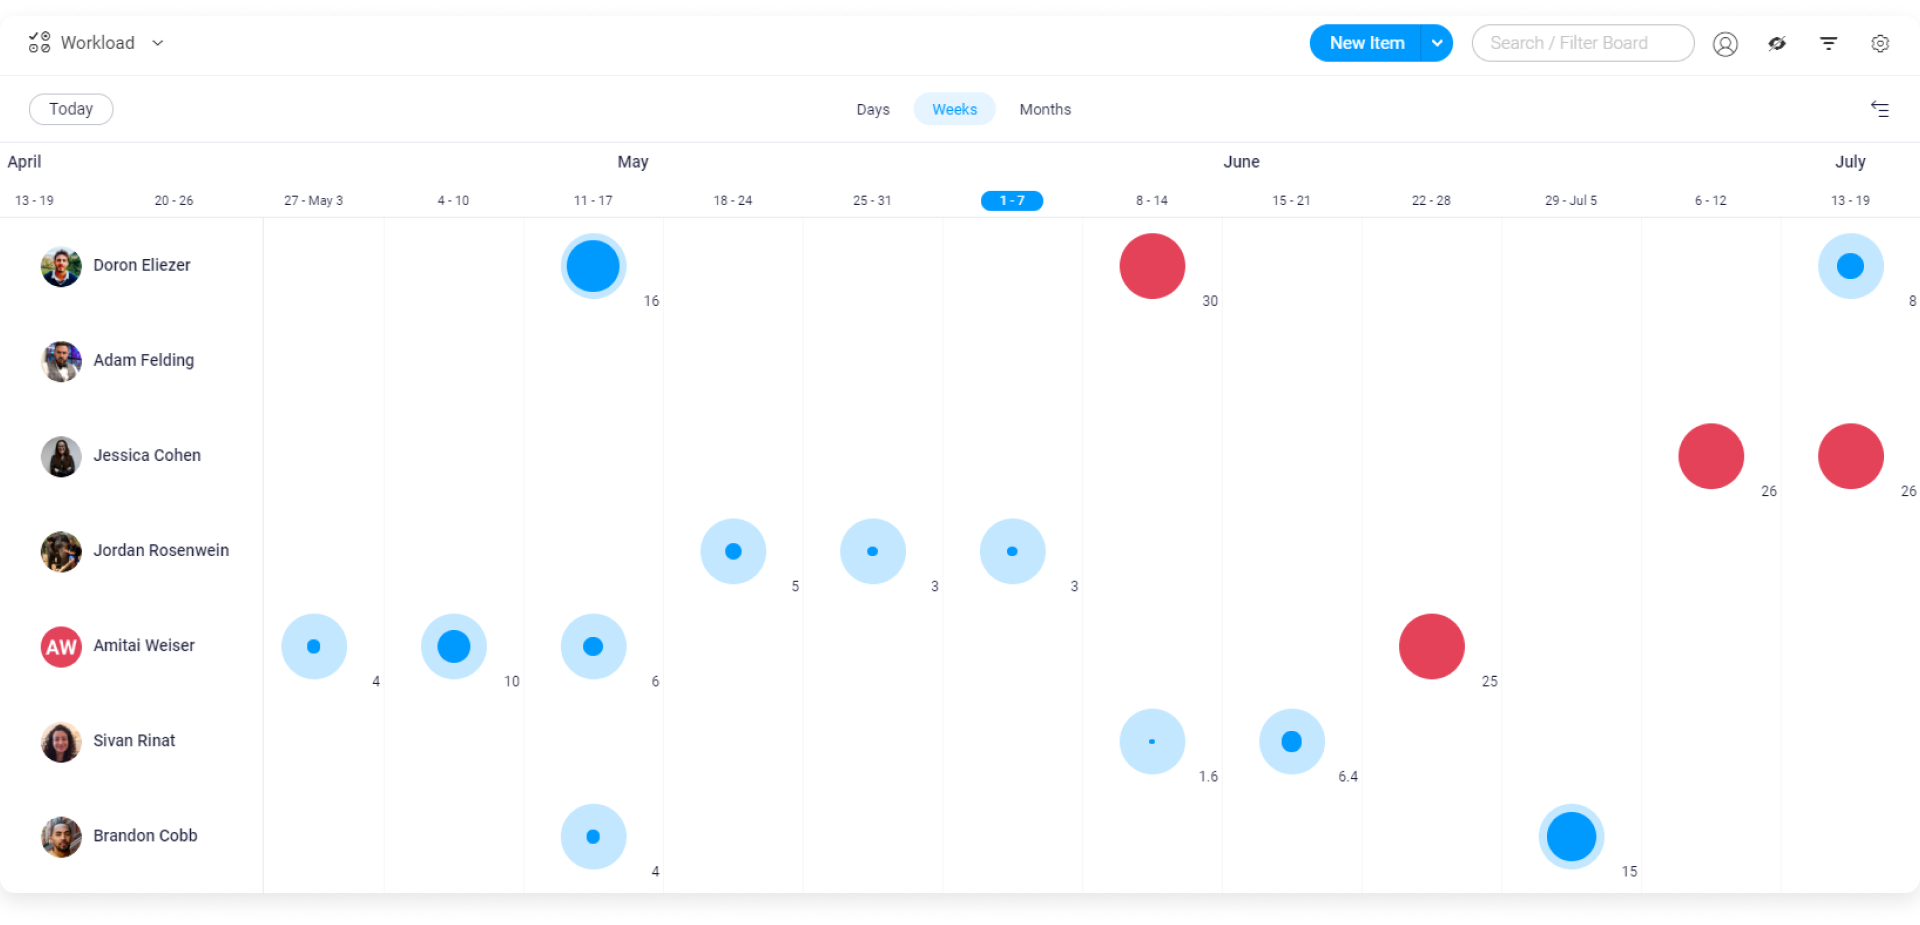
- Effort/Workload Management
Every PM needs some form of structure to plan and aggregate the team effort required for each activity, and to be able to identify bottlenecks and drive the project’s progress.
With the help of the Workload View, we can see the predicted effort management by team member for the entire project moving forward. Here, you can see who is over or under-assigned to activities, and adjust team members' workloads accordingly.
- Cost Management
Tracking Actual Expenses
It is essential for every PM to track the different expenses of the team, to segment these expenses, and to make sure they are not exceeding the project-approved budget. To track expenses effectively, we've added a Numbers Column on this Project Romeo board to reflect the different expenses for each activity as well as a Dropdown Column to track the “Cost type”.
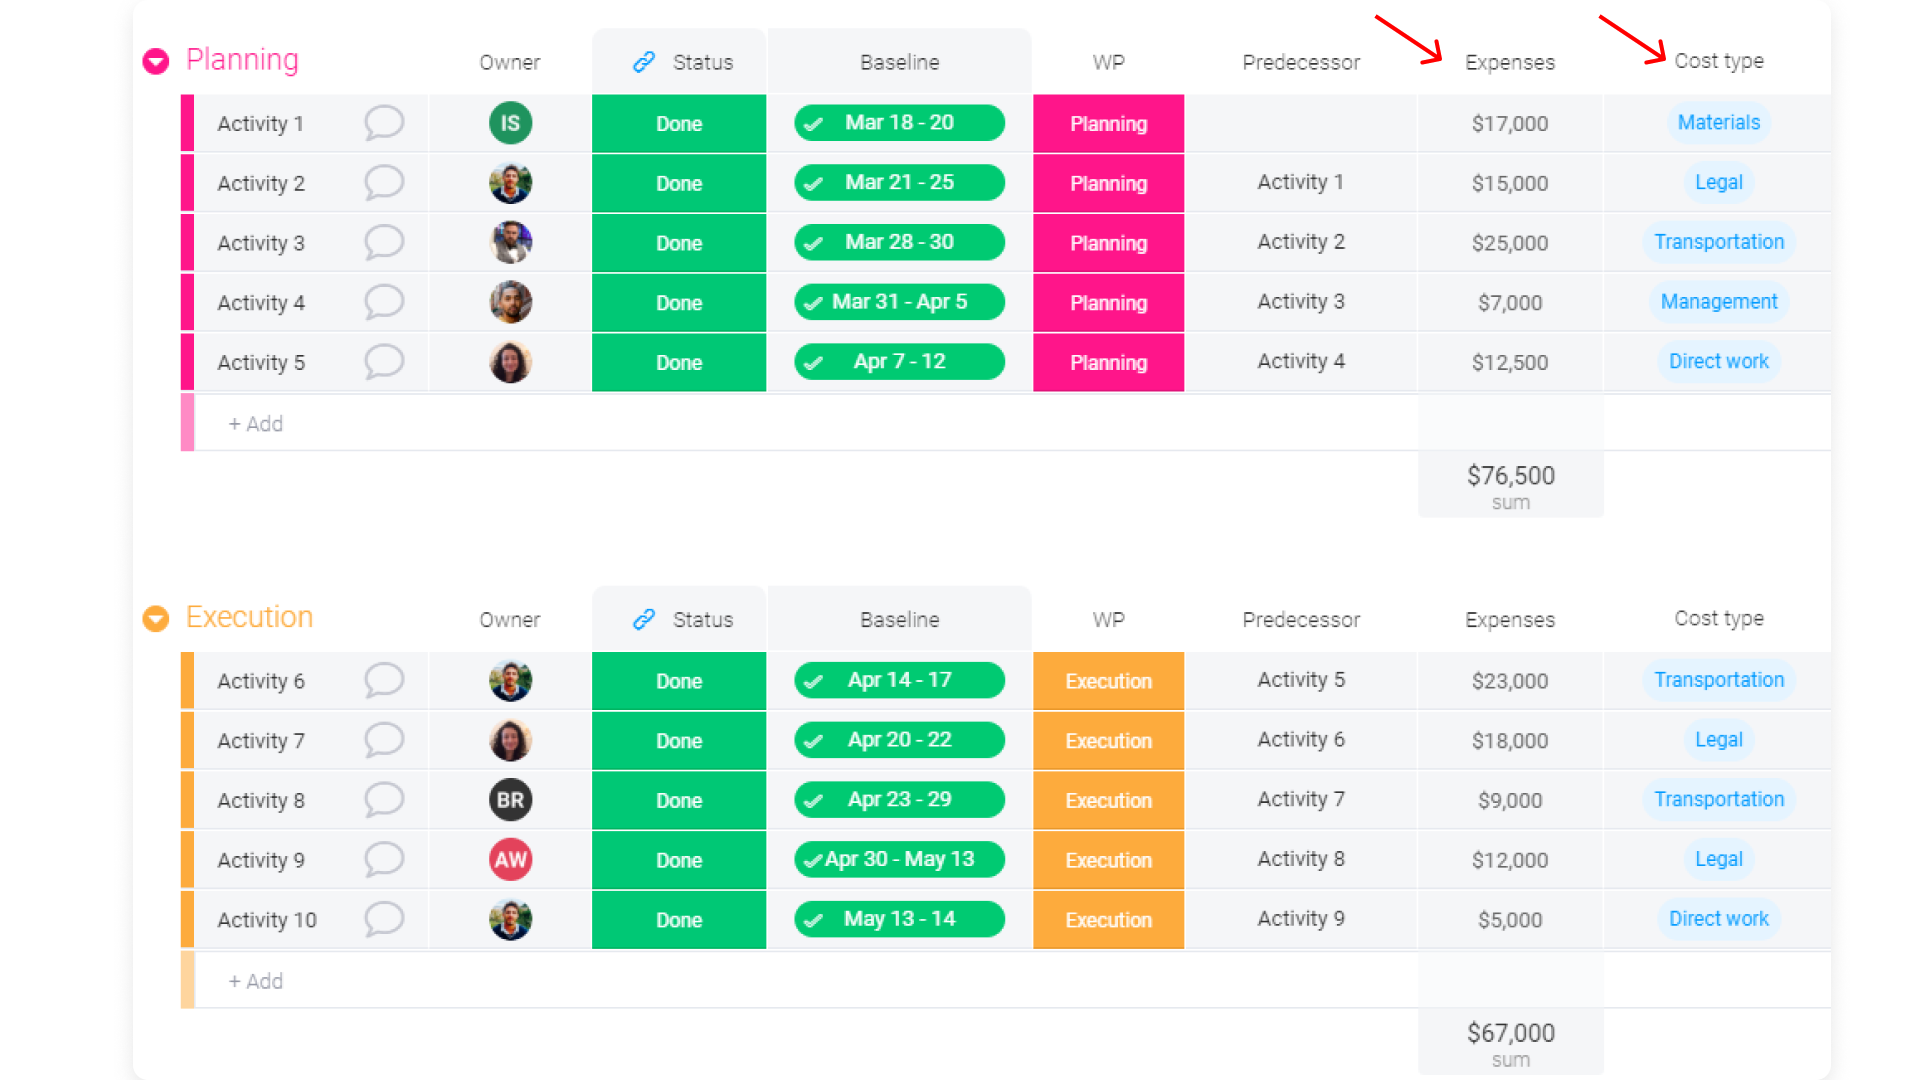
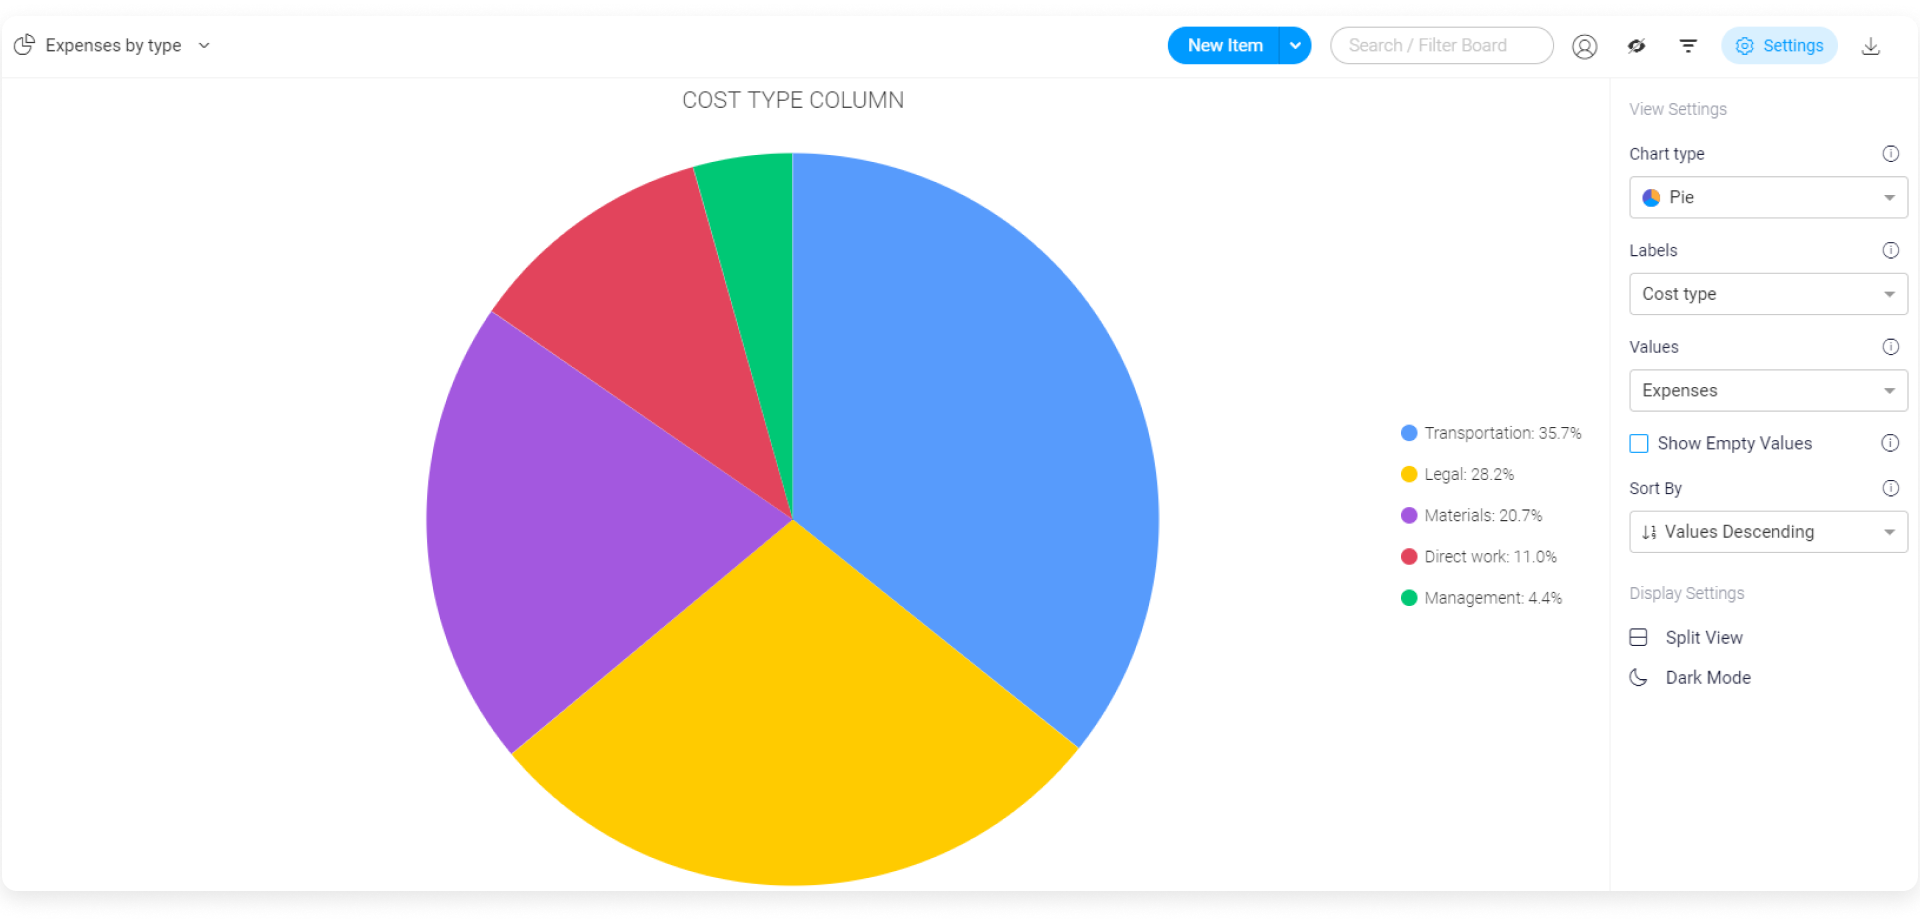
Chart View
The two columns mentioned above (Expenses and Cost type) will help us better analyze our costs in terms of cost segmentation. An analysis can be done using the Chart View by simply setting it up to display the breakdown of costs based on their type.
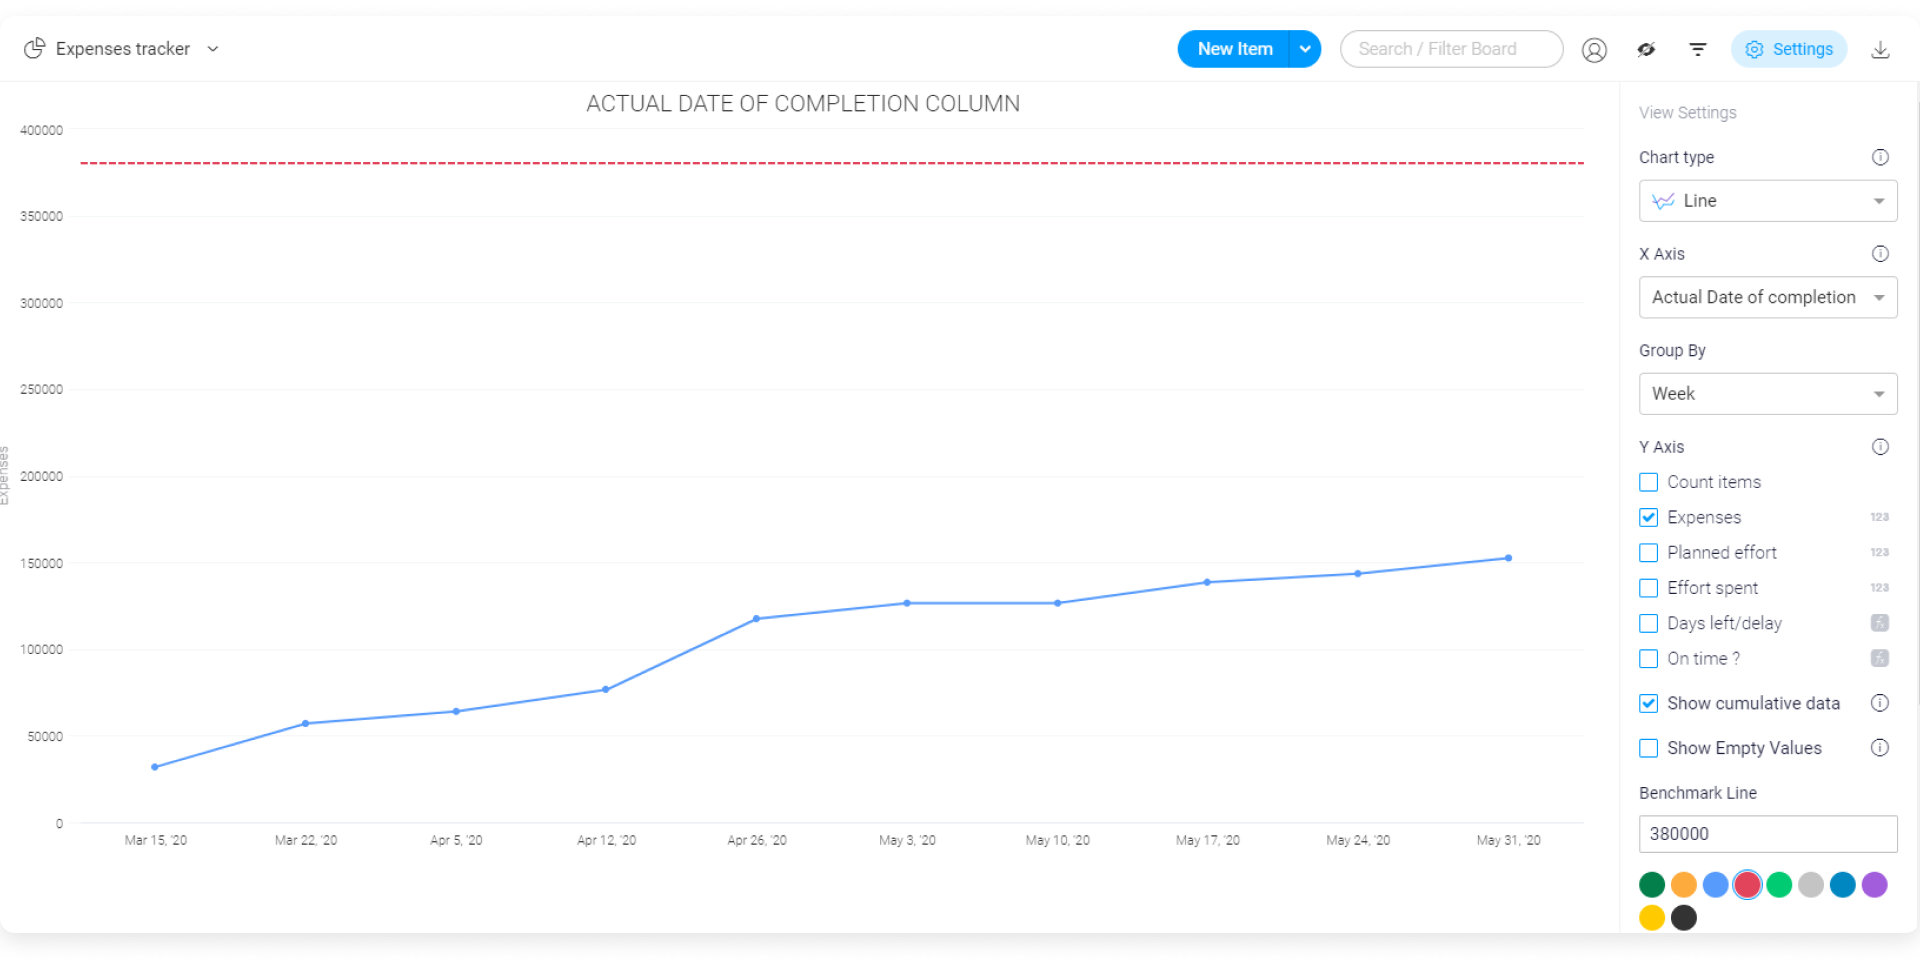
With the line graph, we can also view the cumulative costs vs approved budget.
There you have it! All the necessary requirements to set up your low level, project board - now you can take care of schedule management, workload management, and cost management all in one place!
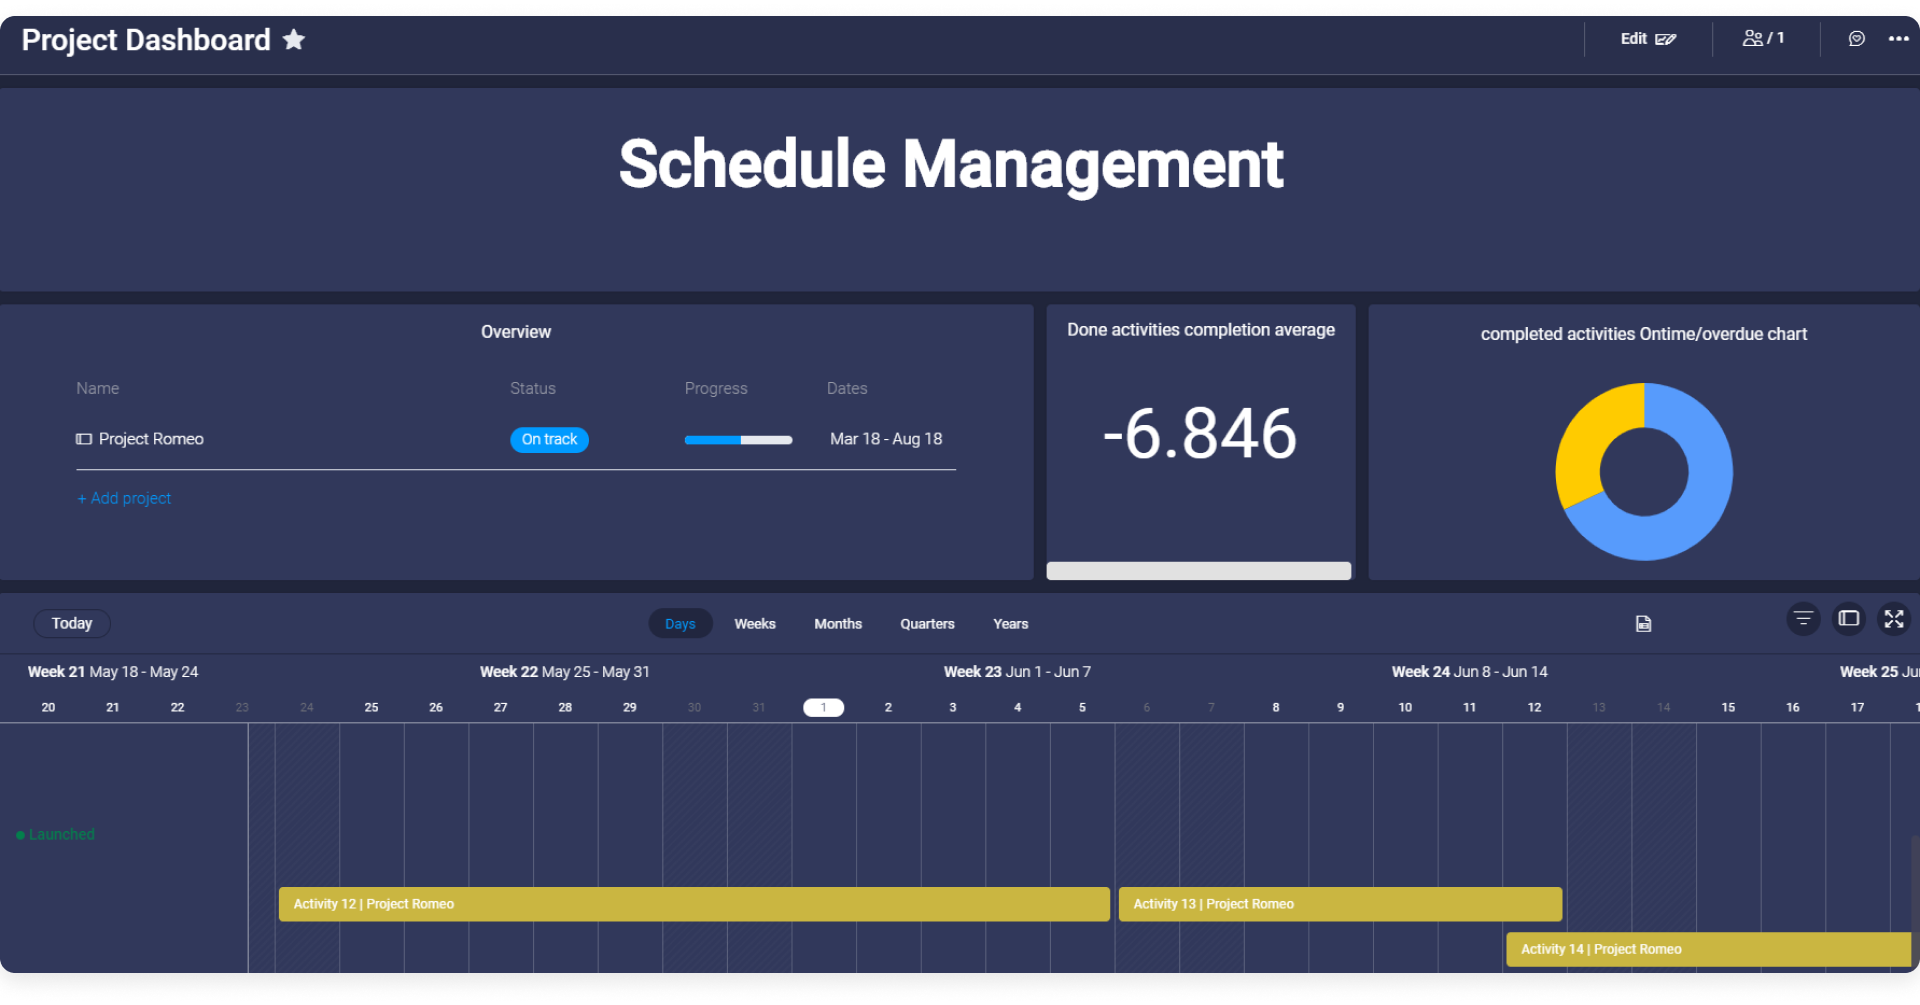
Get Insights From All Project Aspects With a Dashboard
Dashboards are a great way to display all important metrics in one place. They allow you to keep the project team focused and motivated on high-level goals and boost the project productivity!
On our "Project Dashboard", we've used the following widgets to show meaningful information:
- Overview Widget - to reflect the overall project progress based on the timeline and “Done” activity statuses.
- Timeline Widget - to display the entire project timeline grouped by the different phases of the project.
- Filtered Numbers Widget- to indicate the average lead or lag time between planned dates vs actual completion dates.
- Pie Chart Widget - to reflect the percentage of completed activities “On time” or “Delayed”.
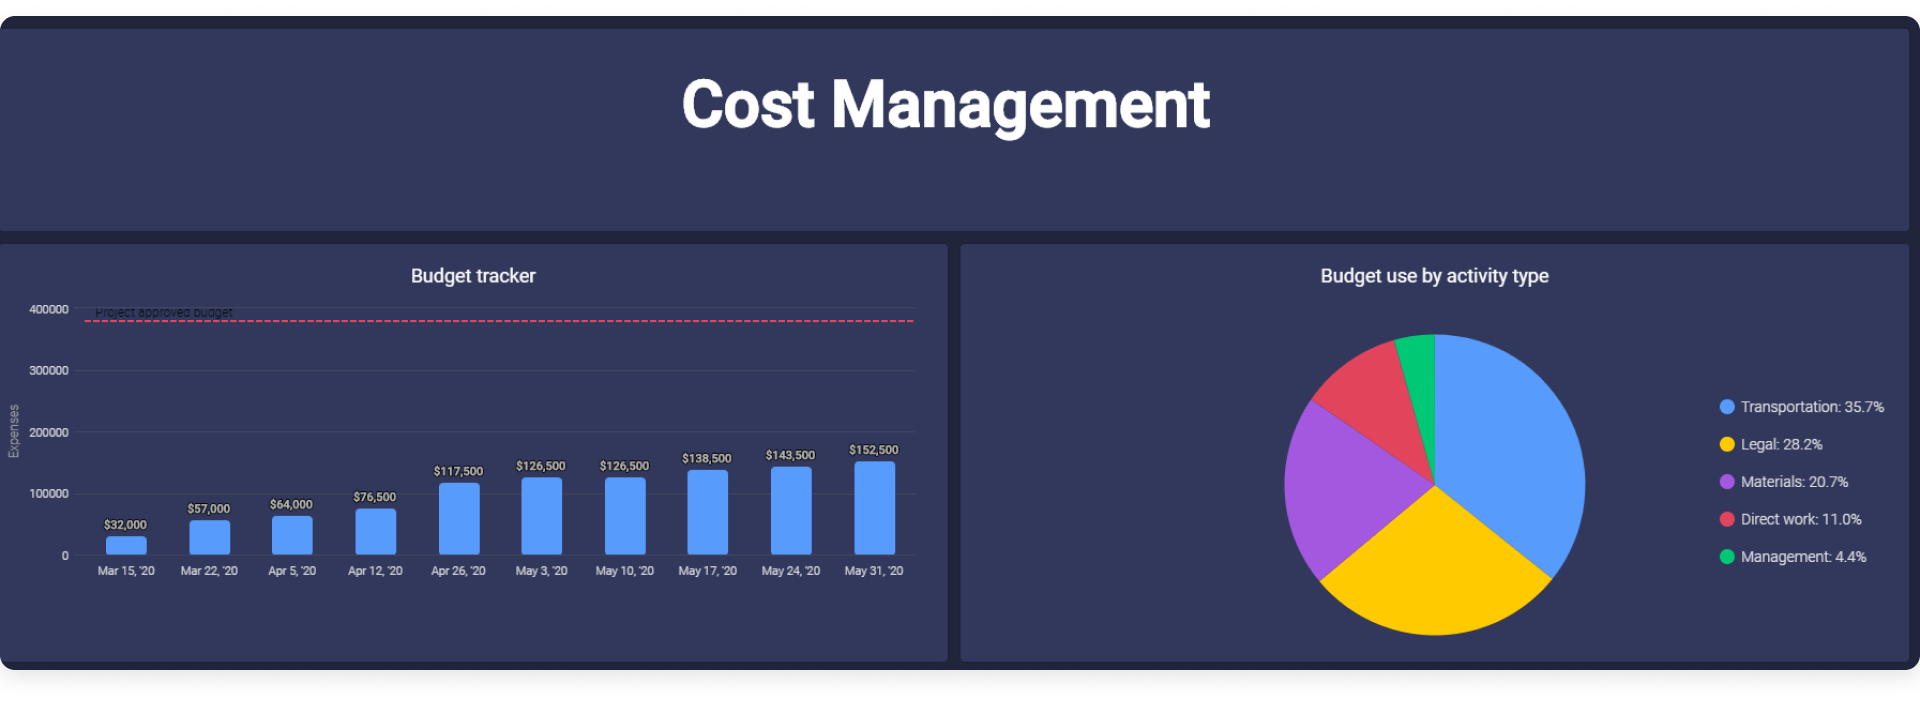
- Cumulative Bar Chart - to track the cumulative expenses throughout the project.
- Pie Chart Widget - to show a breakdown of expenses by type.
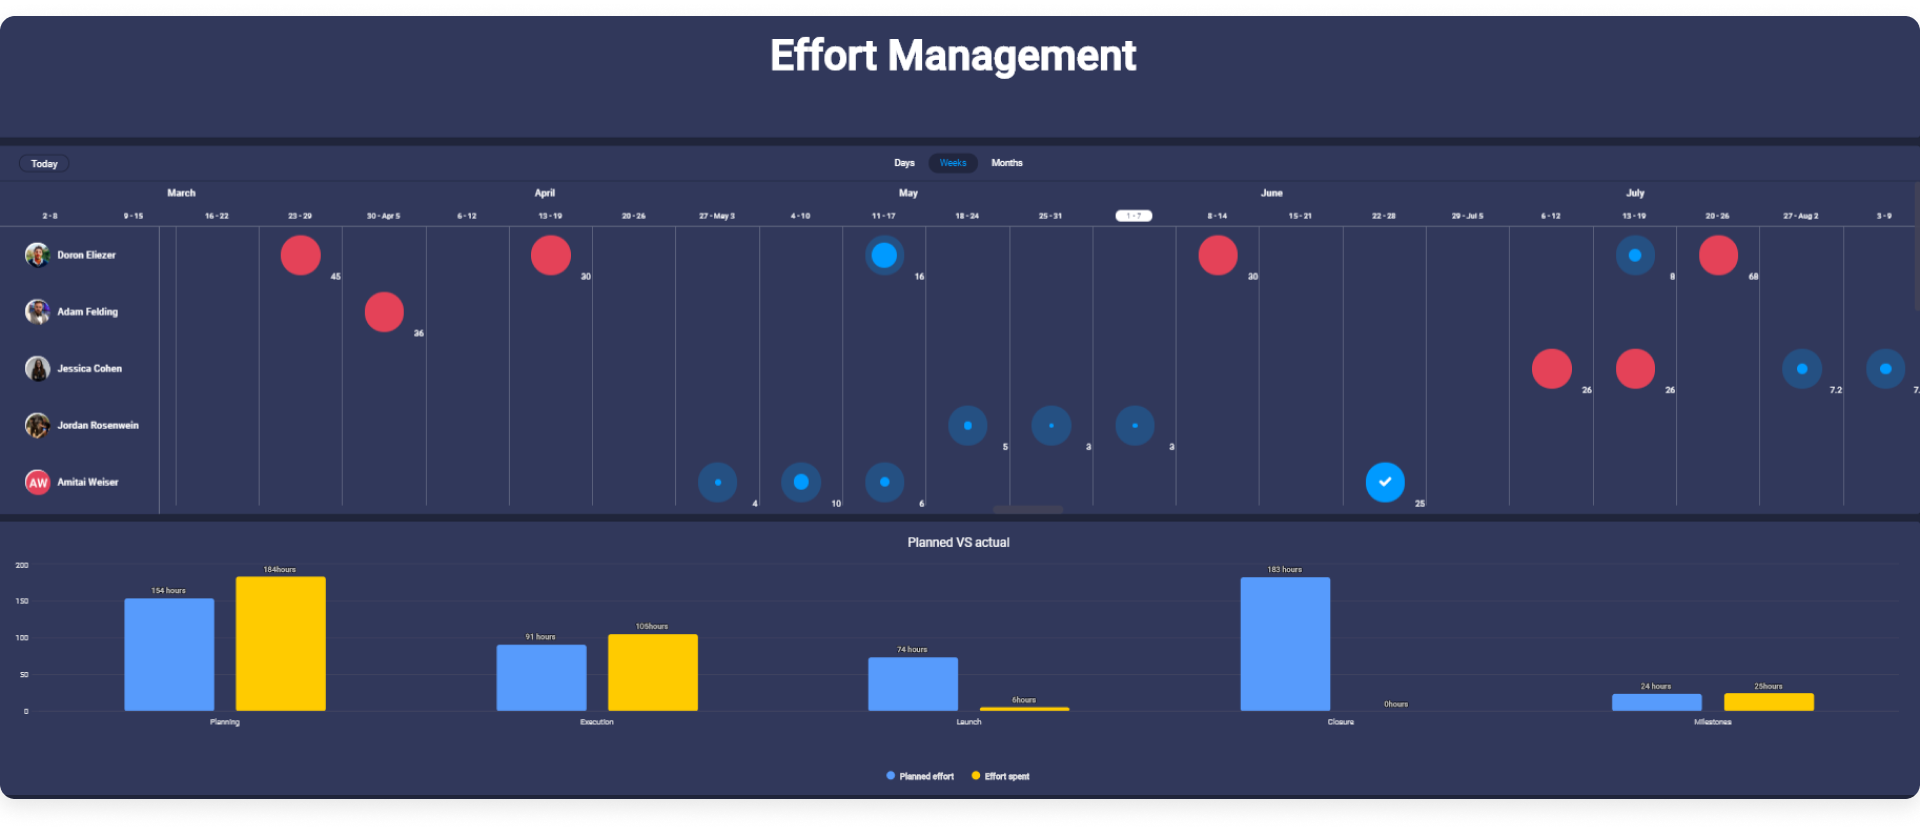
- Workload Widget - to track the different team members' workload based on their expected effort and activity timeline.
- Bar Chart Widget - to compare the planned vs actual effort needed at various different stages in the project life cycle.
View and update data on the go with the mobile app
The mobile app will allow you to collaborate with your team right from the palm of your hand! It's perfect if you're on the go and want to stay in tune with your team members. View your dashboards, board views, and boards, and pull your mobile out of your pocket to update information the minute it becomes relevant! You can even use the mobile app in offline mode to collaborate with your team from the field, or even on the subway on your commute to work! Check out this article to get started!
Summary
To summarize our project management workflow:
- Projects are submitted to the platform using monday.com Forms and then reviewed and approved on the "Project Approvals" board.
- Cross board automations generate the approved projects in the "Program High Level" board to provide the team with an overview of all of their projects.
- When the project's status changes to “Initiating” on the "Program High Level" board, a new low level project board will be created automatically in the projects folder and an automatic notification will be sent to the relevant project manager.
- The low level project board will serve the project team to manage their different work packages and to measure their activities’ execution in the fields of schedule management, cost management and workload management.
- Each project's team will also have the ability to document their risks in the "Program Risk Register" and utilize it to monitor, analyze, and respond to each risk.
- The project's team will have a dedicated "Project Dashboard" that will consolidate all the critical aspects of the projects that they need to track during the entire project Execution, Monitoring and Control Phases.
Just like that, you're all set and ready to get started using monday.com as a Project Management Information solution.
If you have any questions, please reach out to our team right here. We’re available 24/7 and happy to help.
Comments