Working at a marketing agency often means juggling multiple customer projects at the same time. With this, each project will go through many different hands and stages until it reaches its endpoint, and even then, new projects and challenges may arise along the way.
Having one central place to track multiple projects and to keep everyone on the same page is the key to success and productivity!
Why use a 'Customer Projects' board?
When managing multiple projects for numerous customers, you need to easily be able to delegate tasks to teammates, communicate with your customers, meet deadlines, manage resources and oversee entire projects from start to finish. With such a dynamic flow, the need to have one central hub to manage customer projects is more crucial than ever, and a 'Customer Projects' board allows you to have just that!
monday.com provides the perfect platform to keep track of all the information that you need, making sure that you’re able to provide the best possible service to your customers. Keep reading to help you get your customer projects hub set up on monday.com!
Get started with a template
To help you seamlessly get started with managing your customer projects on monday.com, check out our pre-made templates! In this guide, we'll incorporate boards, views, automations and more that you can find ready-made to customize to your own liking.
2. Start customizing your board!
- Groups
We’ve divided up this board based on our different clients, such that each group will represent a different client and their respective projects.
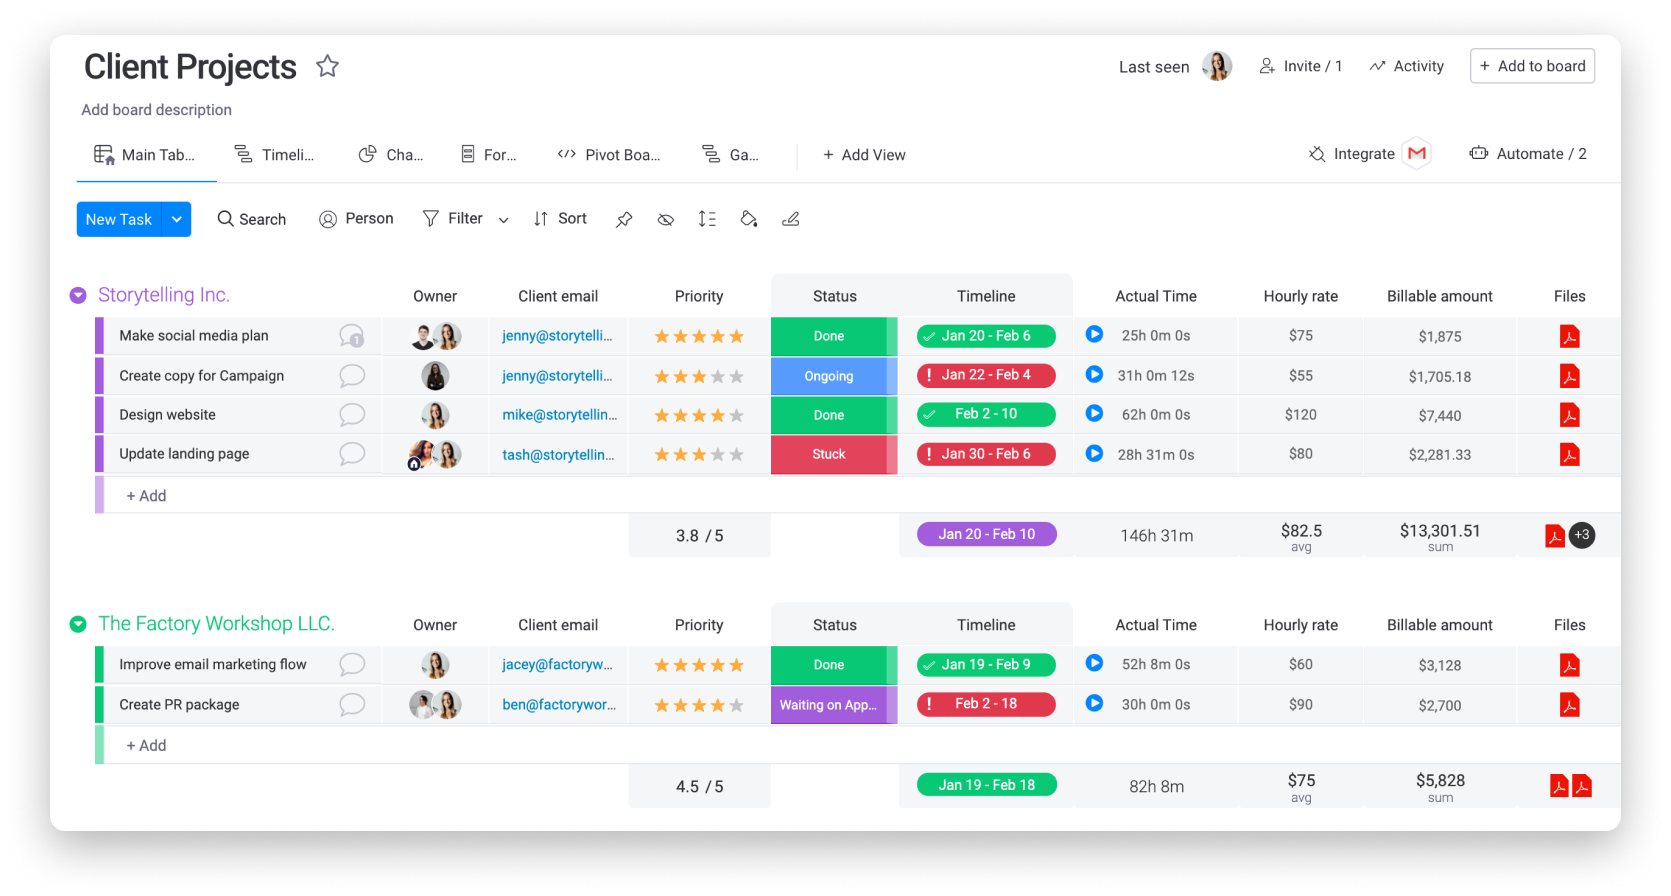
While we’ve grouped our board by the different clients, you could group them based on the stage that each project is in, the time period that the project corresponds to or anything else that works for you and your team!
- Items
Once you have set up your groups, you can start adding your items. An item on our board will represent every project that we have going on for each client.
- Columns
Adding a variety of columns to our board allows us to manage all the information relevant to the particular project in the way that we wish-- from the due dates to statuses, to time spent on each project, and much more. For our workflow, we've used columns such as the People Column, The Rating column, Status Column, Date Column, Time Tracking Column, Numbers Column and more so we can see all of the data points that we need for each of our client projects!
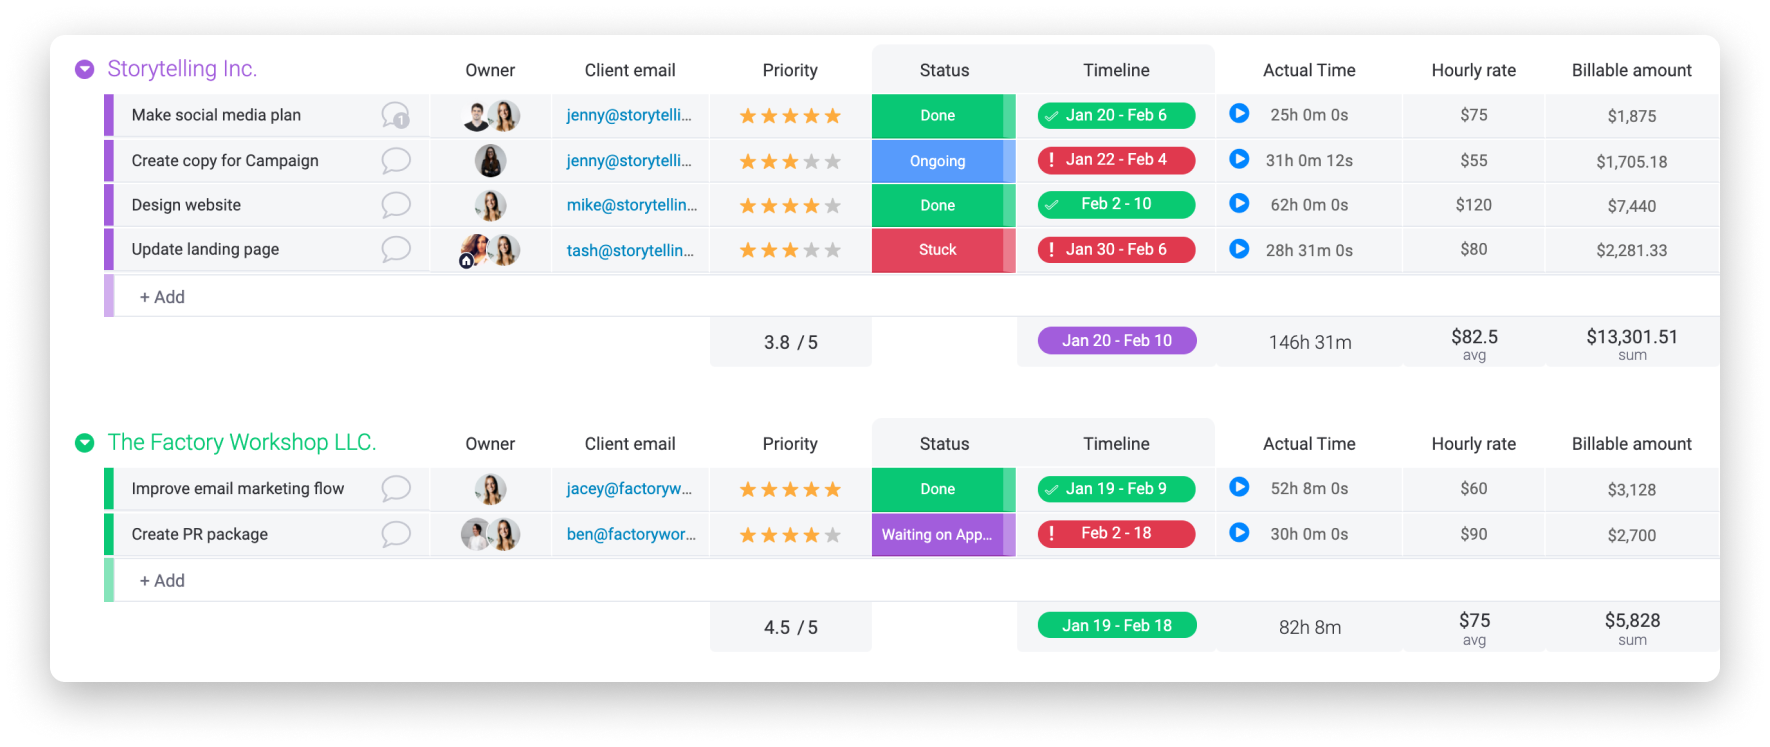
The columns center offers more than 30 column types, enabling you to manage any type of information needed to make your project tracking as smooth as possible. You can really get creative with the way that you choose to structure your own board!
3. Add a Formula to seamlessly calculate billable rates
With the help of the Formula Column, you can easily extract and manipulate data from your board to get the information that you need to see! For our client projects workflow, we created a formula that automatically calculates the billable amount due for each project based on the hourly rate that the client charges and the amount of time spent on that project.
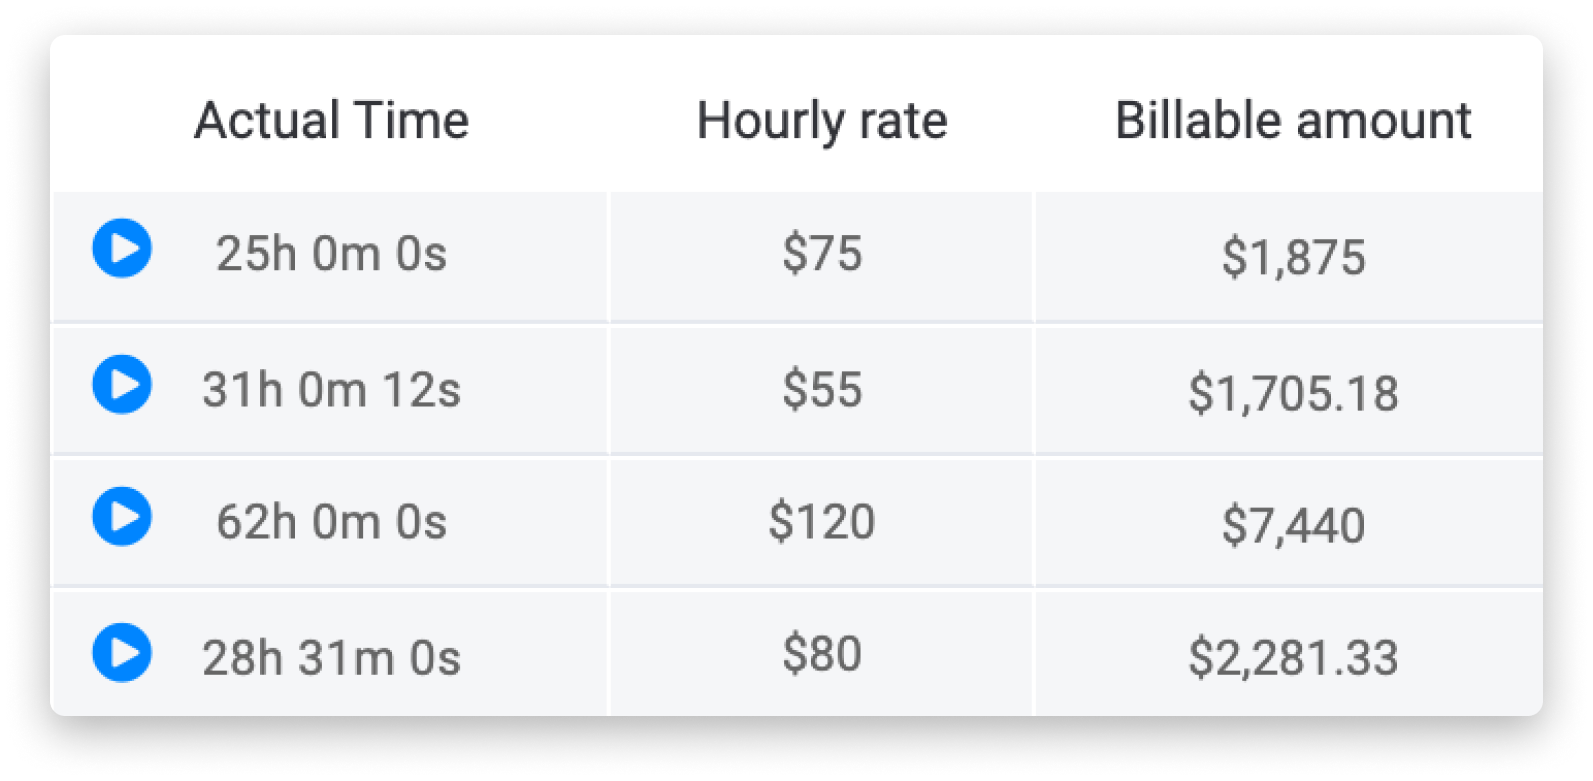
To add this formula to your board, simply copy and paste the below formula and replace "Actual Time" and "Hourly rate" with your exact column names!
4. Add a Gantt View to better visualize all ongoing projects
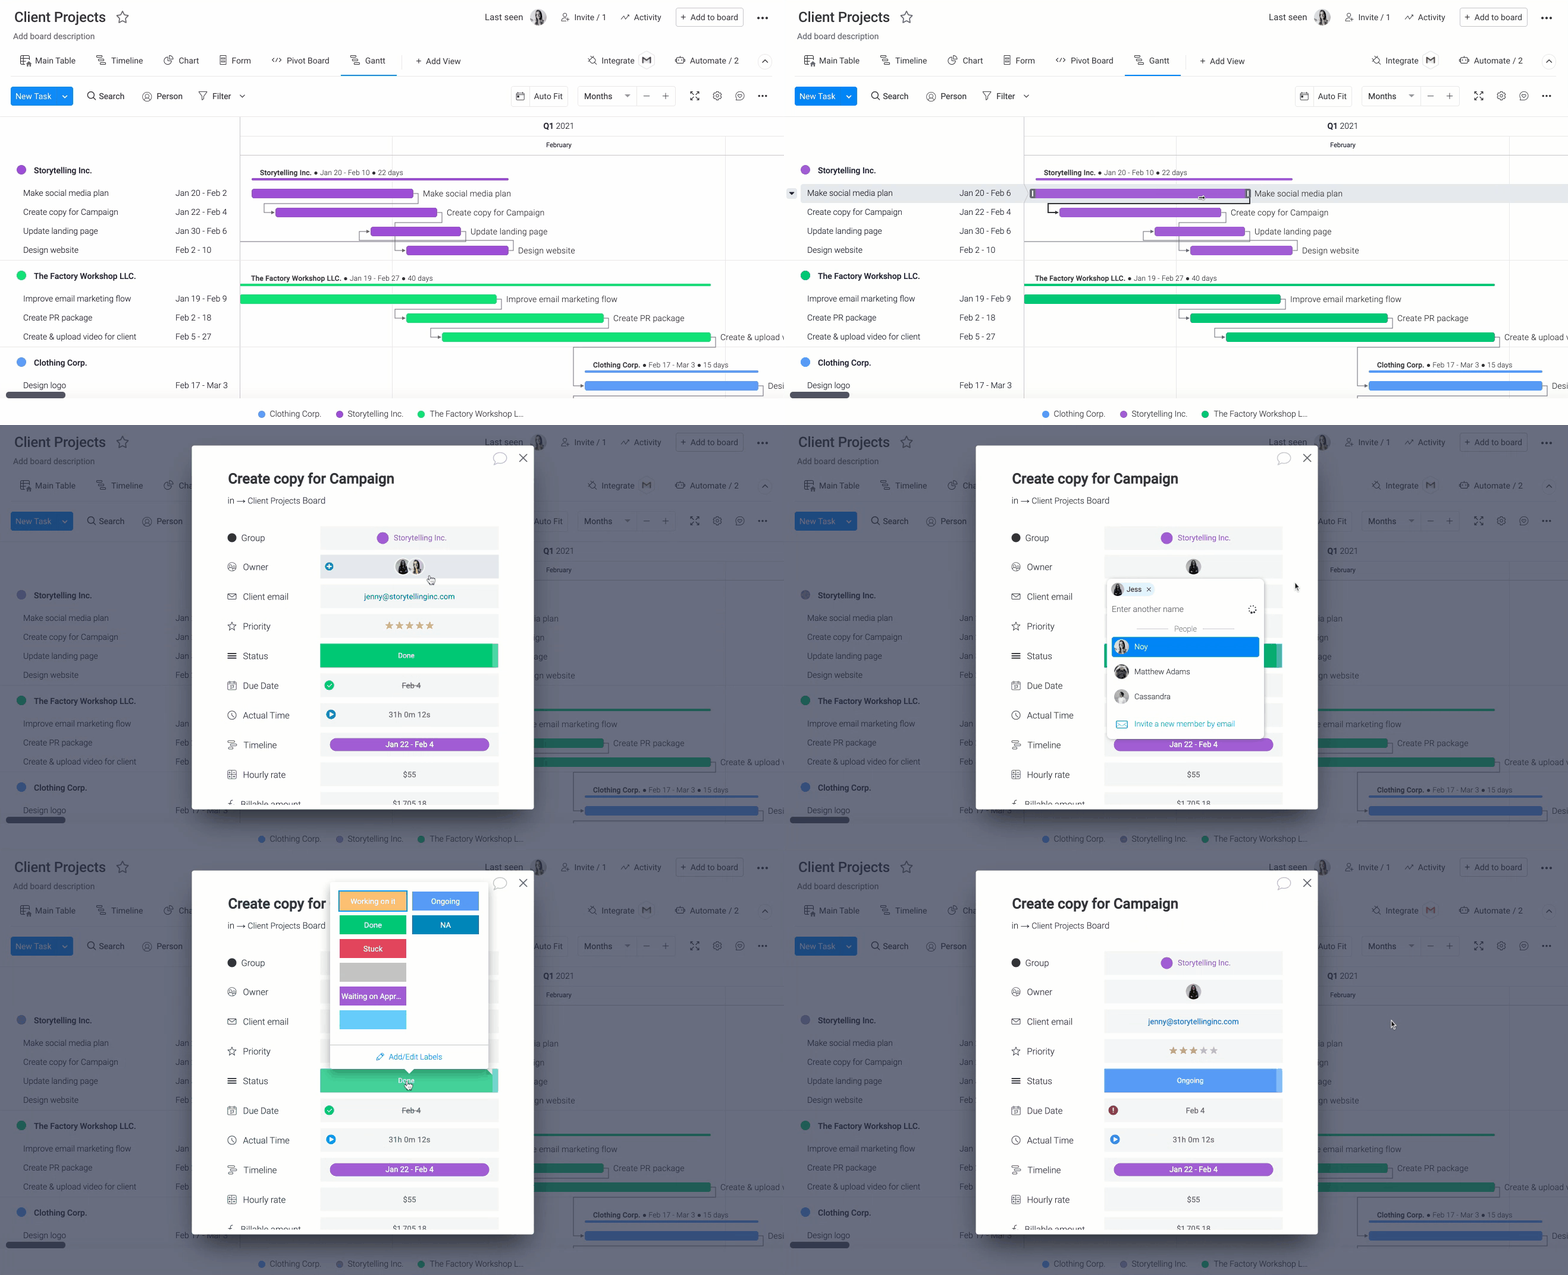
Board views allow you to see information from your board in another way - always visual and easy to understand. In our case, being able to see overlapping projects and visualizing how they relate to each other is super important to us! So, on our Clients Projects board, we’ve added the Gantt View.
From this view, we can easily oversee the timelines of our client projects in a robust, high-level view and visualize the relationships between each of our projects in an organized and colorful way!
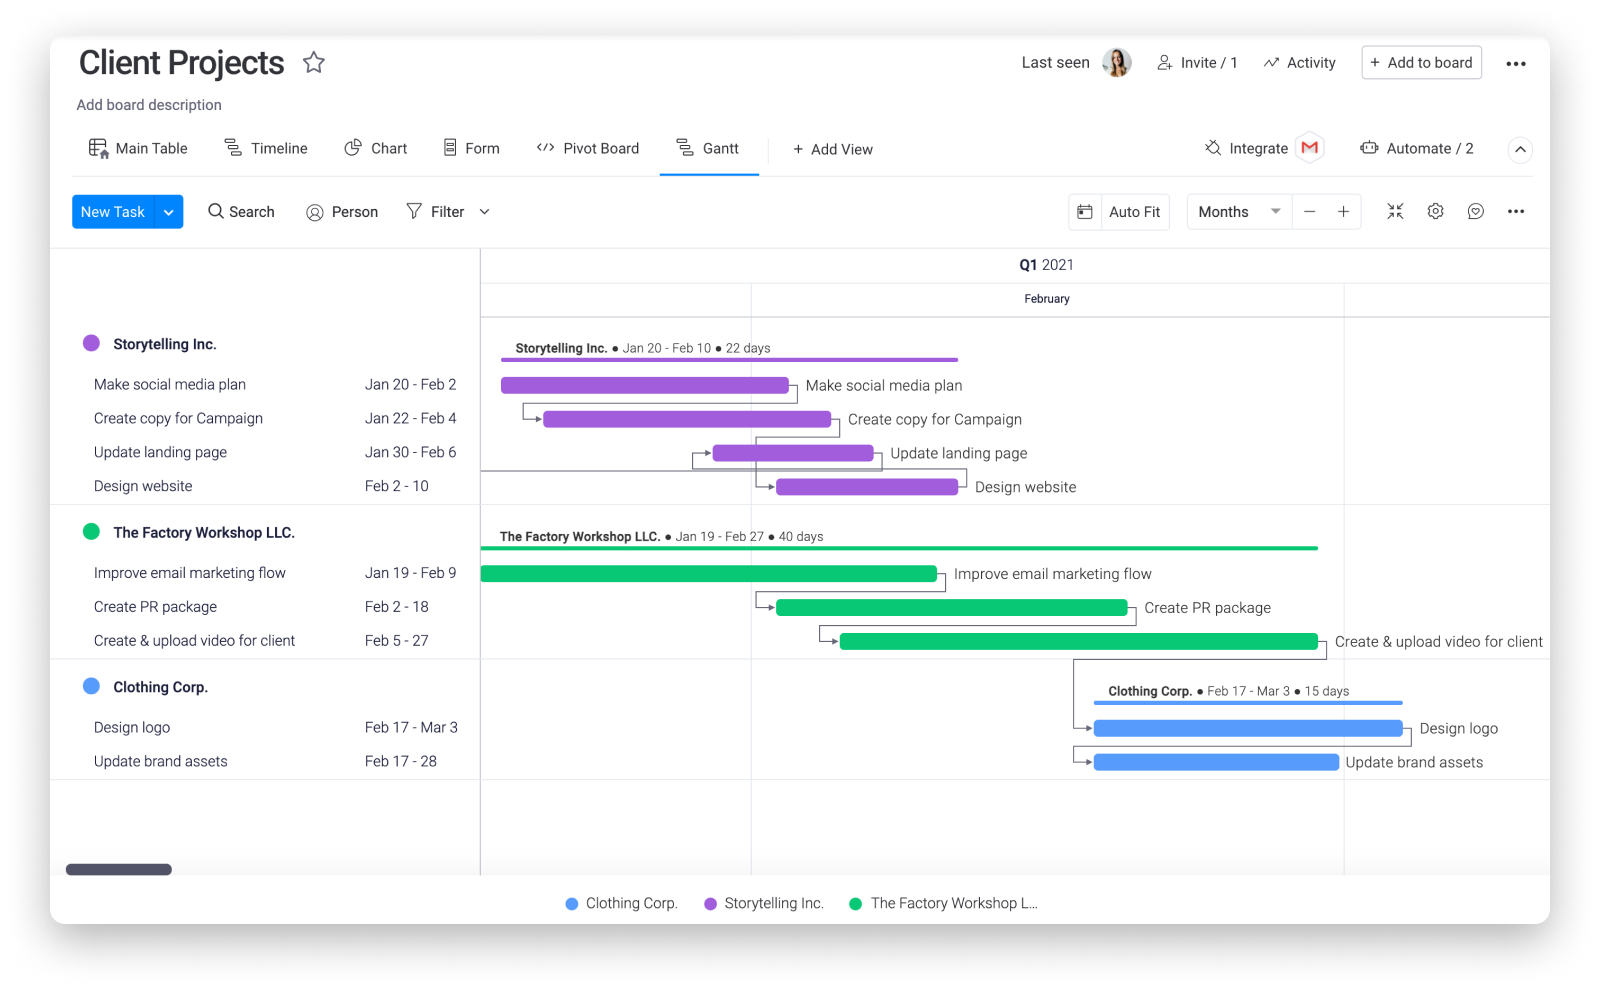
Furthermore, with the Gantt view, you can easily display dependency relationships between your projects, which is super useful if the date or timeline of one project is reliant on the other! You can also work directly from the Gantt view by moving project dates around or clicking on the project name itself to get a simple card view with all relevant details.
5. Internally communicate with your team to get things done quicker and easier!
Collaborating with your teammates requires communication, but who says this needs to be tim consuming and messy?
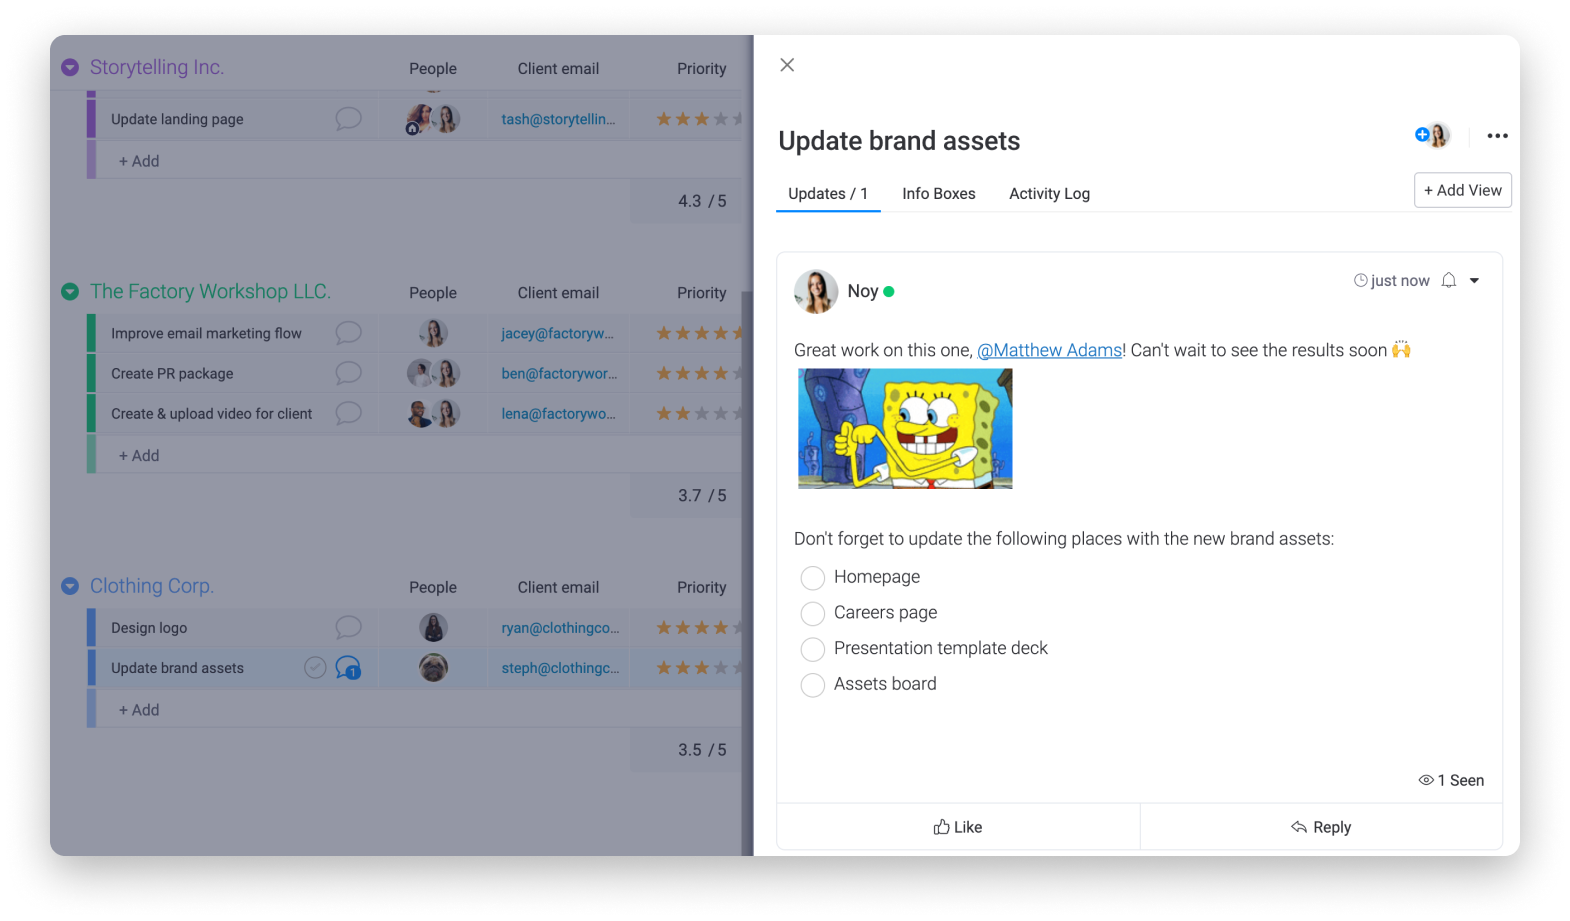
With the help of the Updates Section you can communicate directly with your teammates in context and in one concentrated, collaborative space. We find this specifically helpful to check in with our teammates, ask questions, add reminders and provide feedback. Check out the checklists option to add in organized lists, making it that much easier to stay on top of our workload!
6. Take your workflow one step further with Automations!
Managing multiple different projects, sticking to different deadlines, being accountable to different clients while still trying to produce top-notch quality at the same time? We feel you! To make your life a little easier while juggling numerous client projects, check out our automations!
Some useful automations we've added to our board are the following:
- We’ve added in an automation to notify the specific project owner whenever the due date of the project is approaching and the status is not yet done.

This acts as a reminder and makes sure all information is updated on our boards at all times, thereby increasing productivity!
- In the second automation we set up, every time the status of the project changes to “Waiting on approval” by any of our teammates, we’ll automatically notify the team lead, Ariel, to review and approve a project before reaching out to our clients with the finished product.

You can really have fun with the way you automate your own client projects workflow. Feel free to check out the automations center for all the pre-set recipes that we offer, as well as custom automations that allow you to build out your own automation flows!
7. Integrate your email to keep your clients in the loop
Want to automate your workflow even further? Through monday.com’s simple email integration, you can make sure that your clients are up to speed on the status of their projects by receiving an email as soon as the status of their project changes to “ready for feedback” or “approval”. Here’s an example of how we’ve utilized this easy email integration to keep communication at the core of our everyday workflow:

8. Gain insights and analyze data using the Chart View
Interested in knowing how much of your teammates' time is spent on each project? Which teammates have the highest workload or even which months have the most amount of projects? Chart Views can help with that! By implementing the Chart View into your workflow, you can display customizable breakdowns of your board data to help enable your team to make more informed decisions.
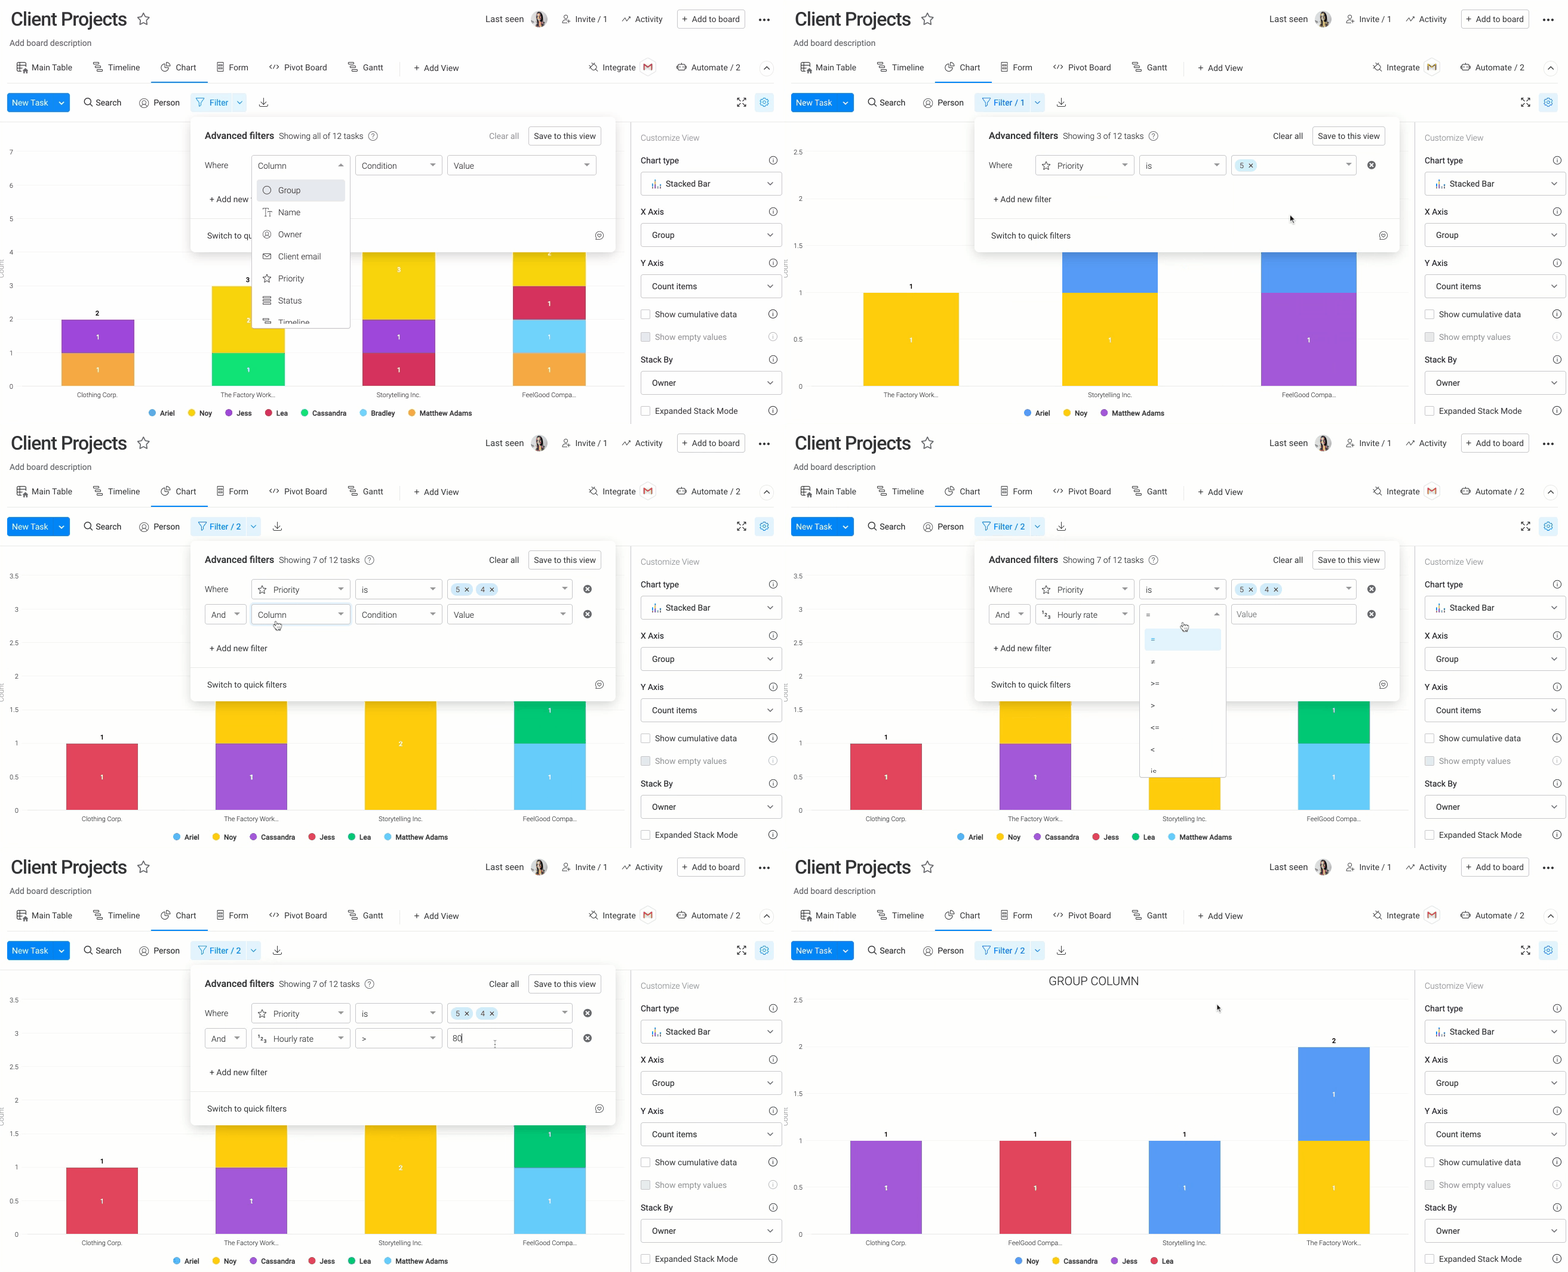
For our workflow, we chose to set up a stacked bar chart to allow us to analyze two separate parameters of our data all at once: the number of projects per client (group) and the distribution of the project owners for each client.

With the help of the Views Filter, we can also break this down this data further according to specific data-points that we are looking to see, such as all projects with a high priority rating whose hourly rate is above 80 USD.
9. Interested in what your clients have to say about you? Send out feedback surveys powered by monday.com Forms!
With many team members and clients collaborating on different projects, it’s important to know how satisfied your clients really are by your service and with their final projects. To collect this data in the simplest of ways, you can use monday.com’s Forms.
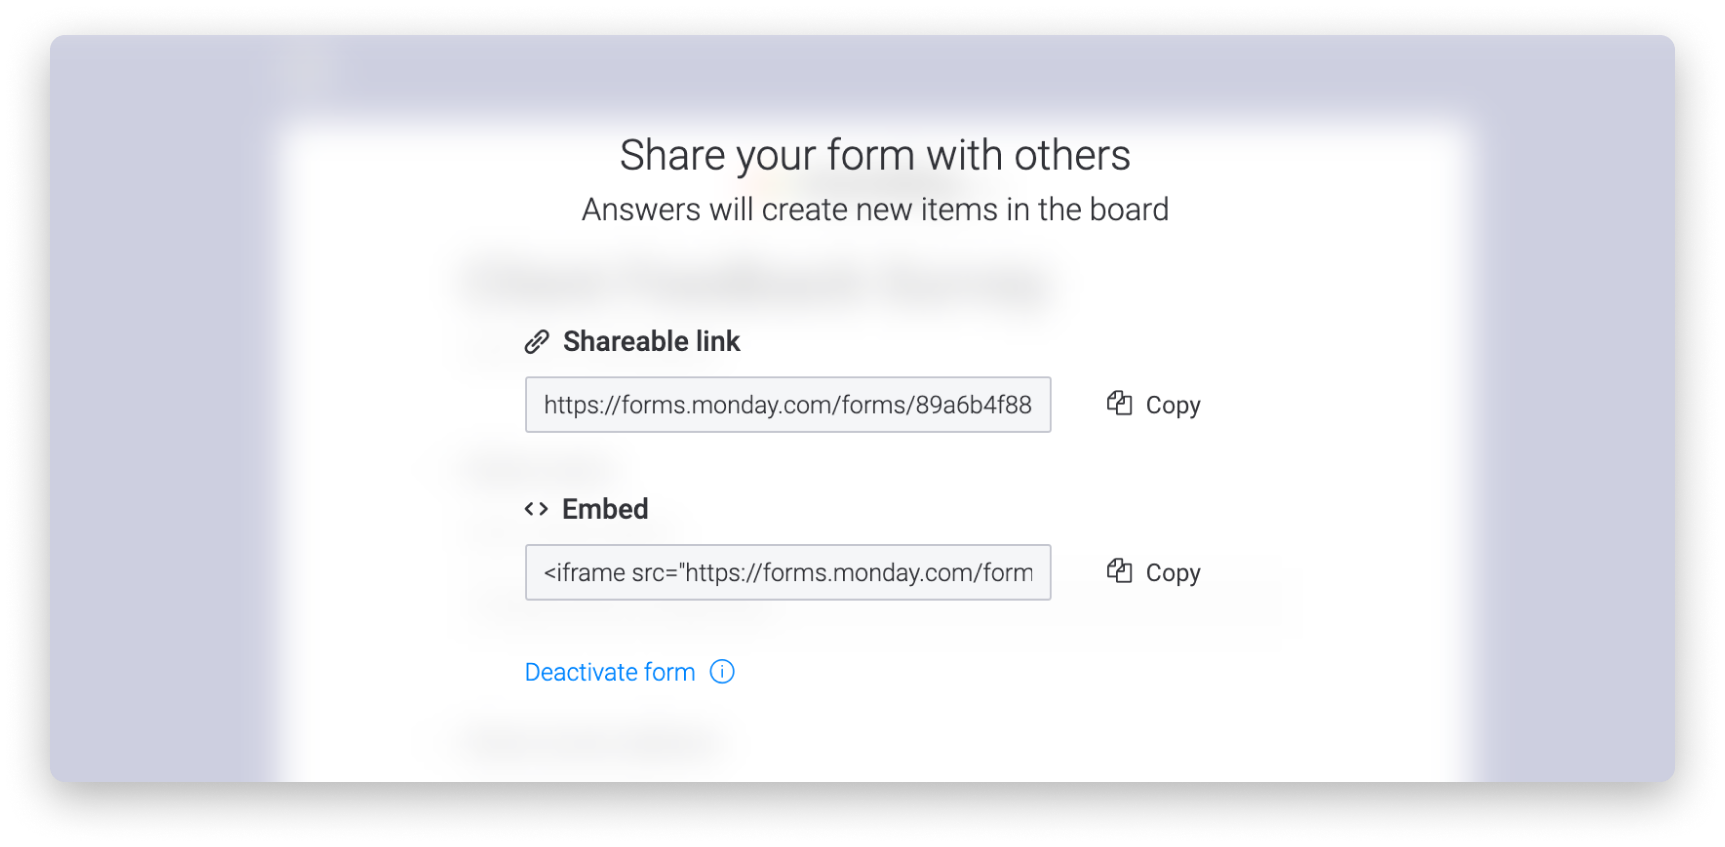
The board structure will be the foundation of the form that you’ll be able to send out to external clients with a shareable link. You can also embed Forms into your website to receive new leads from interested clients!
To add the Forms View, click on the blue “Add view” button on the corner and search for Forms. Each column heading on the board will become a question on the Form which you can customize into a question if you'd like.
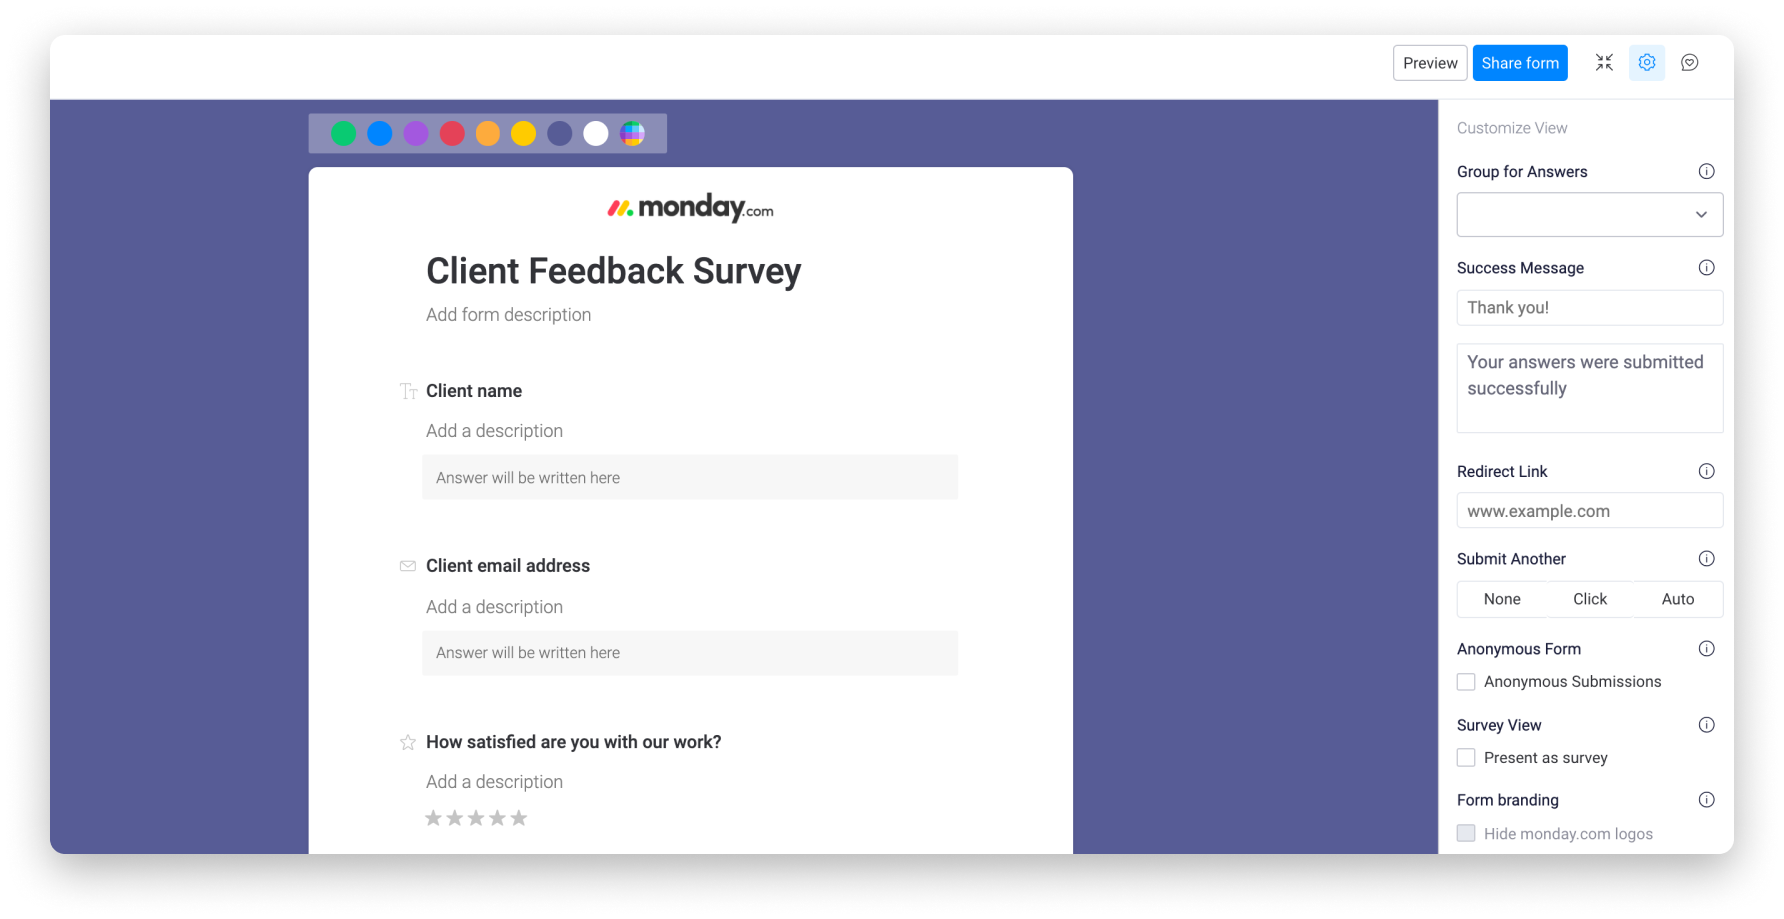
On the form itself, you can customize the background color, add your own logo and select which questions are mandatory to be filled out. You can even choose which board columns should be hidden from the Form, which can be used for internal use only.
Once you’ve customized the Form to suit your needs, you can get the Shareable link to start sending out or embed neatly into your website :)
10. See all your personal tasks due on a weekly basis and stay focused on what's important!
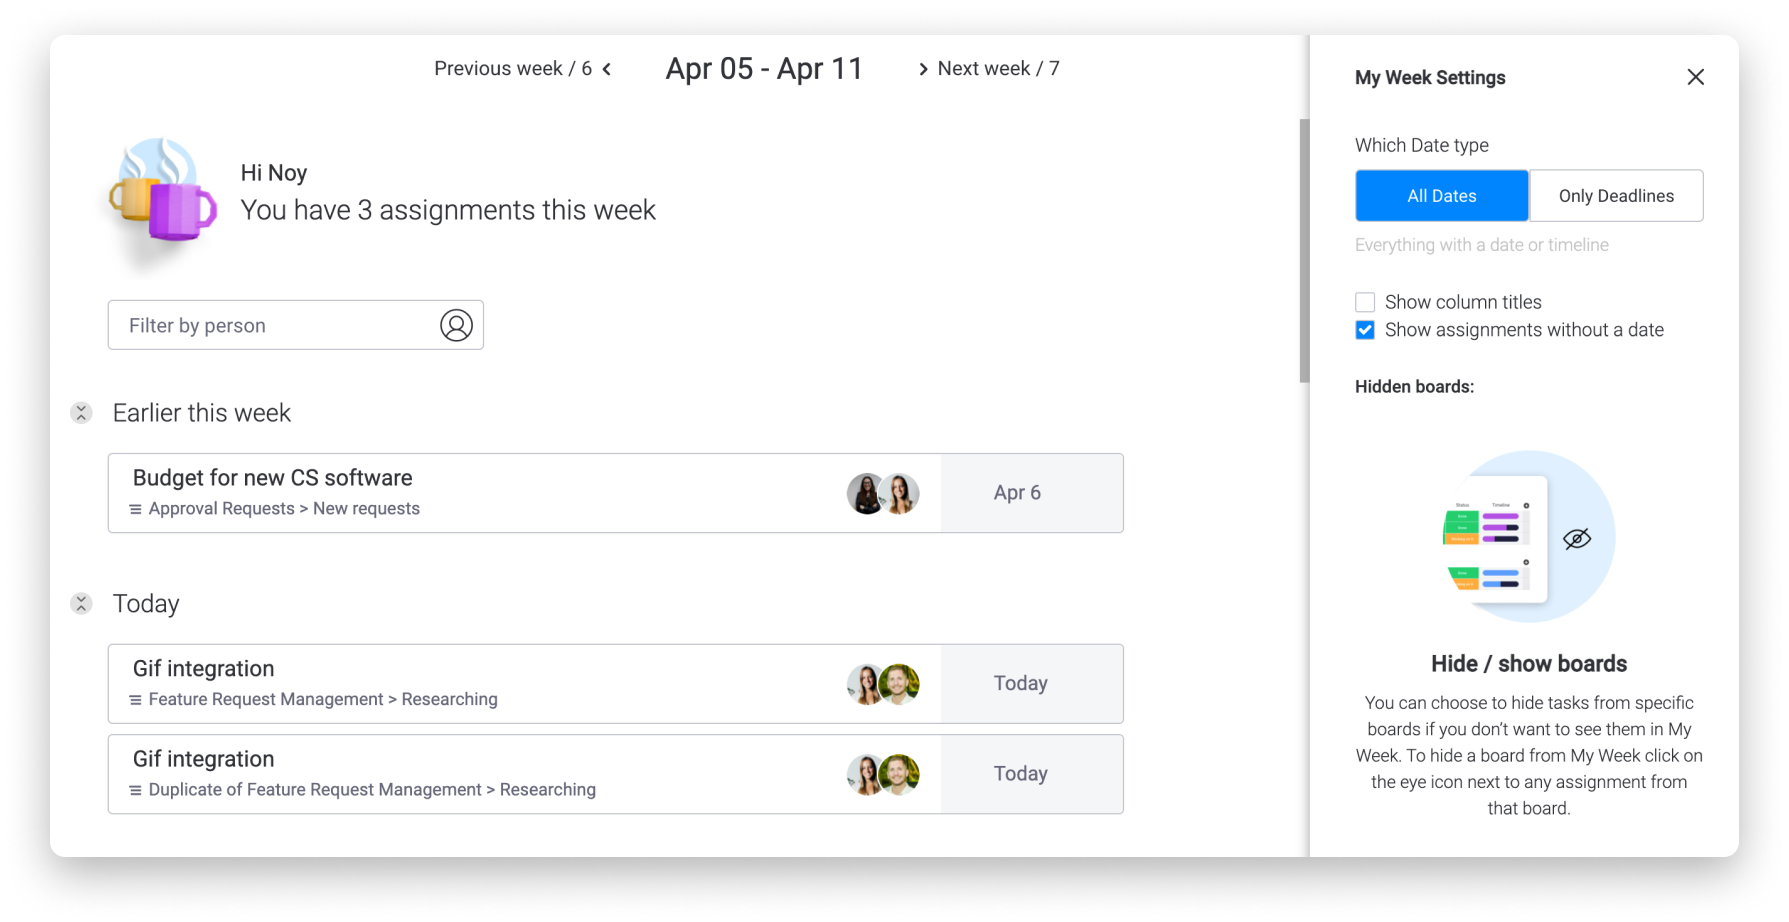
The My Week section of the platform gathers all your tasks from across the many boards and pulls them together into one organized, manageable place.
Use the "All Dates" option in the My Week Settings to see all the tasks with dates, or the "Only Deadlines" option merely to see the deadlines coming up. By clicking on the arrows next to the dates, you can scroll through the previous and upcoming weeks' tasks.
Have fun with it!
These boards, views, automations and more are intended to be a starting point to help you get started on the right foot with your workflow! You can use these exact boards if they're right for you, but don't be afraid to experiment and test out all of the amazing features on monday.com! Make sure to check out other prepared templates and explore the Columns Center to see all of the ways you can use columns as building blocks to build out your own unique board! You can also customize your own automations, enable loads of integrations, and pull in data from multiple boards into high-level dashboards to really connect the dots in your client projects workflow. 🤩
Just like that, you're all set and ready to get started using monday.com to track and manage all your Clients’ Projects!
If you have any questions, please reach out to our team right here. We’re available 24/7 and happy to help.
Comments